Category

S-Docs One-Click and Zero-Click

S-Doc Jobs

By Documentation, S-Docs One-Click and Zero-Click No Comments

What is an S-Doc Job?

An S-Doc Job is a simple, intuitive Salesforce object designed for automatically generating (and optionally emailing) documents. S-Doc Jobs work in conjunction with Salesforce Process Builder, Apex triggers, or Flows.

Once a custom process, trigger, or flow creates the S-Doc Job record and populates its fields, S-Docs will begin generating documents. Certain fields will tell the Job which templates to generate, which object record to pull data from, whether or not the generated documents should be emailed, and much more.

S-Doc Job records contain three sections:

[1] Required fields that always need to be populated when a record is created
[2] Optional fields that allow you to customize the document automation process
[3] Job execution details that provide you with information about in-progress and finished jobs

This article will go through each section of an S-Doc Job record in detail.

Note: For instructions on setting up your process, trigger, or flow, please visit this article.

Access S-Doc Job Records

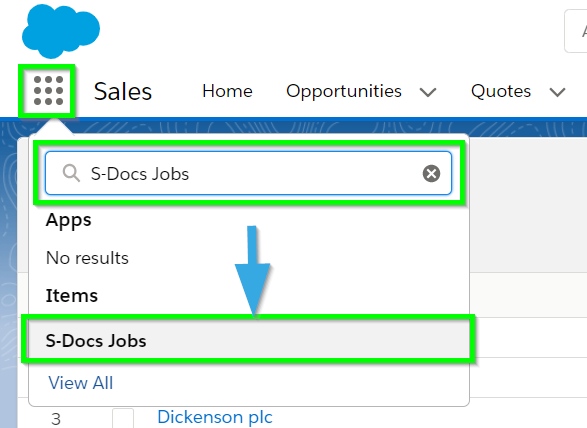
To access S-Doc Job records in your org, click the App Launcher in the upper left corner, type "S-Docs Jobs" into the search field, and click S-Docs Jobs.

This will take you to a list of all S-Doc Jobs that have been run recently in your org.

You can [1] click the SDJob Number to view individual S-Doc Job records, which we'll go over in the next section. You can also select multiple jobs and then [2] click Delete Logs to clear old S-Doc Jobs from this list. Clearing old records will have no effect on the S-Docs that they generated.

Required Fields

S-Doc Job records begin with the 5 fields that your custom process is required to populate. It appears as follows:

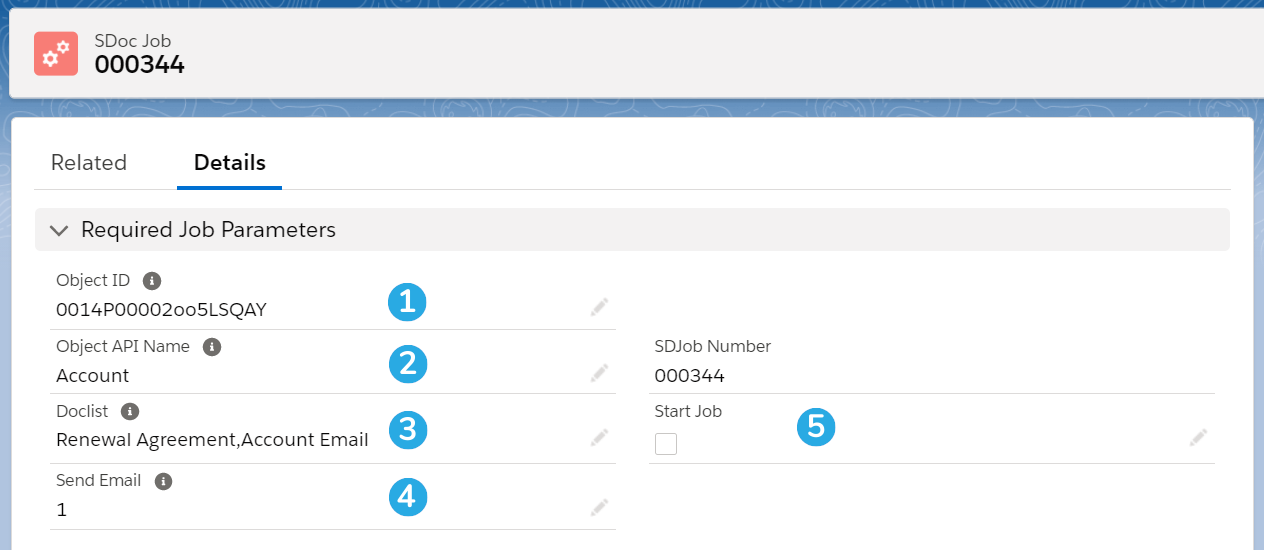
[1] Object ID: The ID of the base record that your documents will pull data from
[2] Object API Name: The API name of the base object
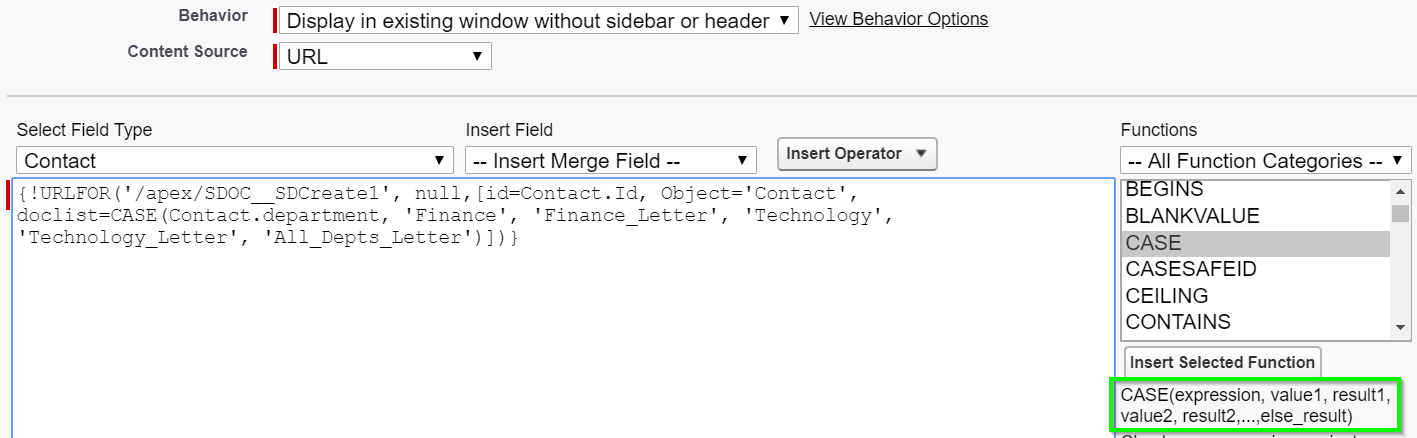
[3] Doclist: A comma-delimited list of S-Doc template names that the S-Doc Job will generate
[4] Send Email: Denotes whether or not the S-Doc Job should email the documents that it generates; 1 will email them, 0 will not

Note: An HTML email template should be included in the Doclist field if the Send Email field will be populated with "1."

[5] Start Job: A Boolean field that must be set to "true" for the S-Doc Job to begin generating documents

Note: The SDJob Number field auto-populates and does not need to be set.

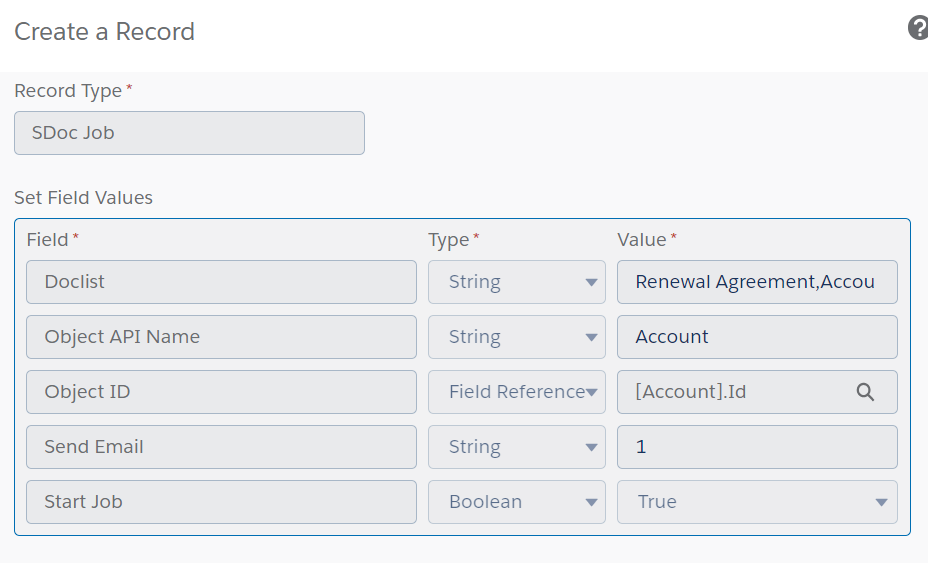
As a reminder, these fields will all be set by a custom process, Apex trigger, or Flow -- not a Salesforce user. For reference, the process that created the above S-Doc Job record looks like this:

Optional Fields

Beyond the 5 required fields, your process, Apex trigger, or Flow can also set several optional fields. A subset of these fields can be found in the next section of the S-Doc Job record:

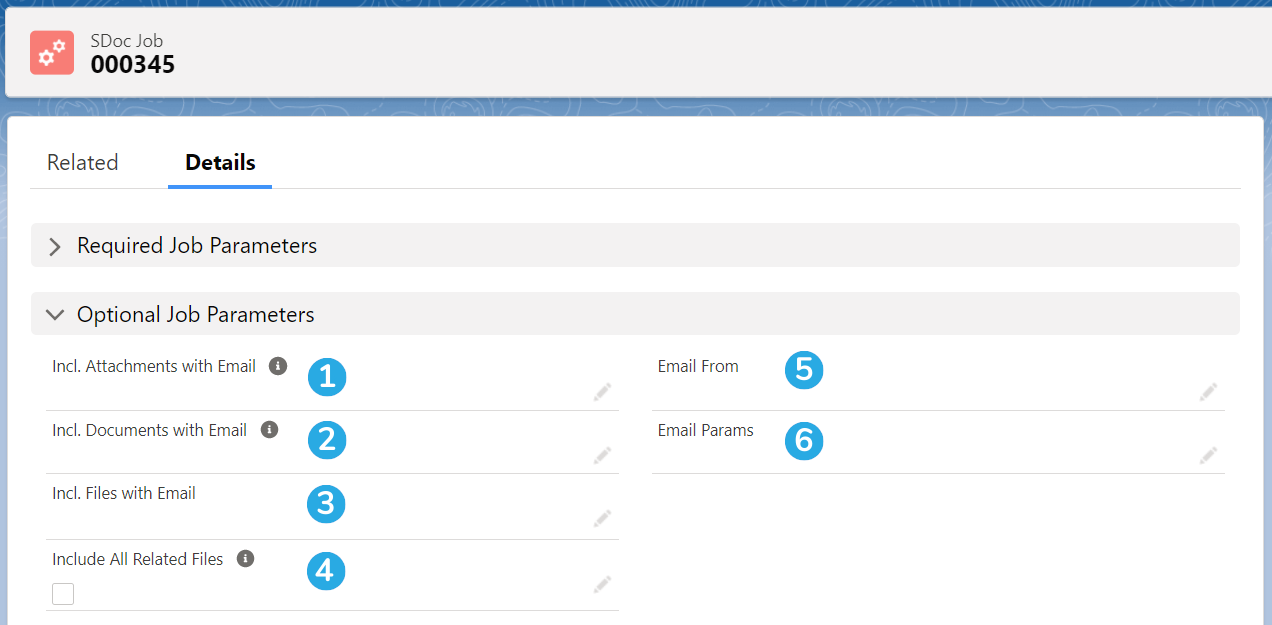
[1] Incl. Attachments with Email: Allows you to specify a comma-delimited list of Salesforce Attachment IDs to be included in the email sent out by the S-Docs Job
[2] Incl. Documents with Email: Allows you to specify a comma-delimited list of Salesforce Document IDs to be included in the email sent out by the S-Docs Job
[3] Incl. Files with Email: Allows you to specify a comma-delimited list of Salesforce File IDs to be included in the email sent out by the S-Docs Job
[4] Include All Related Files: If checked, automatically attaches all files related to the base record to the email
[5] Email From: Allows you to set an org-wide email address as the From address when your S-Docs Job process includes emailing a document
[6] Email Params: Allows you to add advanced email parameters to your process that are not available to access through standard fields on the S-Docs Job object, such as useExistingNoContactRecord=true

Note: The layout of the Optional Job Parameters section may look different based on the version of S-Docs that you're using. For a full list of S-Doc Job fields that can be populated, navigate to Setup > Object Manager > SDoc Job > Fields & Relationships.

S-Doc Job Execution Details

The final section of S-Doc job records includes execution details about the job. These fields aren't populated by a custom process, apex trigger, or flow; instead, they're filled in as the Job progresses. Let's take a look at the status fields before moving on to the other execution details.

S-Doc Job Status

The three S-Doc Job status fields are Status, Status Link, and Status Details.

[1] Status: Indicates Job percentage completed. The following table lists all possible S-Doc Job statuses and what they mean:

Status Meaning
Selected This only occurs on Jobs used with the Mass Merge feature when records are added to the Mass Merge list.
Queued This job is waiting on another job to be completed. By default, 45 jobs are processed at a time.
0 The S-Doc Job record was just created and is beginning to process.
10 The Run As User callout is in progress.
20 The Run As User callout is completed.
35 The S-Doc record was created and concurrent job splitter jobs are currently being processed (this only applies to Job Splitter templates in orgs with Concurrent Job Splitters enabled).
40 The S-Doc record(s) is being created.
60 The S-Doc record(s) was created successfully.
80 The Attachment or File is being created (if applicable) and the email is being sent (if applicable, and the email is non-S-Sign).
Pending File Creation All job processing is complete apart from File creation. This is only applicable for batches of File-enabled S-Docs created by the same user in a single transaction.
90 The Attachment or File was created successfully. If the templates are S-Sign-enabled, the S-Sign Envelope and S-Sign Envelope Documents are being created and emailed.
Completed The Job was completed successfully.
Retry Attempting to re-run a failed job (S-Docs may try to re-run a failed job up to 3 times depending on the cause of error).
Error The Job failed. Check the Status Details field for more information.
Error (Run As User Failed) The Run As User callout failed. Check the Status Details field for more info.

[2] Status Link: Provides a visual representation of Job percentage completed, as well as links to view the generated documents when it reaches 100%
[3] Status Details: Provides in-depth details about each stage of the S-Doc Job's status. This field can be consulted to find out more information about Job errors

Other S-Doc Job Execution Details

A few other notable fields in the Job Execution Details section include the following:

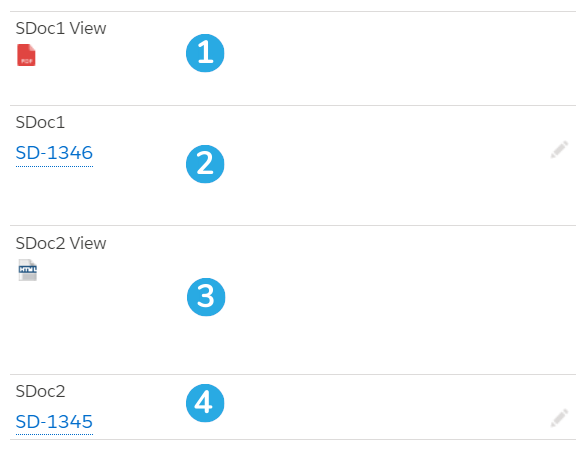
[1] SDoc1 View: Contains a link (document icon) to view the first document generated by the S-Doc Job
[2] SDoc1: Contains a link to the S-Doc record for the first document generated by the S-Doc Job
[3] SDoc2 View: Contains a link (document icon) to view the second document generated by the S-Doc Job
[4] SDoc2: Contains a link to the S-Doc record for the second document generated by the S-Doc Job

Additional Resources

To learn about setting up document automation with S-Docs Jobs in conjunction Salesforce Process Builder, Apex triggers, or Flows, please visit the following articles.


Automating Conditional Template Selection and Generation

By Documentation, S-Docs One-Click and Zero-Click No Comments

Winter '20 Release Note: If you are using S-Docs below version 4.53, you may experience an "Attempt to de-reference a null object" error when interacting with various forms of automation in S-Docs. In order to fix this bug, you can create a new SDocs Settings custom settings set. To do this, type "Custom Settings" into the Quick Find / Search bar in the Setup menu, and click Custom Settings. Click SDocsSettings, then click Manage at the top of the page. From there, click New. Fill out the following information:

Name: SDocsSettings
ConnectedAppLoginURL:
Production: login.salesforce.com
Sandbox: test.salesforce.com
SD Jobs Batch Size: 45
SD Jobs Move to Top of Flex Queue:

Additionally, ensure that you have a Remote Site Setting for either login.salesforce.com (production), or test.salesforce.com (sandbox).

Note: This guide builds on automation features discussed in the one-click and zero-click guide (Automation Options Improving Efficiency and Compliance).

Introduction

With the use of Salesforce logic in the S-Docs button URL, you have an endless amount of possibilities for automating template selection and generation. You can easily modify the standard S-Docs button code so that when users click the button, S-Docs will automatically select or generate certain documents depending on the values in a record’s fields.

For example, suppose that we have multiple templates for a letter sent to contacts, and that this letter will vary depending on what a given contact’s department is. If the variation is small, we could handle this using render statements. But suppose these were completely different letters requiring completely different templates, and we don’t want to require our sales team to memorize the contact’s department, click the S-Docs button on the contact record’s page, and then have to click the appropriate letter template prior to document generation. We’d rather have a user in our org just click S-Docs and be immediately taken to their templates.

We can accomplish this by editing an object’s existing S-Docs button, or creating a new button if you’d like users to have the option of using the normal S-Docs button in case they need to manually select templates. In this case, we’ll go with the first choice, and simply edit our existing S-Docs button.

Using The Doclist Parameter

In the following sections, we will be automatically selecting documents with the doclist Apex parameter. To use this, we simply append the following to our S-Docs button code:

doclist='YourTemplateNameHere1,YourTemplateNameHere2,YourTemplateNameHere3…'

Note: If you have multiple templates with the same name, they will all generate if one of them is referenced by this parameter.

You can also use template IDs for the doclist parameter, however this is not recommended because these IDs will change between sandbox and production orgs, meaning that you will have to re-add the new template IDs into this parameter after transferring to production.

The doclist can include as many S-Doc templates as you’d like. If you just append the doclist parameter, templates will be automatically selected and generated. If you would like your S-Docs templates to be automatically selected, but not automatically generated, you can append oneclick='false' to your S-Docs button code as well, as this parameter modulates the doclist parameter. For a full list of button parameters, please visit our Apex Parameter documentation.

Two Outcomes: True or False (IF Function)

Let’s suppose that members of every department except finance gets letters derived from the same template, and the finance department gets letters derived from a different, special template. This means that we have two outcomes to consider in our automatic template selection: the contact is in the finance department, or the contact is in some other department. So, we handle this with the doclist Apex parameter and an IF function that determines the templates to be included in the doclist. The button URL would look like this:

[code lang="html"]{!URLFOR('/apex/SDOC__SDCreate1', null,[id=Contact.Id, Object='Contact',
doclist=IF(Contact.department=='Finance', 'Finance_Letter', 'All_Depts_Letter')])}[/code]

We see that if the contact’s department is “Finance,” then the template will be "Finance_Letter," which happens to be the S-Docs template for our special finance department letter. However, if the contact’s department is not “Finance,” then the doclist parameter will be "All_Depts_Letter," which is the template for our letter for all other departments.

More Than Two Outcomes (CASE Function)

Now suppose that members of technology departments will also receive a totally different letter. This means we can’t use an IF function, as we now have three outcomes; the contact could be in the finance department, the technology department, or in some other department. This means we’ll have to use the CASE function instead. The button URL would look like this:

[code lang="html"]{!URLFOR('/apex/SDOC__SDCreate1', null,[id=Contact.Id, Object='Contact',
doclist=CASE(Contact.department, 'Finance', 'Finance_Letter', 'Technology', 'Technology_Letter', 'All_Depts_Letter')])}[/code]

We see that the finance department will get their own letter, the technology department their own letter, and since else_result is “All_Depts_Letter," all other departments will receive letters derived from the same template.

Building a Doclist with Multiple Functions

Now, suppose that we’d like to send an account’s primary contact a questionnaire regarding how much they like our product. Additionally, suppose we have two true/false fields: Up_For_Renewal__c and Receives_Discount__c, which respectively denote whether the account is up for renewal and whether the account is eligible for a discount. We’re sending the account’s primary contact the questionnaire no matter what, and depending on the status of the other two fields, we may or may not send a letter informing them that they are up for renewal, and possibly some kind of coupon code or voucher if they are eligible for a discount. Let’s say the questionnaire template is named "Questionnaire_Template," the up-for-renewal template is named "Renewal_Letter," and the coupon code template is named "Coupon_Code."

Then, we could accomplish this with the following button URL:

[code lang="html"]{!URLFOR('/apex/SDOC__SDCreate1', null,
[
id=Account.Id,
Object='Account',
doclist='Questionnaire_Template' +
IF(Account.Up_For_Renewal__c, ',Renewal_Letter', "") +
IF(Account.Receives_Discount__c, ',Coupon_Code', "")
]
)}[/code]

Since we’re sending the questionnaire no matter what, its template name is at the front of the doclist outside of the IF function. Then, we have two IF functions that will return a template (each of which is preceded by a comma, since our doclist must be comma-delimited without spaces) if their respective fields are true. So, if Up_For_Renewal__c and Receives_Discount__c are both true, our resulting doclist will be:
Questionnaire_Template,Renewal_Letter,Coupon_Code.

If  Up_For_Renewal__c is false and Receives_Discount__c is true, our resulting doclist will be:
Questionnaire_Template,Coupon_Code.

If both of these fields are false, our resulting doclist will be:
Questionnaire_Template.

In the last case, this is because value_if_false for our two IF functions is an empty string (specified as two quotation marks with nothing between them). Don’t worry about the additional commas; S-Docs will ignore these and just generate the document with the template name Questionnaire_Template. We could place commas inside of our code’s quotation marks such that they would always yield clean-looking doclists. However, this might take a bit more thought and work to write, and could be more prone to mistakes (or you might think the opposite; it’s a matter of personal preference). No one’s really looking at the resulting doclist after your IF functions evaluate; it’s just used internally by S-Docs to find which templates to use. So, you don’t need to worry about what your doclist evaluates either, as long as the logic is correct and there is at least one comma between each template name whenever the doclist evaluates.

Nested IF Functions

Our code’s structure in the previous example is very useful in plenty of cases. However, it might not make sense to send an account a coupon code along with the questionnaire if they aren’t up for renewal. We might want to send that coupon code only if they’re up for renewal. We can accomplish this using a nested IF function:

[code lang="html"]{!URLFOR('/apex/SDOC__SDCreate1', null,
[
id=Account.Id,
Object='Account',
doclist='Questionnaire_Template' +
IF(Account.Up_For_Renewal__c, ',Renewal_Letter' +
IF(Account.Receives_Discount__c, ',Coupon_Code', ""), "")
]
)}[/code]

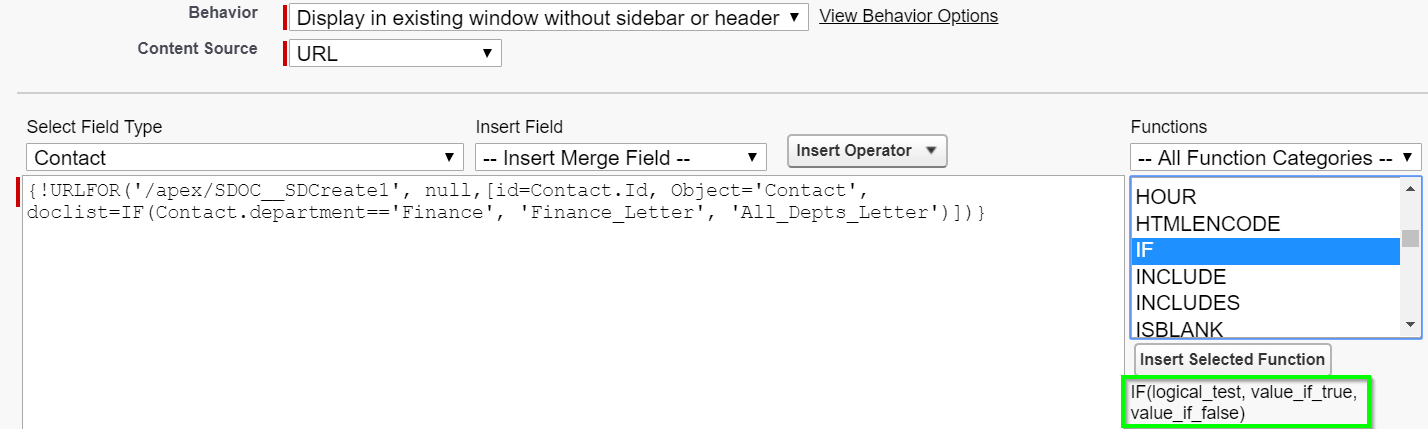
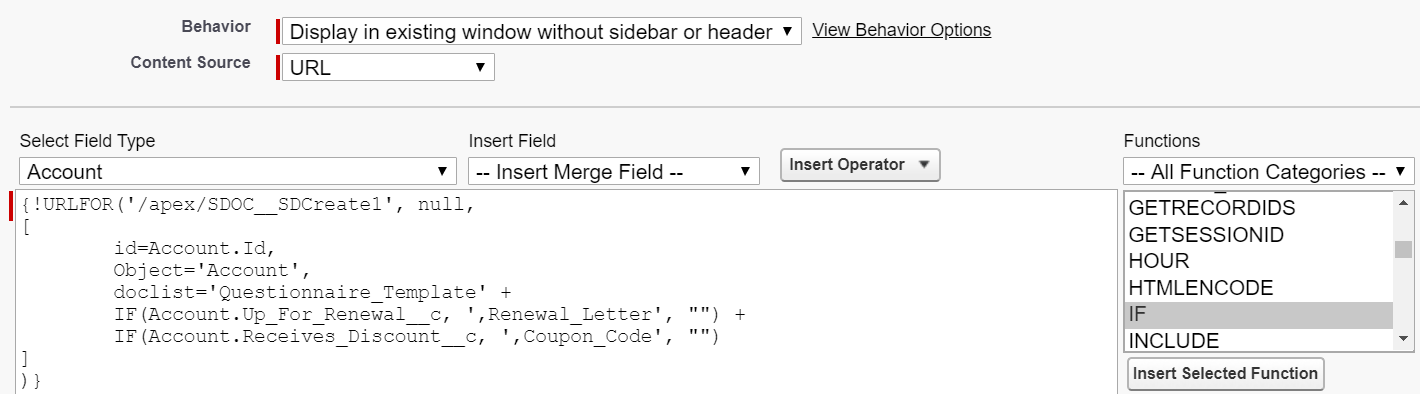
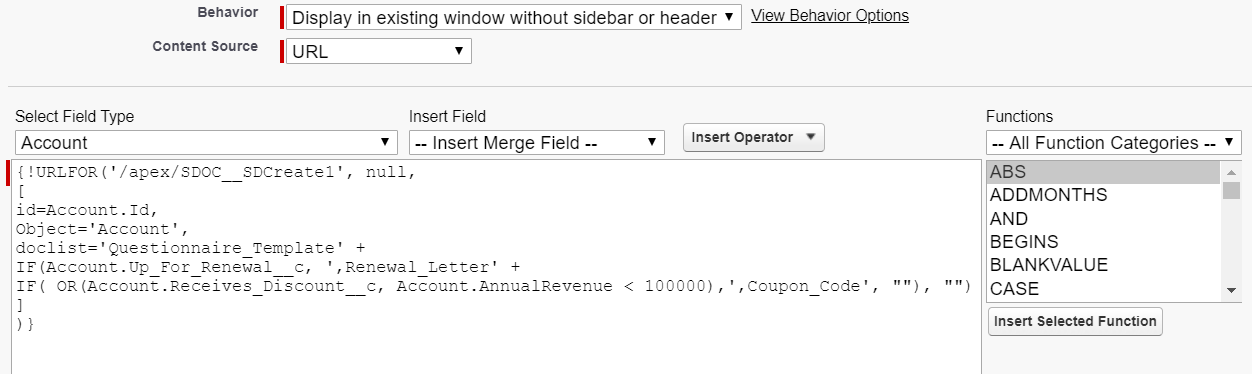
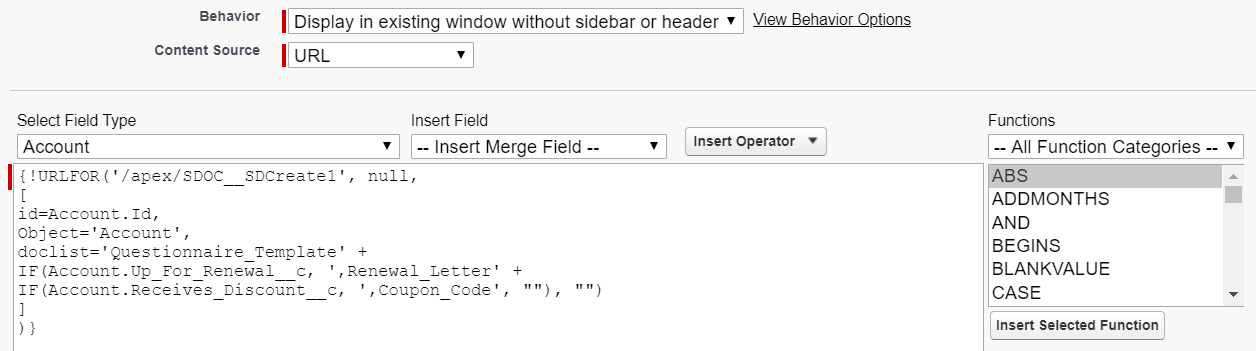
Let’s take this statement apart. Our questionnaire’s template name, Questionnaire_Template, will be on our doclist no matter what. Now, what happens if Account.Up_For_Renewal__c is true? First, note that we included a comma at the end Renewal_Letter; this comma is inside the string, since we don’t want to confuse our IF function with extra commas laying outside the string. We then followed this string with an ampersand (i.e. the concatenation operator) and a nested IF function. Whatever the nested IF function returns will be concatenated to the end of the following string: Renewal_Letter.

So, if Account.Up_For_Renewal__c is true, and Account.Receives_Discount__c is false, our resulting doclist will be:
Questionnaire_Template,Renewal_Letter.

Then, if Account.Up_For_Renewal__c and Account.Receives_Discount__c are both true, our resulting doclist will be:
Questionnaire_Template,Renewal_Letter,Coupon_Code.

And finally, if Account.Up_For_Renewal__c is false and Account.Receives_Discount__c is true, our resulting doclist will be:
Questionnaire_Template.

In other words, accounts will receive just the questionnaire if they aren’t up for renewal, even if they are eligible for the discount. No need to jump the gun on that coupon code!

Using AND/OR Functions

AND/OR functions can be used with the doclist parameter as well. For example, say we become big fans of small business and decide to create a promotional period in which accounts with annual revenues less than $100,000 will also receive a coupon code, even if Account.Receives_Discount__c is false. To accomplish this, we can place an OR function inside of our IF function:

[code lang="html"]{!URLFOR('/apex/SDOC__SDCreate1', null,
[
id=Account.Id,
Object='Account',
doclist='Questionnaire_Template' +
IF(Account.Up_For_Renewal__c, ',Renewal_Letter' +
IF( OR(Account.Receives_Discount__c, Account.AnnualRevenue < 100000),',Coupon_Code', ""), "")
]
)}[/code]


Automation Options: Improving Efficiency and Compliance

By Documentation, S-Docs One-Click and Zero-Click No Comments

Winter '20 Release Note

If you are using S-Docs below version 4.53, you may experience an "Attempt to de-reference a null object" error when interacting with various forms of automation in S-Docs. In order to fix this bug, you can create a new SDocs Settings custom settings set. To do this, type "Custom Settings" into the Quick Find / Search bar in the Setup menu, and click Custom Settings. Click SDocsSettings, then click Manage at the top of the page. From there, click New. Fill out the following information:

Name: SDocsSettings
ConnectedAppLoginURL:
Production: login.salesforce.com
Sandbox: test.salesforce.com
SD Jobs Batch Size: 45
SD Jobs Move to Top of Flex Queue:

Additionally, ensure that you have a Remote Site Setting for either login.salesforce.com (production), or test.salesforce.com (sandbox).

FEATURE OVERVIEW

S-Docs is a powerful tool that allows you to generate and email documents natively on the Salesforce platform. By default, the user experience is very flexible. However, this flexibility means that the user makes all decisions during the document generation and distribution process, which takes time. As an administrator, you may want to automate the process to gain efficiency (to reduce time and clicks), reduce errors (by pre-selecting correct templates based on data) and to ensure compliance (to enforce business rules). S-Docs provides a one-click and zero-click feature described in this document to ensure you can tailor the user experience to meet your business requirements.

The document automation process can be considered a spectrum from maximum flexibility to maximum automation. The out-of-box behavior of S-Docs provides maximum user flexibility. In this use case, the user chooses the document(s), along with the default email template. They decide whether to include additional attachments, determine email recipients, and then finally decide if they want to print or email the generated document(s).

With S-Docs, you can achieve complete automation – meaning an event or field change could drive a fully automated document generation and distribution process, even when the user is not logged into Salesforce! For example, an account status changed to “closed” could generate a win-back email and special offer without any user involvement. Or, a case status change to “Ready for Proposal” could generate a proposal and send it to the client. You can see that there is a huge opportunity to improve your business process. As an administrator, you determine what level of automation is appropriate for your organization to meet your requirements. This document explains how S-Docs can be used to achieve those results.

S-DOCS AUTOMATION SPECTRUM

Maximum Flexibility [Most clicks]                                                          Maximum Automation [Least clicks]
OPTION 1 OPTION 2 OPTION 3 OPTION 4 OPTION 5 OPTION 6
Default S-Docs Behavior Pre-select “One Click” One-Click + Email Prep One-Click + Email Send “Zero-Click”
User chooses every aspect of doc generation, attachments, and email options. You can add filter rules to help selection process. Saves one step to filtering by selecting the default document(s) based on data such as language or product type. User can override pre-selected  docs as needed. Documents along with email cover letter are generated with a single click. User can then choose to print, return to record or proceed to email. One-click leads to fully populated email page with all attachments, default email message and recipients completed. User can verify email and make edits as needed before sending. One-click, document(s) are generated and emailed. Screen returns to the record detail page without any further user input. User cannot change document or messaging. A Field change, or workflow sets off a trigger that generates and optionally emails the document(s). This is fully automated and ideal for mobile devices.

CONFIGURATIONS

The following options provide you with edits to the S-Docs button that you can use to increase automation. To get to the button edit page, navigate to the Setup menu and click Object Manager. Click the name of your object.

Then, navigate to the Buttons, Links, and Actions tab. Find the S-Docs button, click the arrow on the right, and click Edit.

Note: The S-Docs button comes prepackaged for the following standard objects: Contract, Opportunity, Account, Contact, Lead, Task, and Event. Because of this, the button will be managed and therefore unable to be edited for these objects. You will need to create a new S-Docs button (and replace the old button on the object's page layout) to make edits.

OPTION 1: Default Behavior & Adding Template Filters

S-Docs default behavior allows a user to choose any document(s) to generate along with any email template. The user can then decide to print or email the document. If emailed, the user can attach additional files, add recipients and customize the email message before it is sent. While this provides for maximum flexibility, it also requires the greatest amount of user interaction (clicks).

You can reduce template searching by optionally providing an initial search filter to the template list. When the user clicks on the S-Docs button, a subset of templates can be displayed to help them find the most likely one needed. This is done by using a search filter and/or category filter, as in the button URL. But keep in mind, the Salesforce user will still need to click the checkbox next to the template and then click the “Next" button to continue. If you want the box checked for them, you need to move to Option 2. Option 1 is useful when you have many templates and want to simply help the user by providing the likely choice. Users can still search for and use other templates as needed.

The first example below shows the button syntax where the templates are initially filtered based on a dynamic field value such as the language preference of the client. Using the “searchfilter” parameter below will automatically display only templates that have a “Name” or “Description” field that contains the value of the searchfilter parameter.

Button or Link URL:

[code lang="html"]{!URLFOR('/apex/SDOC__SDCreate1', null,[id=Opportunity.Id, Object='Opportunity',
searchfilter=Opportunity.ContactLanguage__c])}[/code]

Similarly, you can filter based on the value of the template’s “category” field. In this example, only templates with a category of “Contract” will be displayed by default. Button or Link URL:

[code lang="html"]{!URLFOR('/apex/SDOC__SDCreate1', null,[id=Opportunity.Id, Object='Opportunity',
categoryfilter='Contract'])}[/code]

Note:You can use both searchfilter and categoryfilter parameters together within the same button. When doing so, both conditions need to be met for the related templates to appear (i.e. they are joined by an “AND” condition).
Note 2:
If you want to restrict access to templates based on user or profile, you can easily implement this using Salesforce’s sharing model feature. You would need to change the SDTemplate object to a private sharing model and then configure your sharing rules based on your business requirements.

Option 2: Pre-select Templates:

This option will save users an additional click by automatically pre-selecting (filtering and checking off) the document to be generated. The user can still remove the pre-selected template and choose their own if they wish to override the default selection. The user will then need to click on the Next Step button to generate the document. This option is useful when you have business rules that can identify the correct template in the majority of use cases, but still allows the user to override the default selection if needed.

This automation is achieved by passing the template’s name into a URL parameter called “doclist.” This parameter can contain multiple template names, but they must be separated by a comma. Additionally, the oneclick parameter needs to be set to false. This tells the S-Docs engine to stop for further input. Note that if there are multiple templates with the same name in your org, all of them will generate if one of them is referenced by this parameter.

Note: You can also use template IDs for the doclist parameter, however this is not recommended because these IDs will change between sandbox and production orgs, meaning that you will have to re-add the new template IDs into this parameter after transferring to production.

S-Docs Button or link URL:

[code lang="html"]{!URLFOR('/apex/SDOC__SDCreate1', null,[id=Opportunity.Id, Object='Opportunity',
doclist='Template_1,Template_2',
oneclick='false'])}[/code]

The doclist parameter can also be dynamically set using Salesforce functions within the button like “IF” or “CASE.” This button will choose the correct document and email template based on a field value. S-Docs Button or link URL:

[code lang="html"]{!URLFOR('/apex/SDOC__SDCreate1', null,[id=Contact.Id, Object='Contact',
doclist=IF(Contact.Department=='Finance', 'Finance_Template', 'All_Other_Depts_Template')])}[/code]

Option 3: One-Click Generation

The “one-click” builds on Option 2 but takes it one step further – the document(s) are generated without the user selecting any templates. Once the user clicks the S-Docs button, they will go directly to the list of newly generated documents. From there, they can then decide to view, print, email or return to the original Salesforce record. This option achieves one-click generation while still allowing the user to determine next steps.

One-click configuration is a similar URL to option 2, but should NOT contain the “oneclick='false'” parameter. Only the doclist parameter (which contains a comma delimited list of documents) is needed.

S-Docs Button or link URL:

[code lang="html"]{!URLFOR('/apex/SDOC__SDCreate1', null,[id=Opportunity.Id, Object='Opportunity',
doclist='Template_1,Template_2'])}[/code]

Option 4: One-Click + Email Prep

The “one-click” builds on Option 3 but again goes one step further – by pushing the user and documents to an email screen. To effectively use this option, one of the templates in the doclist should be of type “HTML.” This HTML template will comprise the default email body and can set the default subject line and recipients for the outbound email being prepared.

Any other S-Docs templates that are included in the doclist will be automatically added as attachments. This option is appropriate where you want to give the user the opportunity to “eyeball” the email and make any small changes prior to sending. You can leverage the advanced features of the S-Docs Template to default all email values and lock down fields where you want to restrict the users. One-click is configured with a “prepemail='1'” parameter in the S-Docs button URL. Only the doclist parameter (which contains a comma delimited list of template names) and prepemail parameters are needed. Again, when using this feature, one of the templates in the doclist should have an output type of “HTML” that will set the default email body. S-Docs Button or link URL:

[code lang="html"]{!URLFOR('/apex/SDOC__SDCreate1', null,[id=Opportunity.Id, Object='Opportunity',
doclist='Email_Template,Template_1',
prepemail='1'])}[/code]

Option 5: One-Click + Email Send

This option will create the document and email it according to the parameters in the button and the configuration of the S-Docs templates included in the doclist parameter. This MUST contain an HTML template as one of the doclist parameters, and that template MUST contain at least a default “To” address, subject line and email body. Without this set, it will not be a valid email. The users will return to the original record detail page once complete. This is a useful option when you want complete control of the messaging but still allow the user to control when the message is generated.

S-Docs Button or link URL:

[code lang="html"]{!URLFOR('/apex/SDOC__SDCreate1', null,[id=Opportunity.Id, Object='Opportunity',
doclist='Email_Template,Template_1',
sendemail='1'])}[/code]

You can include additional email attachments to your outbound email by specifying the document ID or attachment ID parameters. Keep in mind that these records need to exist within Salesforce prior to the document generation process so their IDs can be included in the URL. Attachments use the parameter “aid=”  followed by a comma delimited list of Salesforce IDs corresponding to attachment records. Salesforce documents use the parameter “did=” and the list of Salesforce IDs for the document record. S-Docs Button or link URL with additional attachments from attachment related list and documents tab:

[code lang="html"]{!URLFOR('/apex/SDOC__SDCreate1', null,[id=Opportunity.Id, Object='Opportunity'
doclist='Email_Template,Template_1',
aid='00PG0000006neU1',
did='015G0000001gbu9,015G0000002qtXw',
sendemail='1'])}[/code]

Option 6: Zero Click

This option can create documents and emails from the Salesforce platform whenever a field is set to a particular value. You can therefore use workflow rules to update a field value, which in turn can generate and optionally email documents through S-Docs. This option is ideal for behind-the-scenes document generation and distribution. It is also ideal for mobile devices, since it is a field change that runs a process without further user interaction. For example, you can easily add a custom picklist field on a mobile page layout. The user simply changes the value and saves the record. All document processing is handled post-save on the Salesforce platform. You can also do this without even prompting the user through workflow rules!

This integration uses the S-Docs Jobs Object in conjunction with the Salesforce Process Builder, Visual Workflows, or APEX triggers. You can learn how to use S-Docs Jobs for zero-click automation by reading this documentation.


Top