Category

S-Docs Automation: Jobs & REST API

Create An S-Docs Connected App For S-Sign

By Documentation, S-Docs Automation: Jobs & REST API No Comments

Introduction

This article will detail the 3 steps needed to create an S-Docs Connected App to use with S-Sign e-signatures.

Step 1: Create a Self-Signed Certificate

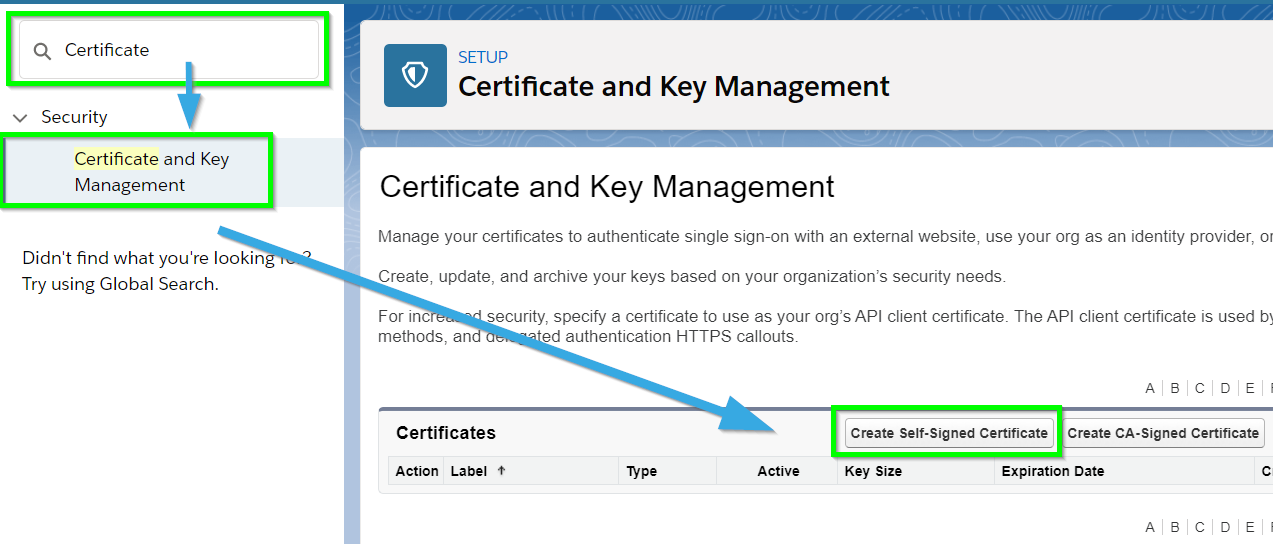
From the setup menu, type "Certificate" into the Quick Find bar, then click Certificate and Key Management in the dropdown menu. Click Create Self-Signed Certificate.

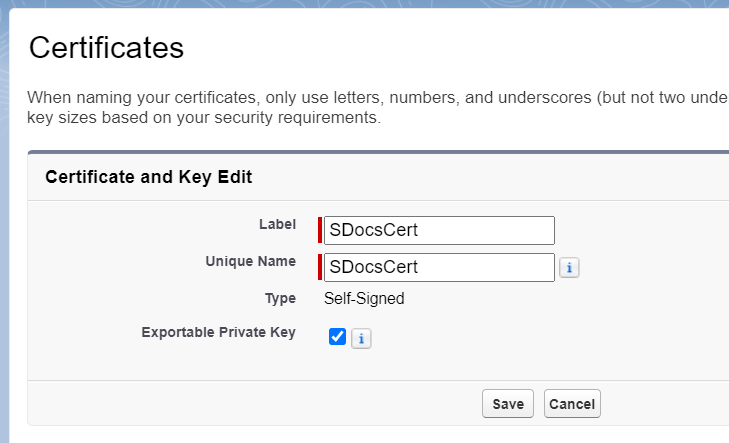
Name your certificate SDocsCert. Click Save.

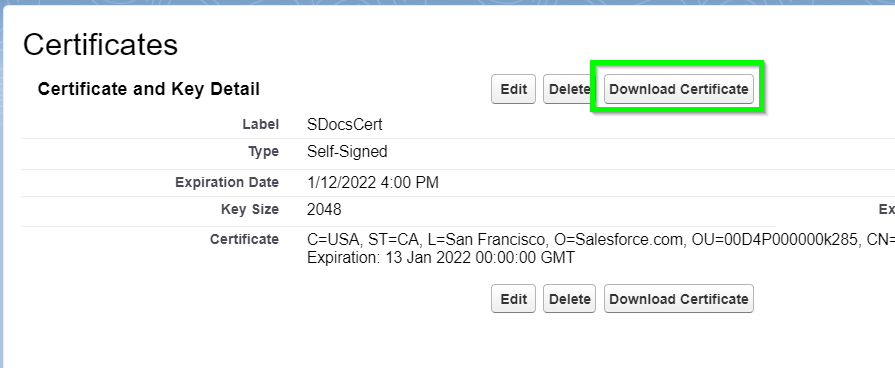
Click Download Certificate, and keep track of where the file is stored. We will use this in the next step.

Step 2: Create A New Connected App

Navigating to the Connected App creation page is a bit different in Classic and Lightning. In Lightning, type "App Manager" into the Quick Find bar in the setup menu, then click App Manager in the dropdown menu. Click New Connected App in the top right.

In Classic, type "Apps" into the Quick Find bar in the setup menu, then click Apps in the dropdown menu (under Build > Create). Scroll down to the Connected Apps section and click New.

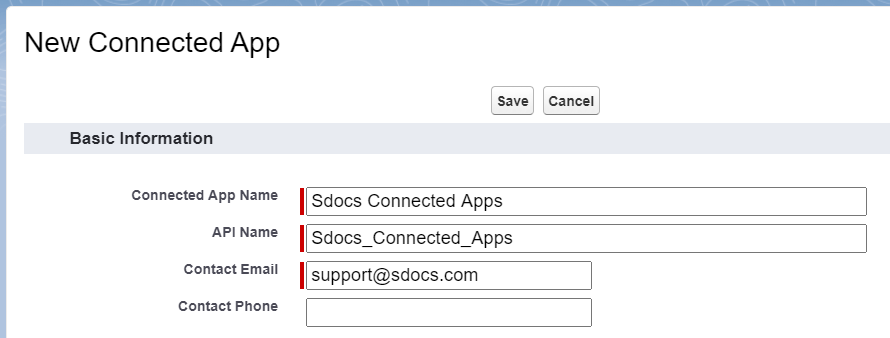
In the Basic Information section, fill in the following fields:

Connected App Name: Sdocs Connected Apps
API Name: Sdocs_Connected_Apps
Contact Email: support@sdocs.com

Scroll down to the API (Enable OAuth Settings) section and check Enable OAuth Settings. Then, enter one of the following URLs into the Callback URL field, depending on if you're working in a sandbox or production environment:

Production: https://login.salesforce.com/services/oauth2/callback
Sandbox: https://test.salesforce.com/services/oauth2/callback

Next, check the Use Digital Signatures checkbox and upload the self-signed certificate that you downloaded in step 2.

Then, scroll down to the Selected OAuth Scopes field. Add the following scopes to your selected scopes:

  • Perform requests on your behalf at any time
  • Access and manage your data
  • Access and manage your Chatter data

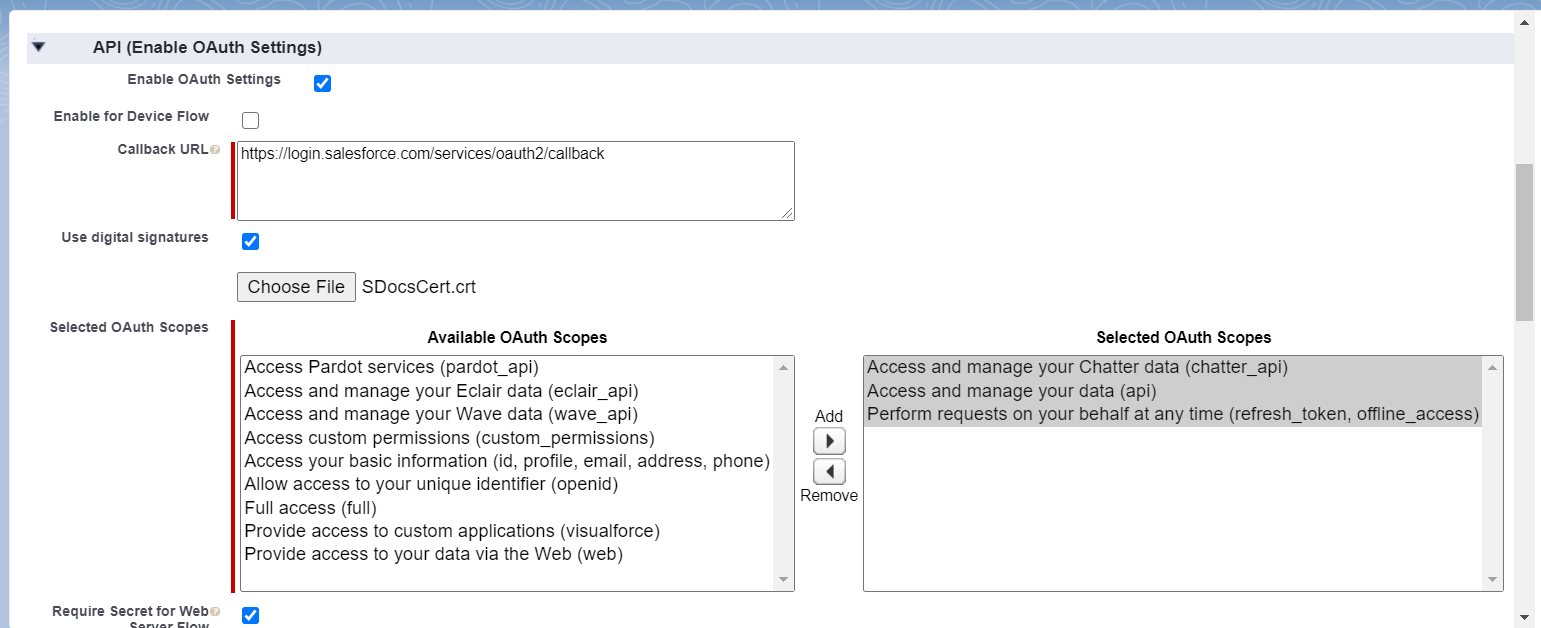
This section should look similar to the following image when you are finished:

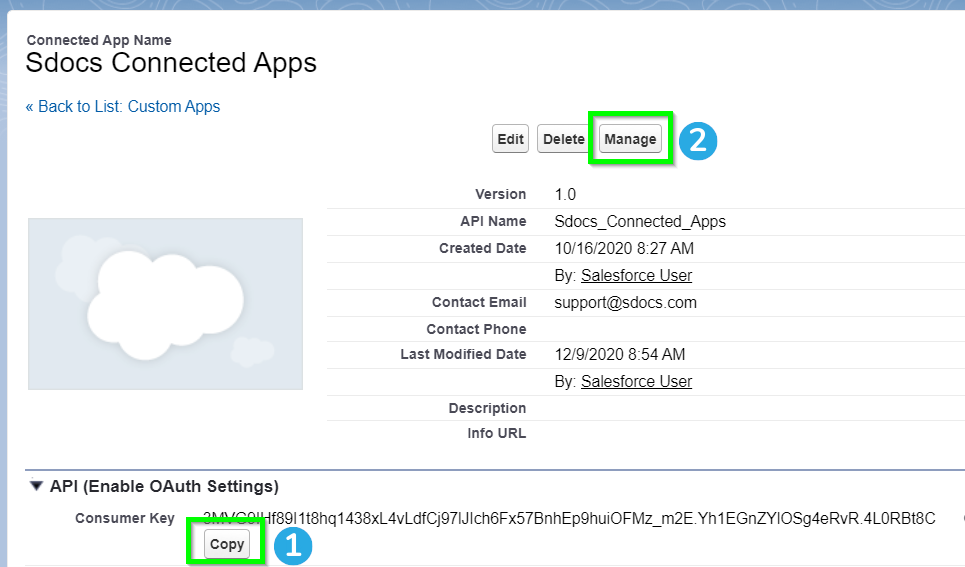
Leave the rest of the fields at their default settings, and click Save. You will be redirected to the Connected App detail page. Scroll down to the API (Enable OAuth Settings) section and click Copy next to the Consumer Key field. Paste this somewhere you can access later. You will use this key in Step 3. Then, click Manage at the top of the page.

On the next page, click Edit Policies.

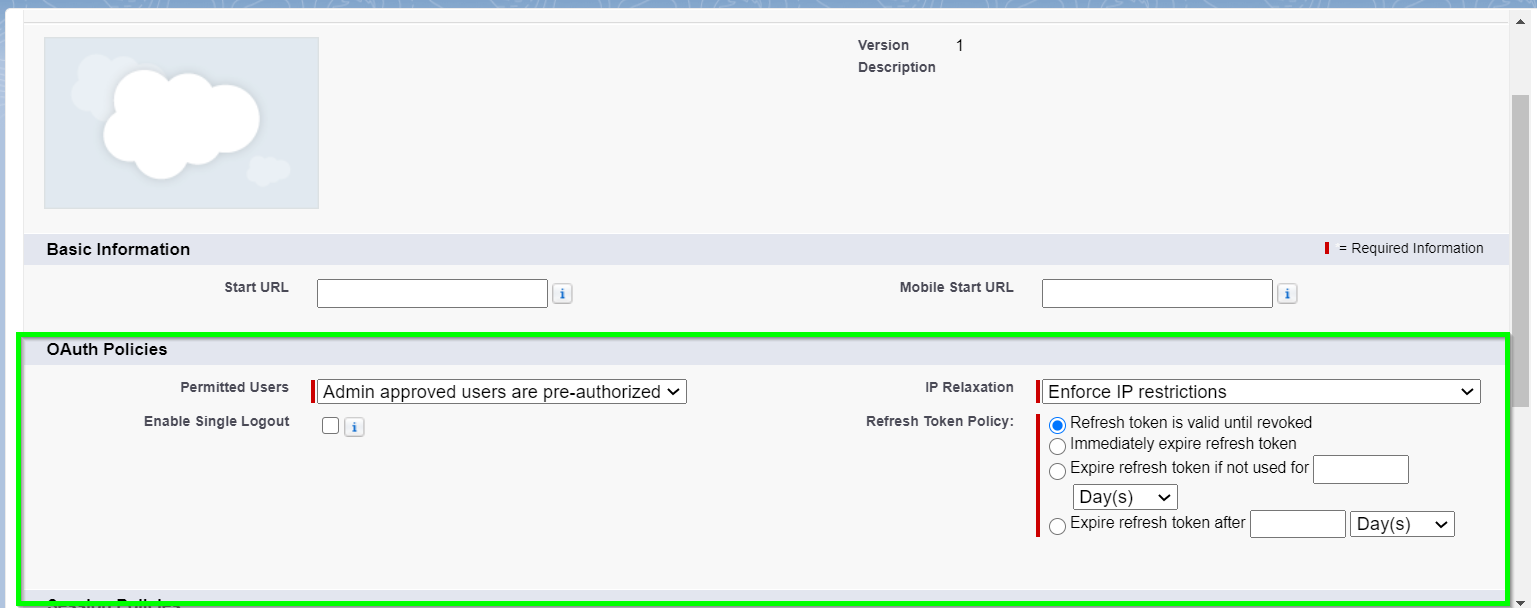
Scroll down to the OAuth Policies section. Set the Permitted Users field to Admin approved users are pre-authorized. Set the IP Relaxation field in accordance with your organization's policies. Keep the Refresh Token Policy set to Refresh token is valid until revoked. Then, click Save.

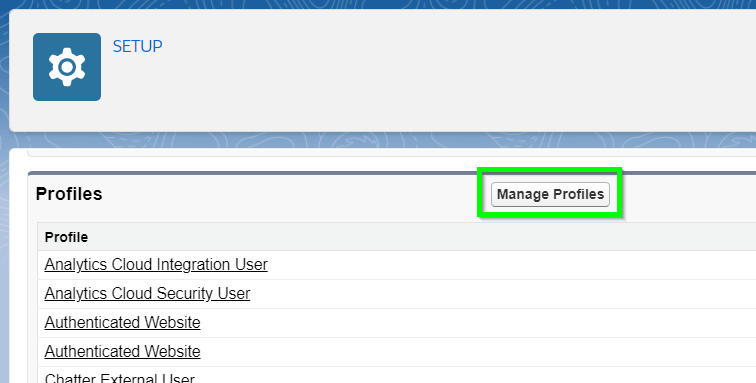
Next, scroll down to the Profiles section and click Manage Profiles.

Add the profile for the user that will be used as the S-Sign Internal User (we recommend using an administrator as the S-Sign Internal User). The S-Sign Internal User is a Salesforce user which all S-Sign operations will be conducted by through the secure S-Docs Connected App. Click Save.

Step 3: Create A New Custom Setting Entry

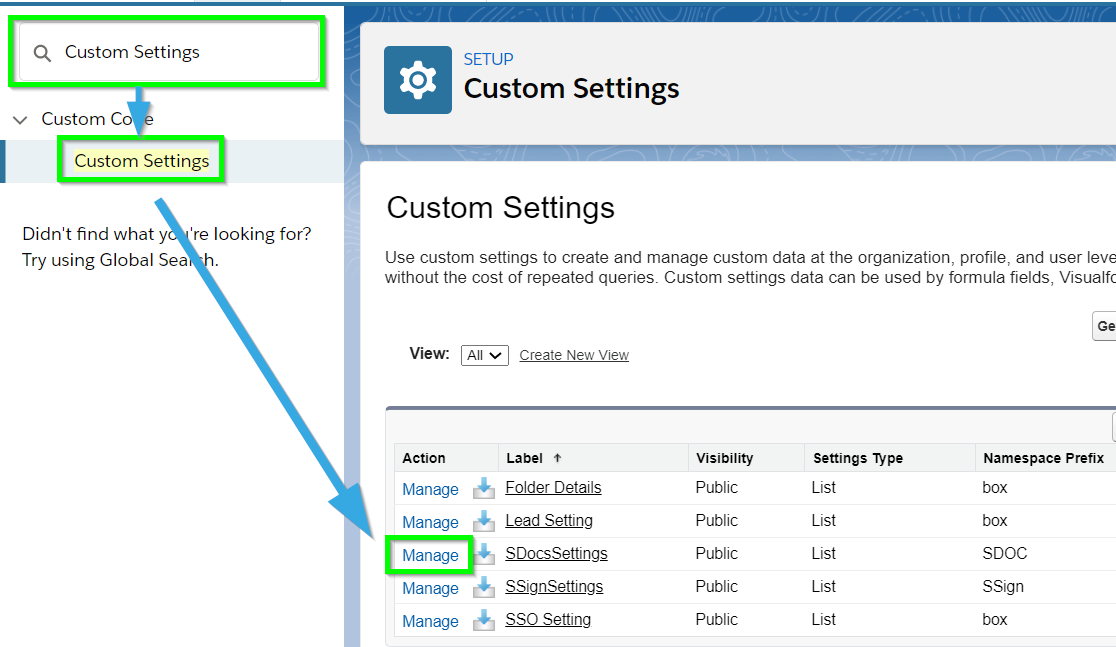
From the setup menu, type "Custom Settings" into the Quick Find bar, then click Custom Settings in the dropdown menu. Find SDocsSettings and click Manage.

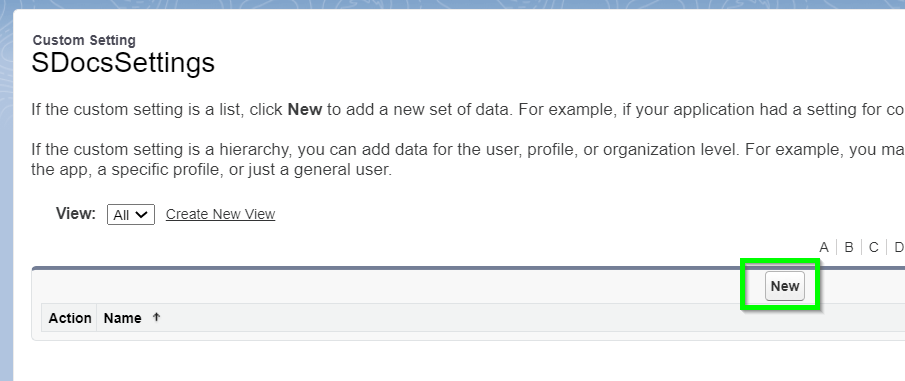
If you've created an S-DocsSettings entry in the past, you can click the Edit link next to its name to edit it now. Otherwise, click New to create a new SDocsSettings entry.

Fill in the following values:

Name: SDocsSettings
ConnectedAppCertificateName: SDocsCert
ConnectedAppConsumerKey: Paste the consumer key that you copied in step 3
ConnectedAppLoginURL:
[Production]: https://login.salesforce.com
[Sandbox]: https://test.salesforce.com

Note: If you are using Salesforce Government Cloud, use your MyDomain URL instead of the URLS listed above.

ConnectedAppTokenURL: Enter your Salesforce domain URL.
ConnectedAppUserName: Enter the username that you want to use as the S-Sign Internal User (we recommend using an administrator's user name). The S-Sign Internal User is a Salesforce user which all S-Sign operations will be conducted by through the secure S-Docs Connected App.

Note: If you are using Salesforce Government Cloud, you also need to fill in the ConnectedAppAudienceURL field with one of the URLs listed below. This field sometimes populates with your MyDomain URL, which should not be used for this field. If your MyDomain URL populates this field, replace it with one of the 2 URLs listed below.

ConnectedAppAudienceURL:
[Production]: https://login.salesforce.com
[Sandbox]: https://test.salesforce.com

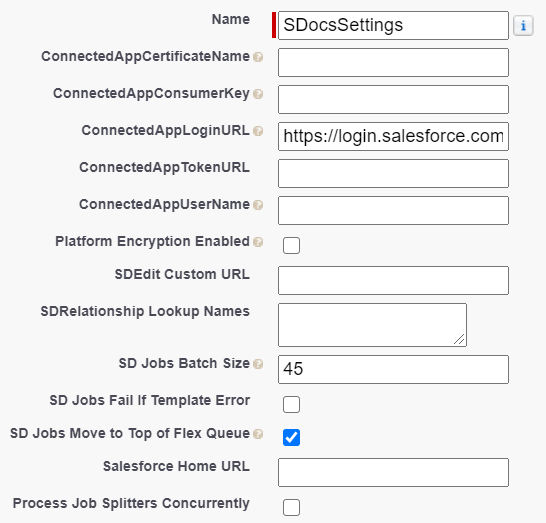
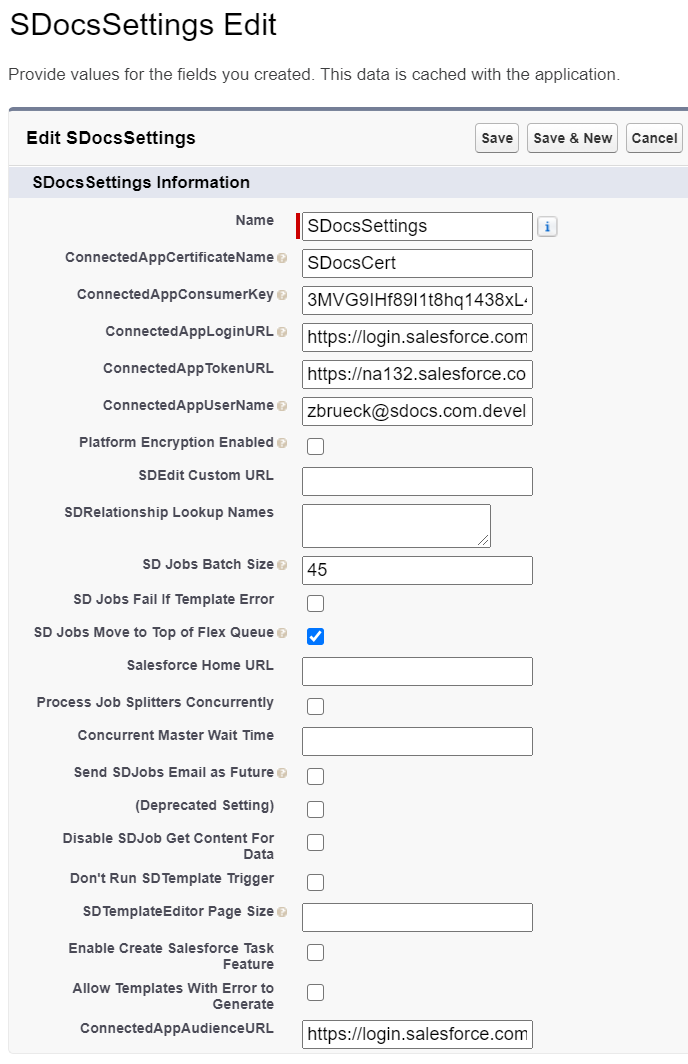
Your SDocsSettings entry should look similar to the following:

Click Save.

You've now successfully configured your S-Docs Connected App. You can return to the S-Sign Configuration Steps and continue with Step 4.

Return to S-Sign Installation and Configuration - Salesforce Lightning

Return to S-Sign Installation and Configuration - Salesforce Classic.

Troubleshooting

My Self-Signed Certificate is Expiring Soon!

Several months after setting this up, you may get an email from Salesforce informing you that your self-signed certificate expired. If that is the case, you can follow the steps below to renew your certificate. We recommend doing this after hours.

1. From the setup menu, type "Certificate" into the Quick Find bar and click Certificate and Key Management in the dropdown menu.
2. Click Delete for SDocsCert.
3. Click Create Self-Signed Certificate.
4. Set Label to SDocsCert.
5. Set Unique Name to SDocsCert.
6. Click Save.
7. Click Download Certificate.

The next steps are different in Salesforce Classic and Salesforce Lightning.

For Classic:

1. From the setup menu, type "Apps" into the Quick Find bar, then click Apps (under Build > Create).
2. Scroll down to the Connected Apps section, find "Sdocs Connected Apps," and click the Edit link next to it.
3. Scroll down to Use digital signatures.
4. Click Choose File and select the previously downloaded certificate.
5. Click Save.
6 It may take several minutes for the new certificate to take affect.
7. Confirm that everything is working (test SDJobs with Mass Merge).

For Lightning:

1. From the setup menu, type "App Manager" into the Quick Find bar, then click App Manager in the dropdown menu.
2. Find the "Sdocs Connected Apps" connected app. Click the dropdown arrow on the right, and click View.
9. Click Edit at the top of the page.
11. Scroll down to Use digital signatures.
12. Click Choose File and select the previously downloaded certificate.
13. Click Save.
14. It may take several minutes for the new certificate to take affect.
15. Confirm that everything is working (test SDJobs with Mass Merge).

General Troubleshooting

If you performed this setup but are receiving errors, please try the following:

  • Navigate to Setup > Connected Apps > SDocs Connected Apps > Profiles, and verify that the profiles of the following users are added to the app's permitted profiles list:
    1. The S-Sign Internal User
  • Go to Setup > Remote Site Settings and verify that there are entries for the appropriate Salesforce production/sandbox URL and the customer’s home URL (Salesforce Classic). Additionally, verify that these entries are active.
  • Make sure the user's profile has the Apex REST Services permission checked.


Automation & Batch Processing Using S-Docs Jobs in Salesforce Lightning

By Documentation, S-Docs Automation: Jobs & REST API No Comments

Winter '20 Release Note: If you are using S-Docs below version 4.53, you may experience an "Attempt to de-reference a null object" error when interacting with various forms of automation in S-Docs. In order to fix this bug, you can create a new SDocs Settings custom settings set. To do this, type "Custom Settings" into the Quick Find / Search bar in the Setup menu, and click Custom Settings. Click SDocsSettings, then click Manage at the top of the page. From there, click New. Fill out the following information:

Name: SDocsSettings
ConnectedAppLoginURL:
Production: login.salesforce.com
Sandbox: test.salesforce.com
SD Jobs Batch Size: 45
SD Jobs Move to Top of Flex Queue:

Additionally, ensure that you have a Remote Site Setting for either login.salesforce.com (production), or test.salesforce.com (sandbox).

Introduction

If you're looking for a way to automate your document generation process--perhaps you want a document to be automatically generated and emailed when a field value has changed or a date has passed--this document will help you configure S-Docs to meet your requirements using the S-Docs Jobs object.

For example, when a user changes an opportunity stage field to “send quote,” you can configure S-Docs to generate a PDF quote along with a customized cover letter and email it to the opportunity contact. Users would not need to click on any buttons or choose any templates. Whenever the field value is changed, even from a mobile device, the process is invoked and the documents are generated and optionally emailed.

This document will show you how to use S-Docs Jobs to automate document generation in three different ways: with Salesforce Process Builder, APEX Triggers, and Flows.

If you are looking for a way to generate multiple S-Docs (in batch) from an object list view, you can accomplish this with S-Docs Jobs as well. For example, a user could select multiple records at once from a list view and send each record a custom invitation email to an event. The possibilities to further automate and distribute your documents are unlimited. Please refer to this documentation for more information about batch document generation.

Automatic Document Generation with S-Docs Jobs

An S-Docs Job is a simple, intuitive Salesforce object designed for automatically generating (and optionally emailing) documents with your custom code, Salesforce Processes, Salesforce Flows, or other integrations. We recommend you use S-Docs Jobs with Process Builder, which can do just about anything workflows can.

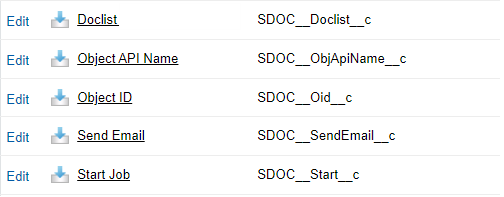
For use with your custom code, Salesforce Processes, or Salesforce Flows, the API name for S-Docs Jobs is SDOC__SDJob__c, and the API names for some of its fields can be found in the following list. You'll use these fields later when configuring your document automation.
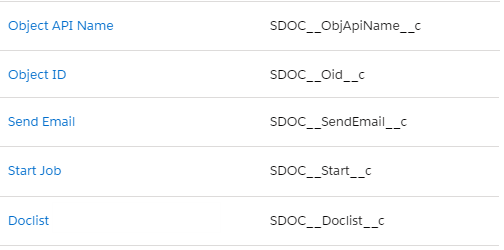
To automatically generate S-Docs with S-Docs Jobs, you'll be configuring your Salesforce Process, custom code, or Flow to do at least five things:

  1. Create an S-Docs Job record
  2. Specify the ID of the record you would like to generate these documents for
  3. Specify this record’s object API name (Opportunity, Account, etc.)
  4. Specify the name of the template you would like to use for document generation
  5. Optionally fill in the fields for emailing these documents. Finally, you will need to set the SDOC__Start__c field for this Job record to “true” in your APEX code or Salesforce flow to run this Job (i.e. to generate and optionally email the specified documents)

Before we see how to use S-Docs Jobs for automatic document generation, we’ll see what the Job records themselves look like.

Behind the Scenes of S-Docs Jobs

When one of the three methods (Salesforce Processes, APEX code, or Flow) creates an S-Docs Job, it is stored as an S-Docs Jobs record. To view these records, navigate to the App Launcher, scroll down to All Items, and click S-Docs Jobs.
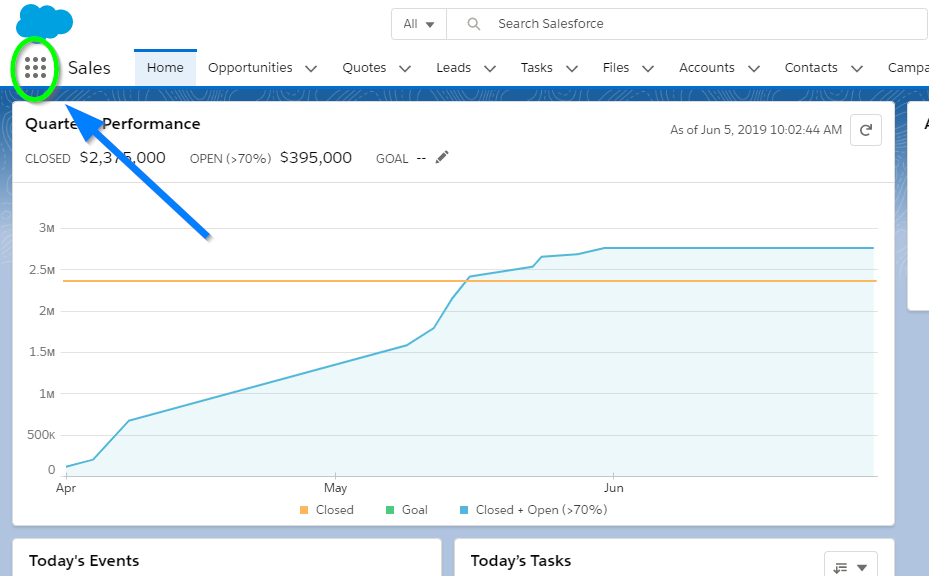
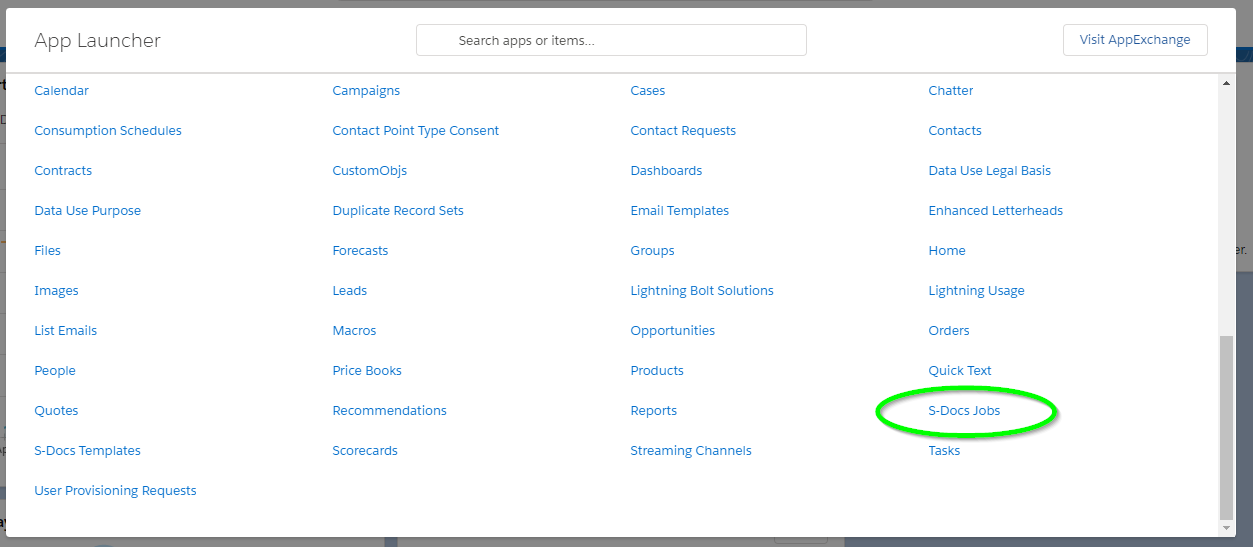
All S-Docs Jobs Record appear here. In most (if not all) cases, we will not be creating Jobs records with the New button here; the records here should be created by your Salesforce Process, APEX triggers, Salesforce flows, etc. However, you can delete logs here by clicking the arrow at the end of each log and then clicking Delete (though this may also be done programmatically).You can open a job record by clicking on the blue SDJOB number. The record will show you things like the IDs of the templates used to generate it (i.e. the Doclist), the ID of the record it generated documents for (i.e. the Object ID), and other relevant Jobs fields.
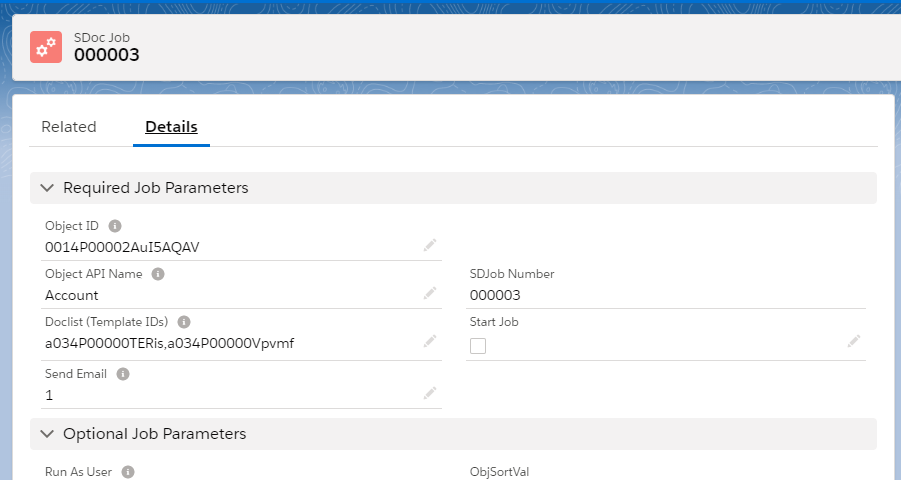
The documents the Job generated will also be included in the record under the Job Execution Details section. You can click on their icons to view them.

You don't need to find the job record to view documents generated by a job, however. A related list for these documents will be automatically created on the page of the record you generated the documents for. For example, if we created an APEX trigger that would create a Job to generate three documents whenever an account record was created, we would see those three documents on that account record’s related tab like so:
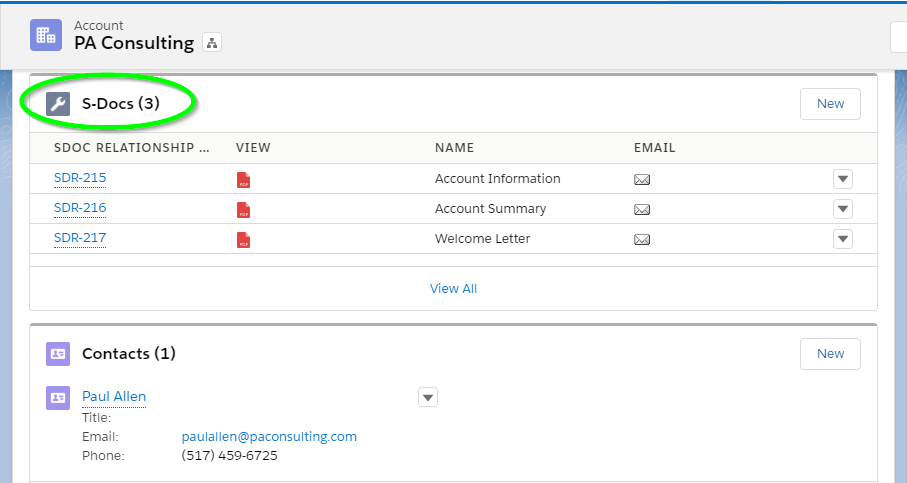

Note that these documents would still exist in the S-Docs related list on the account record page even if we deleted the Job that created these documents. If you wanted to delete these documents for good, you could delete them from the S-Docs related list.

Now that we’ve seen how S-Docs Jobs work behind the scenes, we can see how we might leverage their functionality with Salesforce Processes, APEX triggers, and Salesforce flows.

Use Case: Automatically Generating & Emailing a Welcome Letter Whenever an Account is Created

Consider the following use case: whenever an account is created, we would like S-Docs to generate a welcome letter for that account, and then email it to a contact associated with that account. This process can be automated in no time using S-Docs Jobs! In the three sections following this one, we will explore how to accomplish this in Process Builder, APEX triggers, and in Salesforce Flows. In all three of these scenarios, we will have to fill in the following fields in order to automate this particular case; you'll see how to use these fields once we get into each scenario.

Fields for our Use Case
SDOC__Start__c (Start Job)This will be set to ‘true’ so that the specified documents will automatically generate (and in this case, automatically email, as we have specified them to do so using the Job’s email fields) upon the creation of this particular S-Doc Job record.

SDOC__SendEmail__c (Send Email)If we set this to ‘0,’ an email will not be sent. If we set it to ‘1,’ this S-Doc Job record will email the document it generated. Thus, we will be setting this to ‘1.’

For this to work properly, our Doclist needs to include an S-Doc HTML email template. In our example, this template will use a merge field in the Email To field (found under the Email Settings tab of the template editor) that will be dynamically populated with the appropriate contact's email address. Then, each Job record would generate a welcome letter PDF, generate an email using the HTML email template, attach the welcome letter PDF to that email, and then send that email.

SDOC__Oid__c (Object ID): This is the Object ID field, i.e. the place where we specify which object our Process/APEX Trigger/Flow should pull record IDs from. In our example, we will choose Account, since we want our process to use Account record IDs.

SDOC__ObjAPIName__c (Object API Name)This is the API name of our objects. In our example, we’re creating this trigger for new accounts, so we store Account in this field.

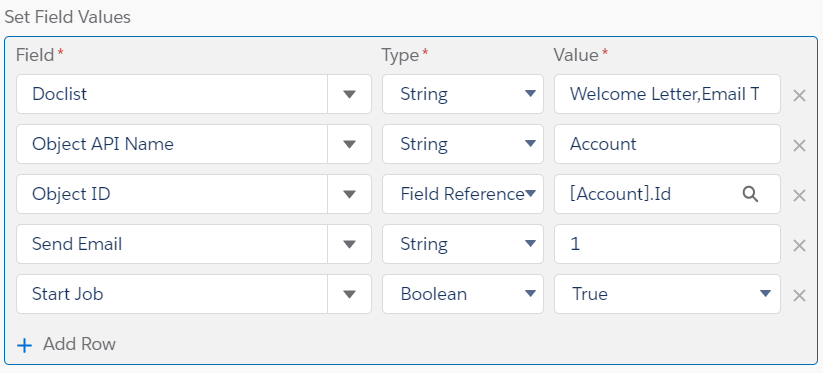
SDOC__Doclist__c (Doclist)This is the comma-delimited list of S-Docs template names that we will be using to generate our documents. Make sure there aren’t any spaces in your comma-delimited list. In our example use case, Welcome Letter is the name of our S-Docs PDF welcome letter template, and Email Template is the name of our S-Docs HTML email template. Thus, we will be using the following Doclist for our example use case Salesforce Process, APEX code, and Salesforce Flow:

Welcome Letter,Email Template

You can also use template IDs for the doclist parameter, however this is not recommended because these IDs will change between sandbox and production orgs, meaning that you will have to re-add the new template IDs into this parameter after transferring to production.

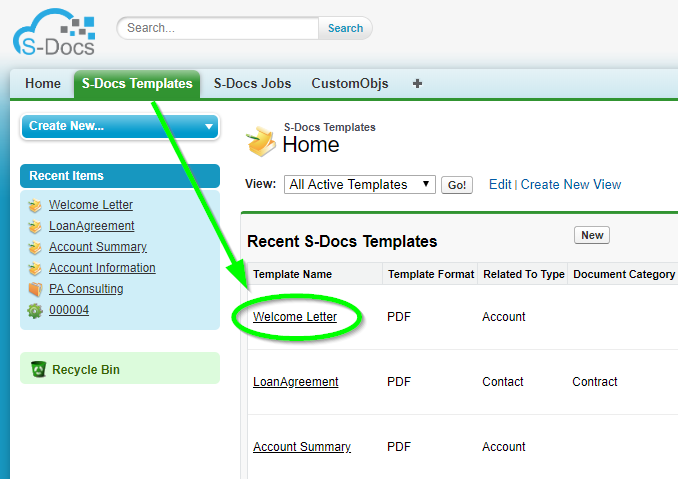
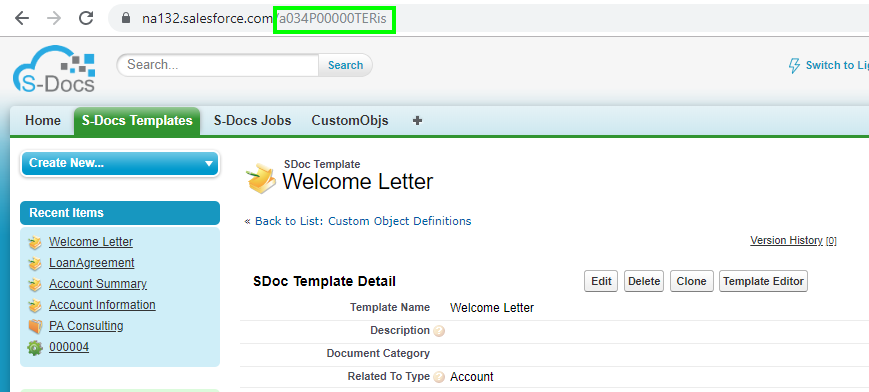
To find the template IDs for use in your Doclist field, go to the template record page for each template you're using.
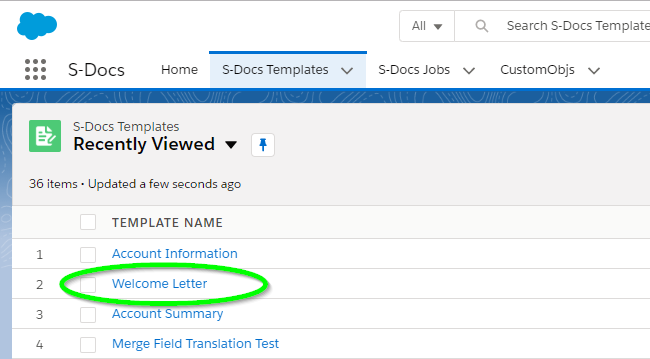

The template ID can be found in the URL of the template record. You can then copy and paste this ID into your Doclist field for an S-Docs Job in your Process, APEX code, Flow, etc.
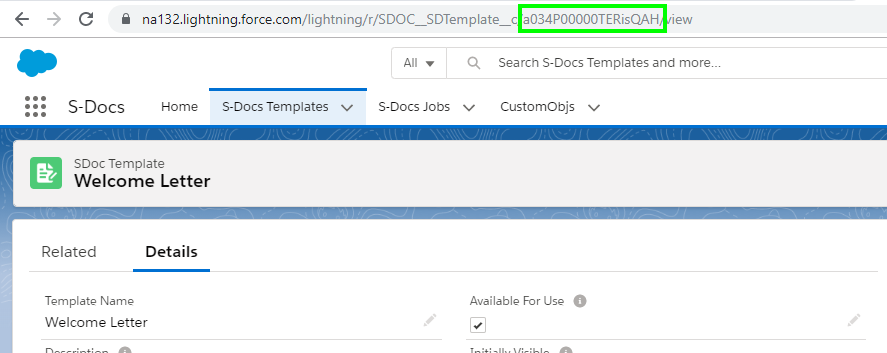
Note: If your org contains multiple templates with the same name, all of them will generate if one of them is referenced in one of your processes. In this case, you should use the template ID instead.

In the following three sections, we will see how to use S-Docs Jobs with Salesforce Processes, APEX triggers, and Salesforce Flows to automatically generate and email a welcome letter whenever an account is created.

Additional Fields

While the example use case in this article only uses 5 fields, S-Docs Jobs also support a number of other fields that you can use to further customize your process.

Email From

Email From allows you to set an org-wide email address as the From address when your S-Docs Job process includes emailing a document.

Email Params

Email Params allows you to add advanced email parameters to your process that are not available to access through standard fields on the S-Docs Job object, such as useExistingNoContactRecord=true.

Incl. Attachments with Email

Incl. Attachments with Email allows you to specify a comma-delimited list of Salesforce Attachment IDs to be included in the email sent out by the S-Docs Job.

Incl. Documents with Email

Incl. Documents with Email allows you to specify a comma-delimited list of Salesforce Document IDs to be included in the email sent out by the S-Docs Job.

Incl. Files with Email

Incl. Files with Email allows you to specify a comma-delimited list of Salesforce File IDs to be included in the email sent out by the S-Docs Job.

Include All Related Files

Include All Related Files allows you to opt to attach every file related to the base record to the email sent out by the S-Docs Job.

Using S-Docs Jobs with Process Builder

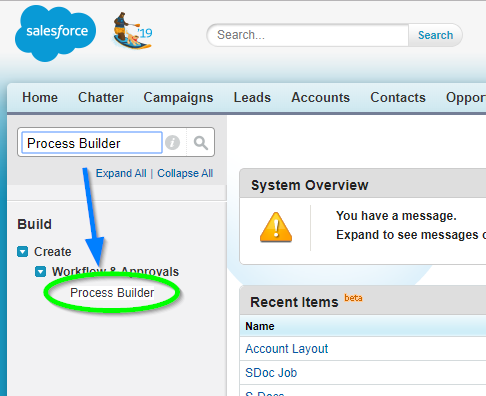
The easiest way to generate and email a welcome letter whenever an account is created is to use an S-Docs Job in a Salesforce Process. From the Setup menu, type "Process Builder" into the Quick Find / Search bar and click Process Builder.
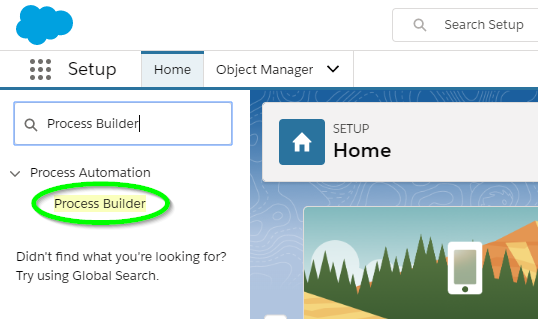
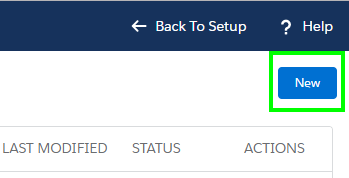
Click New to create a new process.

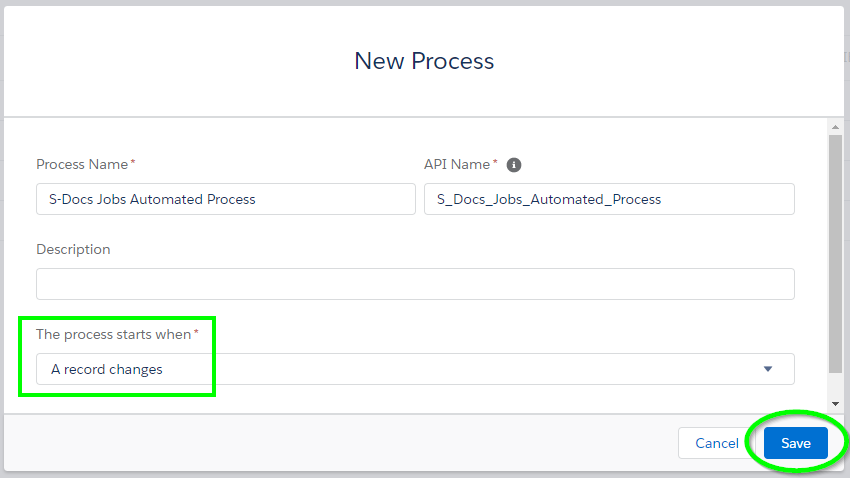
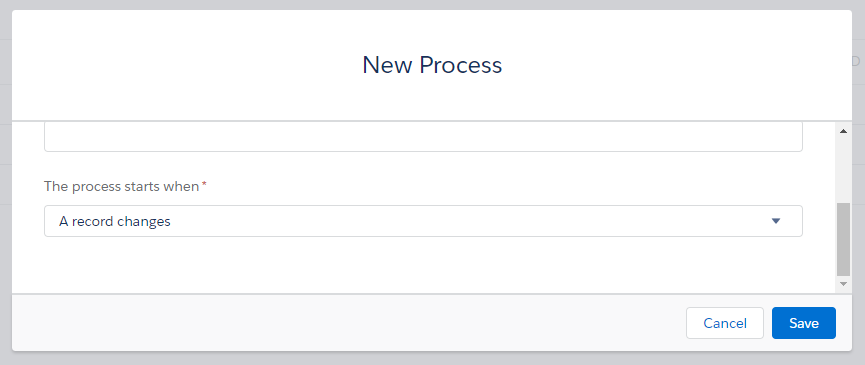
You can name the process whatever you want, then choose to have this process start when a record changes. Click Save.
Click Add Object, choose Account, and start the process only when a record is created.
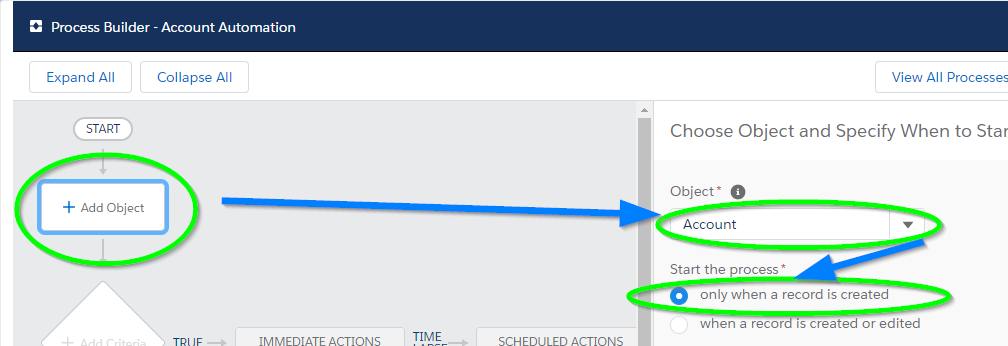

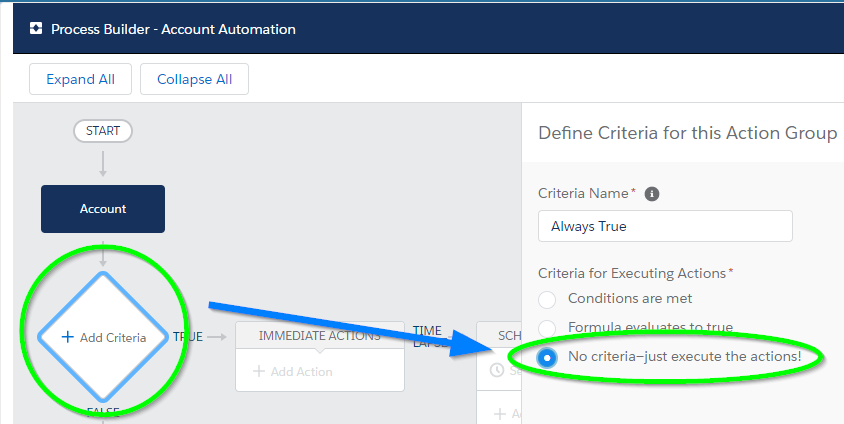
Click Save. Then, click Add Criteria and set it to No Criteria, since we want our Job to execute every time a new account record is opened.

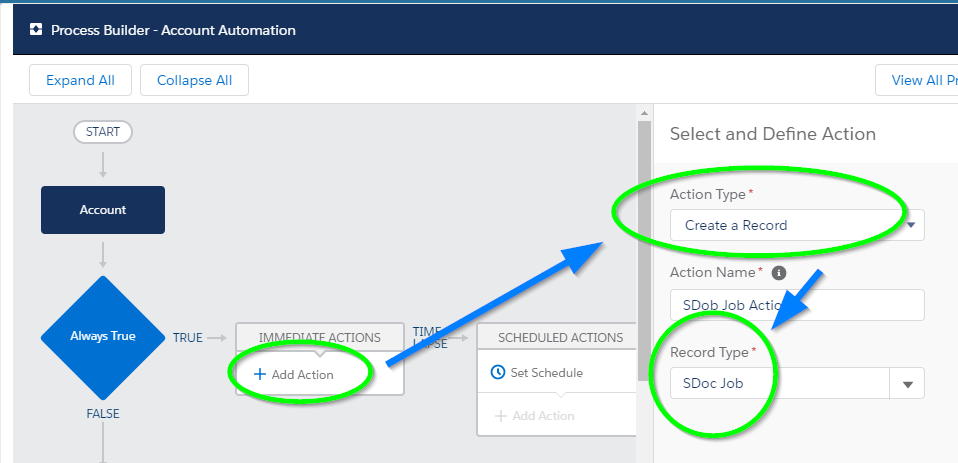
Then, click Add Action and choose Create a Record for our Action Type. For the Record Type, select SDoc Job. You may have to type it in to find it.

A Field Values menu will appear below. This is where you will add the five fields described above in the Fields for Our Use Case section. Click Add Row to add each new field.
 

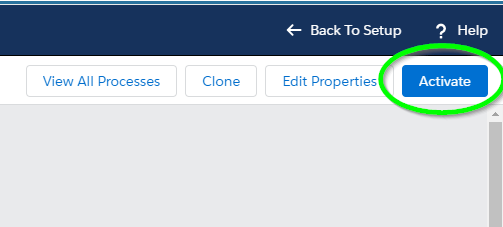
Then, we click Save and click Activate at the top right of the screen.
All done! S-Docs will now automatically generate and email a welcome letter whenever an account is created.

Using S-Docs Jobs with APEX Triggers

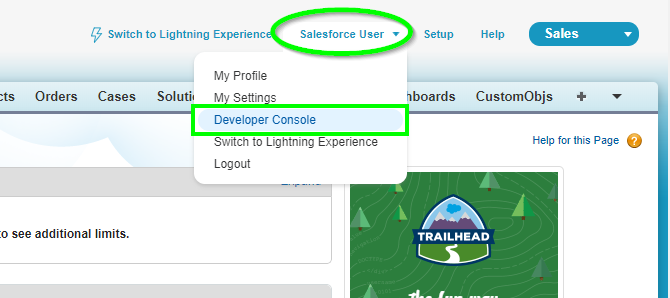
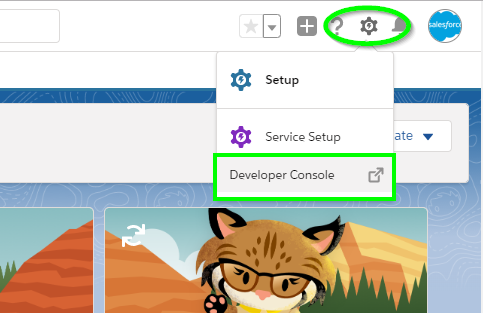
S-Docs Jobs are also simple to use with APEX triggers. To get started, click the Setup cog in the upper right corner, then click Developer Console.
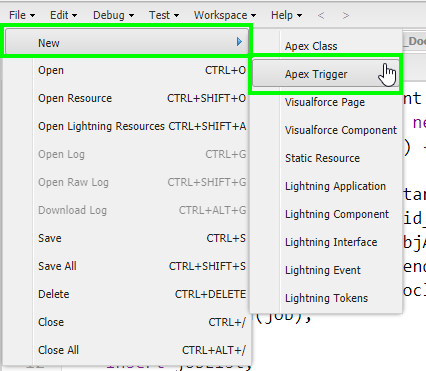
Then, navigate to File > New > Apex Trigger.
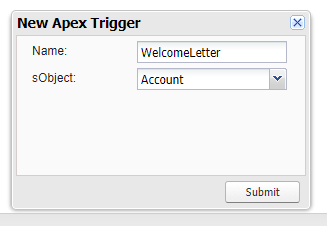
You can name the trigger whatever you want, then select Account for the sObject.
You'll see the following screen.

You can delete the text here, then copy and paste the following APEX trigger into the text field.

[code lang="html"]trigger SendWelcomeLetter on Account (after insert) {
List<SDOC__SDJob__c> jobList = new List<SDOC__SDJob__c> {};
for(Account acct : Trigger.New) {
SDOC__SDJob__c job =
new SDOC__SDJob__c(SDOC__Start__c=true,
SDOC__Oid__c=acct.Id,
SDOC__ObjApiName__c='Account',
SDOC__SendEmail__c='1',
SDOC__Doclist__c='Welcome Letter,Email Template');
jobList.add(job);
}
insert jobList;
}[/code]

This simply creates a Job Object in the APEX trigger, fills in its fields as previously discussed in the Fields for our Use Case section above, and inserts each Job into our Salesforce database. Note that SDOC__SendEmail__c is a string, so its value must be specified in single quotes. SDOC__Doclist__c and SDOC__ObjApiName__c must be specified in single quotes as well.

SDOC__Oid__c, the Object ID field, is given the value acct.Id. This means that for each account record in our loop, the S-Doc Job created for this particular account record will have this account record’s ID stored in its SDOC__Oid__c field.

Click File > Save to complete your APEX Trigger!

Using S-Docs Jobs with Salesforce Flows

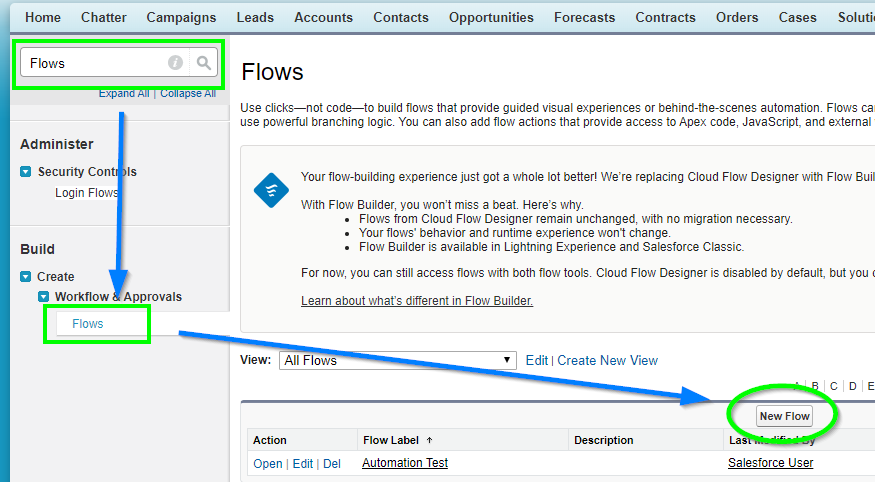
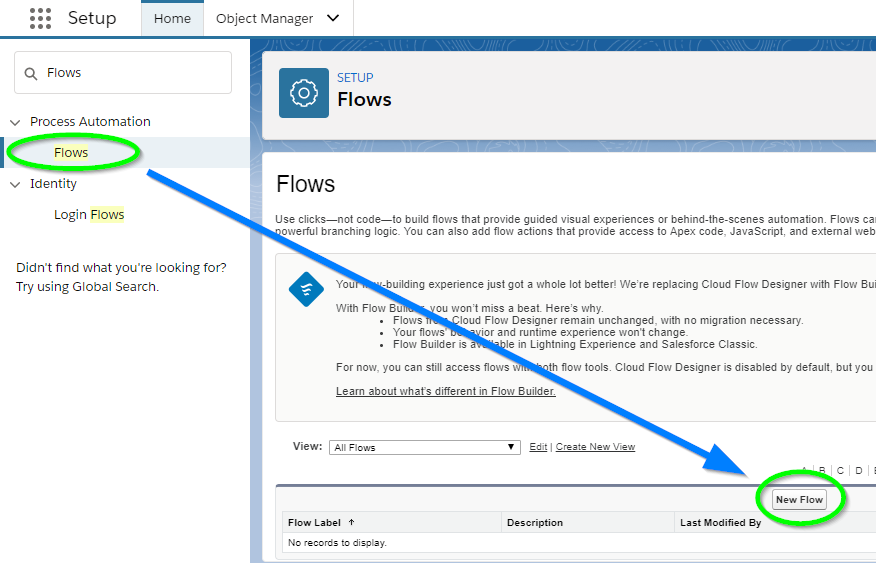
This option is a special case; say we don’t want to generate an email letter whenever an account is created anywhere in our org. Rather, we would like to generate and email a welcome letter only when an account record is created in a Salesforce Flow. Using S-Docs Jobs with Salesforce Flows is as simple as using any other object with Salesforce Flows, so this is easy to accomplish. To get to Flow Builder, type "Flows" into the QuickFind / Search bar in the Setup menu, click Flows, then click New Flow.
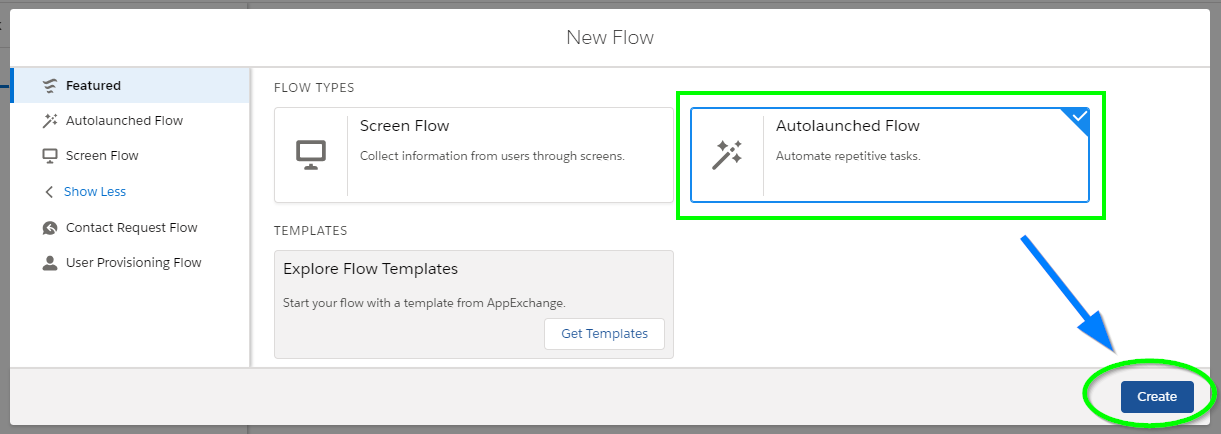
Create an Autolaunched Flow.
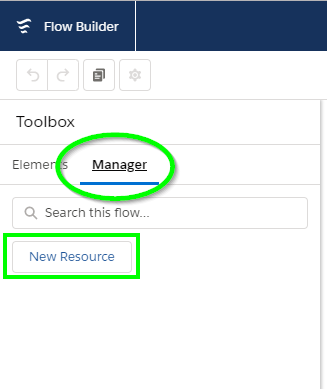
First, we need to create a new variable called “acct.” Select Manager in the Toolbox area, then click New Resource.
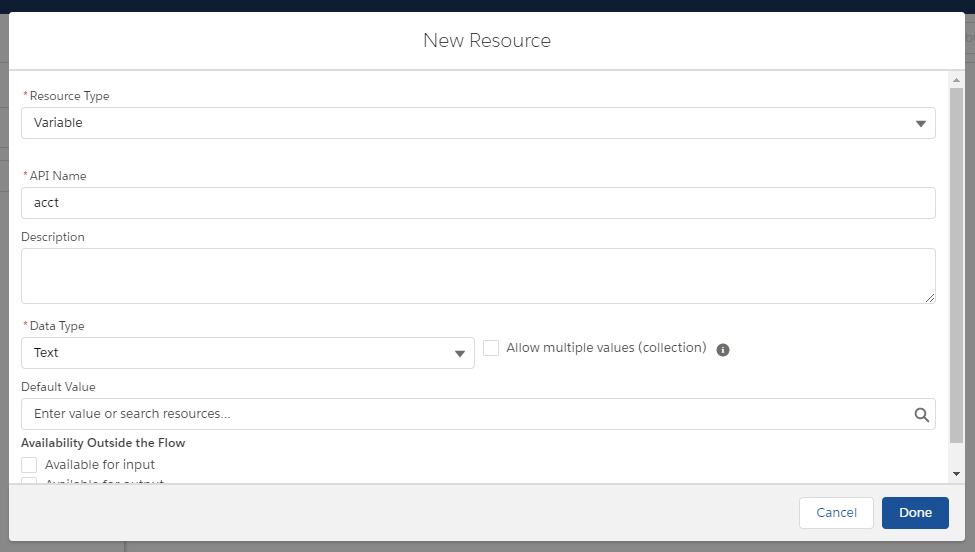
For the Resource Type, select Variable. Enter "acct" for the API name, and make sure the Data Type field is set to Text.
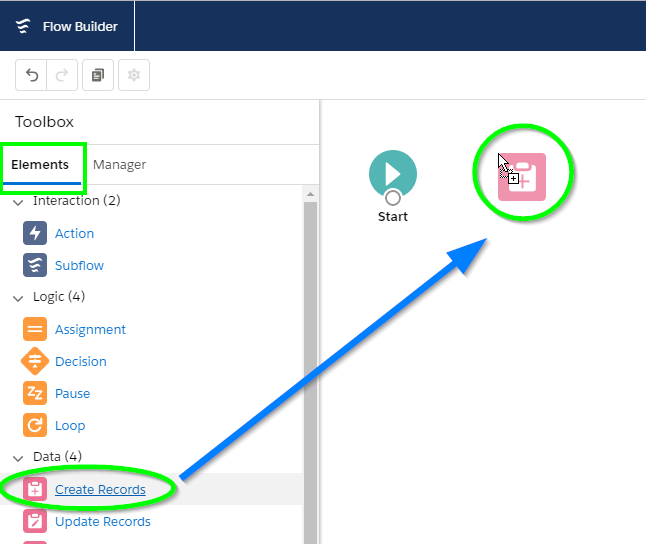
Now we need to create two Record Creates: one for an Account and one for an SDoc Job. We'll create the Record Create for an Account first. Navigate back to the Elements tab in the Toolbar, then drag Create Records into the Flow.
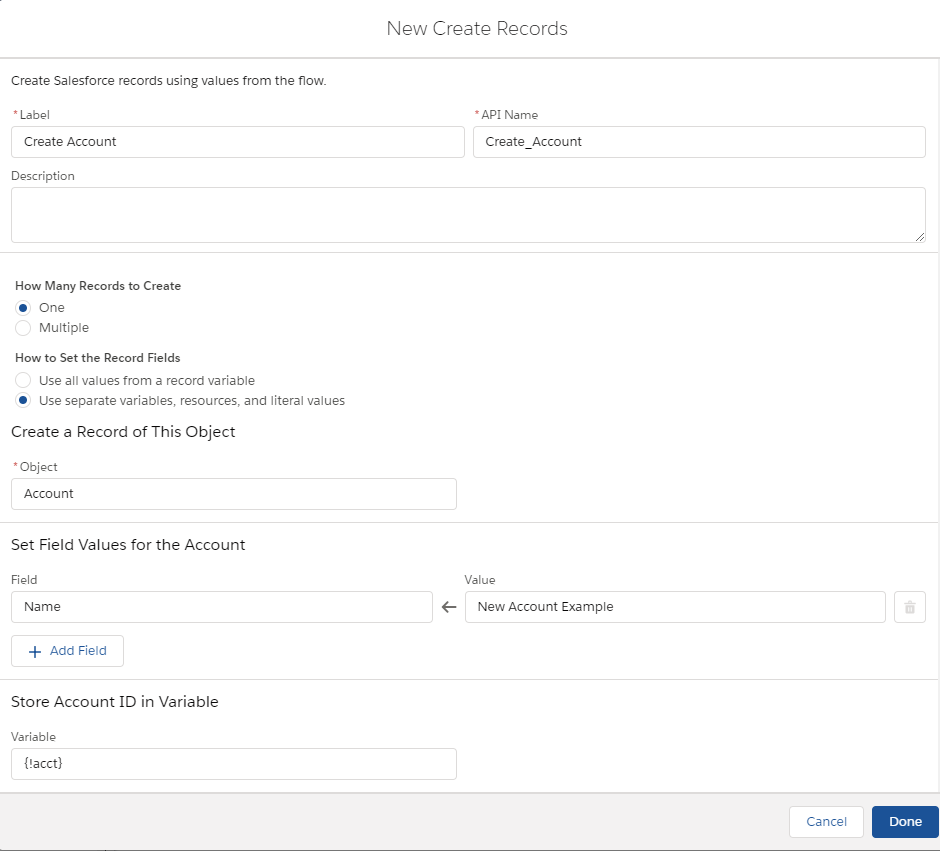
Insert the following information:

Label: Create Account
API Name: Create_Account
How Many Records to Create: One
How to Set the Field Records: Use separate variables, resources, and literal values
Object: Account
Field: Name
Value: New Account Example
Variable: {!acct}

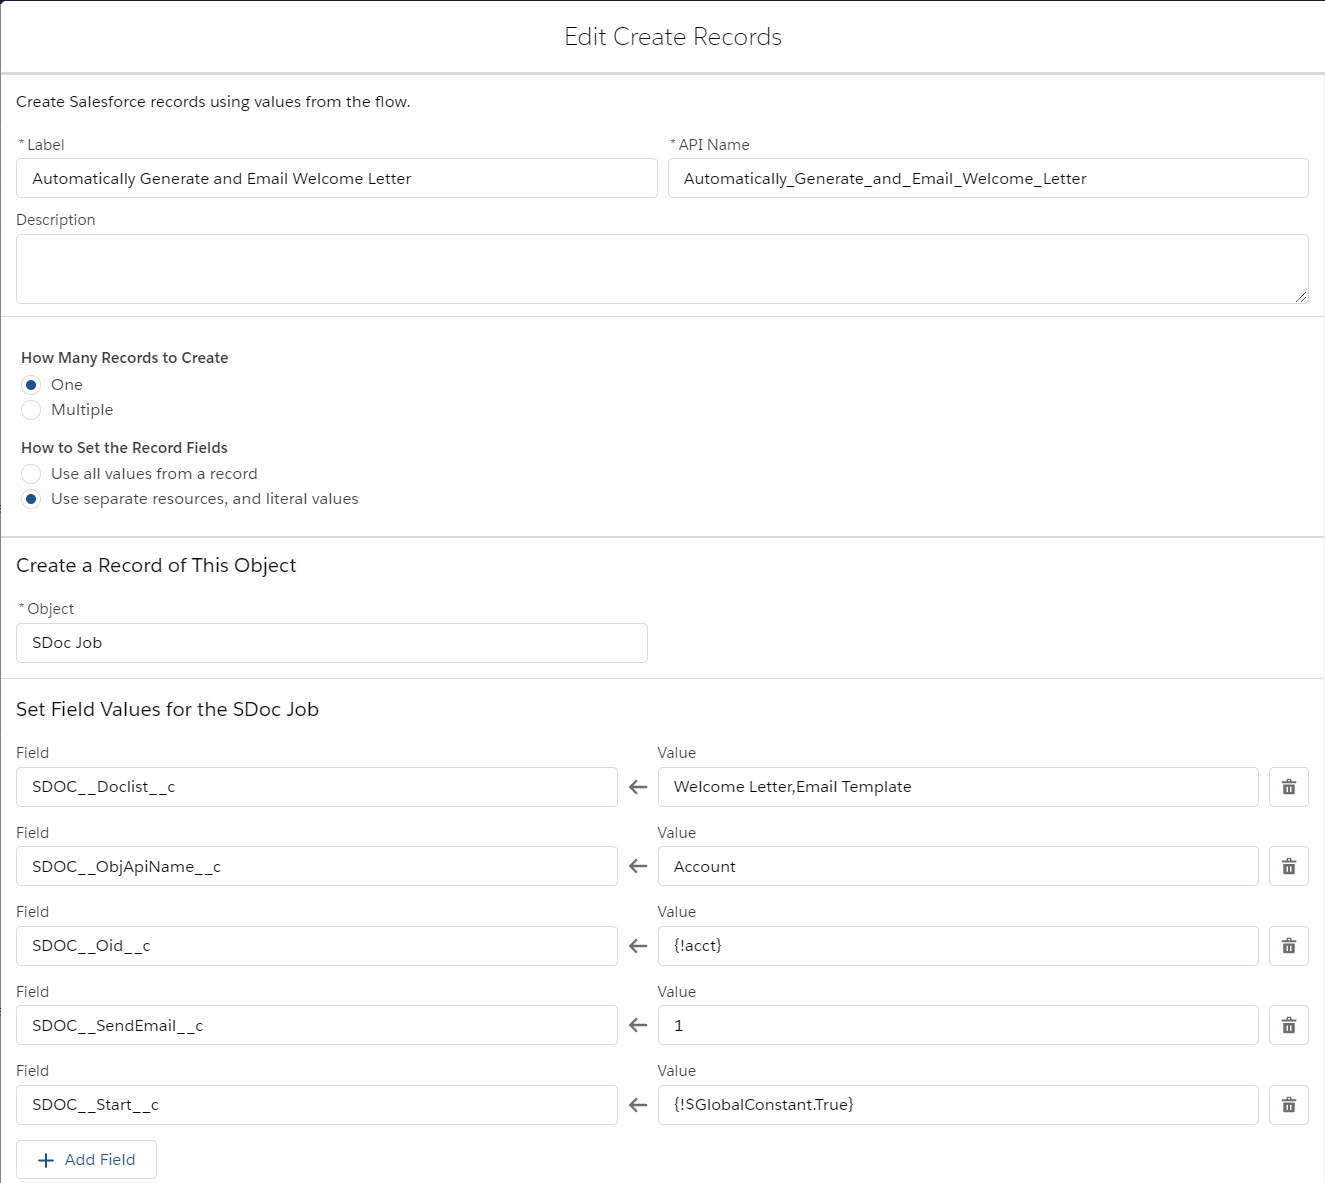
Next, we need to add a Record Create for the SDoc Job. Drag Create Records into the flow again. Insert the following information:

Name: Automatically Generate and Email Welcome Letter
Label: Automatically_Generate_and_Email_Welcome_Letter
How Many Records to Create: One
How to Set the Record Fields: Use separate variables, resources, and literal values
Object: SDoc Job

Fields & Values:

SDOC__Start__c: {!$GlobalConstant.True}
SDOC__SendEmail__c: 1 (This specifies that we wish to email the document generated by this Job record (we would type in “0“ (without quotes) if we did not wish to send an email)
SDOC__Oid__c: {!acct} This variable stores the ID of the Account record created when the “Record Create” that we made for an Account executes.
SDOC__ObjApiName__c: Account
SDOC__Doclist__c: [Insert your template names here]
Once you've saved both record creates, attach them together by clicking the circle on "Create Account" and dragging the line to the circle on "Automatically Generate and Email Welcome Letter," and attach "Start" to "Create Account."
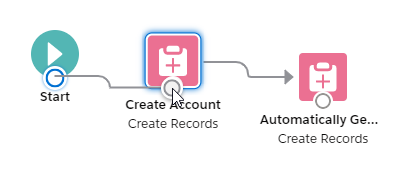
At this point, running this flow would result in an account called “New Account Example” being created, and documents for this account would automatically be generated and emailed by the S-Doc Job record created for this account.

If we wanted to, we could now start building a much larger flow involving these two Record Create boxes.

Batch Processing with S-Docs Jobs (Recommended)

S-Docs Jobs are also used to facilitate batch document processing. However, they are used behind the scenes throughout the entire process; batch processing is performed in a simple click-only interface, so you won’t have to worry about creating the Jobs themselves. This feature, in addition to the mass merge feature, is covered in detail in the S-Docs Mass Merge & Batch Document Feature documentation.

Allow S-Docs Jobs & API Calls to be Run as Another User

By Documentation, S-Docs Automation: Jobs & REST API No Comments

Introduction

This document is intended as an additional reference for allowing S-Docs Jobs to be run as a specified user. Click here for the complete guide to automating S-Docs with S-Docs Jobs.

Running S-Docs Jobs as any user is simple; getting Salesforce to allow this, however, is a bit more work. This document discusses how you can get Salesforce to allow you to run S-Docs Jobs as another user and configure Process Builder to run as another user. This setup uses JWT Bearer assertion flow to run as any user without preauthorization. The steps include adding remote site settings, creating a connected app, and linking the app details to S-Docs via a custom settings entry.

Video Tutorial

Step 1: Create Remote Site Settings

From the setup menu, type "Remote Site Settings" into the Quick Find bar, then click Remote Site Settings in the dropdown menu.

  1. Click New Remote Site. For Remote Site Name, enter whatever you'd like. For Remote Site URL, enter:
    • For production: https://login.salesforce.com
    • For sandbox: https://test.salesforce.com

Ensure that the Active checkbox is checked, and click Save.

  1. Click New Remote Site again. For Remote Site Name, enter whatever you'd like. For Remote Site URL, enter your Salesforce domain URL.
    Note: In Classic, you can copy your domain from your address bar, e.g. https://na1.salesforce.com or https://cs2.salesforce.com. In the URL, note that the number after na or cs will vary.
    In Lightning, you can copy your domain by clicking your user profile in the upper right corner, and copying it from under your username. Note that you need to add "https://" at the beginning.

Ensure that the Active checkbox is checked, and click Save.

  1. If you are using S-Docs with Communities with a custom domain, you should add a new remote site for your custom domain as well.

Step 2: Create a Self-Signed Certificate

From the setup menu, type "Certificate" into the Quick Find bar, then click Certificate and Key Management in the dropdown menu. Click Create Self-Signed Certificate.

Name your certificate SDocsCert. Click Save.

Click Download Certificate, and keep track of where the file is stored. We will use this in the next step.

Step 3: Create A New Connected App

Navigating to the Connected App creation page is a bit different in Classic and Lightning. In Lightning, type "App Manager" into the Quick Find bar in the setup menu, then click App Manager in the dropdown menu. Click New Connected App in the top right.

In Classic, type "Apps" into the Quick Find bar in the setup menu, then click Apps in the dropdown menu (under Build > Create). Scroll down to the Connected Apps section and click New.

In the Basic Information section, fill in the following fields:

Connected App Name: Sdocs Connected Apps
API Name: Sdocs_Connected_Apps
Contact Email: support@sdocs.com

Scroll down to the API (Enable OAuth Settings) section and check Enable OAuth Settings. Then, enter one of the following URLs into the Callback URL field, depending on if you're working in a sandbox or production environment:

Production: https://login.salesforce.com/services/oauth2/callback
Sandbox: https://test.salesforce.com/services/oauth2/callback

Next, check the Use Digital Signatures checkbox and upload the self-signed certificate that you downloaded in step 2.

Then, scroll down to the Selected OAuth Scopes field. Add the following scopes to your selected scopes:

  • Perform requests on your behalf at any time
  • Access and manage your data
  • Access and manage your Chatter data

This section should look similar to the following image when you are finished:

Leave the rest of the fields at their default settings, and click Save. You will be redirected to the Connected App detail page. Scroll down to the API (Enable OAuth Settings) section and click Copy next to the Consumer Key field. Paste this somewhere you can access later. You will use this key in Step 4. Then, click Manage at the top of the page.

On the next page, click Edit Policies.

Scroll down to the OAuth Policies section. Set the Permitted Users field to Admin approved users are pre-authorized. Set the IP Relaxation field in accordance with your organization's policies. Keep the Refresh Token Policy set to Refresh token is valid until revoked. Then, click Save.

Next, scroll down to the Profiles section and click Manage Profiles.

Add all user profiles that will generate documents, or be used as the "Run As" user. Click Save.

Note: We recommend only setting system administrators to "Run As" users.

Step 4: Create A New Custom Setting Entry

From the setup menu, type "Custom Settings" into the Quick Find bar, then click Custom Settings in the dropdown menu. Find SDocsSettings and click Manage.

If you've created an S-DocsSettings entry in the past, you can click the Edit link next to its name to edit it now. Otherwise, click New to create a new SDocsSettings entry.

Fill in the following values:

Name: SDocsSettings
ConnectedAppCertificateName: SDocsCert
ConnectedAppConsumerKey: Paste the consumer key that you copied in step 3
ConnectedAppLoginURL:
[Production]: https://login.salesforce.com
[Sandbox]: https://test.salesforce.com

Note: If you are using Salesforce Government Cloud, use your MyDomain URL instead of the URLS listed above.

ConnectedAppTokenURL: Paste your Salesforce domain URL. If you're not sure how to find it, refer to Step 1
ConnectedAppUserName: If you are configuring S-Sign e-signatures, enter a username to be used as the S-Sign Internal User (we recommend using an administrator's user name). The S-Sign Internal User will be the user which all S-Sign operations will be conducted by through the secure S-Docs Connected App.

Note: If you are using Salesforce Government Cloud, you also need to fill in the ConnectedAppAudienceURL field with one of the URLs listed below. This field sometimes populates with your MyDomain URL, which should not be used for this field. If your MyDomain URL populates this field, replace it with one of the 2 URLs listed below.

ConnectedAppAudienceURL:
[Production]: https://login.salesforce.com
[Sandbox]: https://test.salesforce.com

Your SDocsSettings entry should look similar to the following:


Click Save.

Step 5: Configure Your Salesforce Process, Apex Trigger, or Flow

The last step is to configure your Process, Apex trigger, or flow to populate the Run As User field on the S-Doc Job object . Please refer to the "Fields For Our Use Case" section in this article to learn more about S-Doc Job fields.

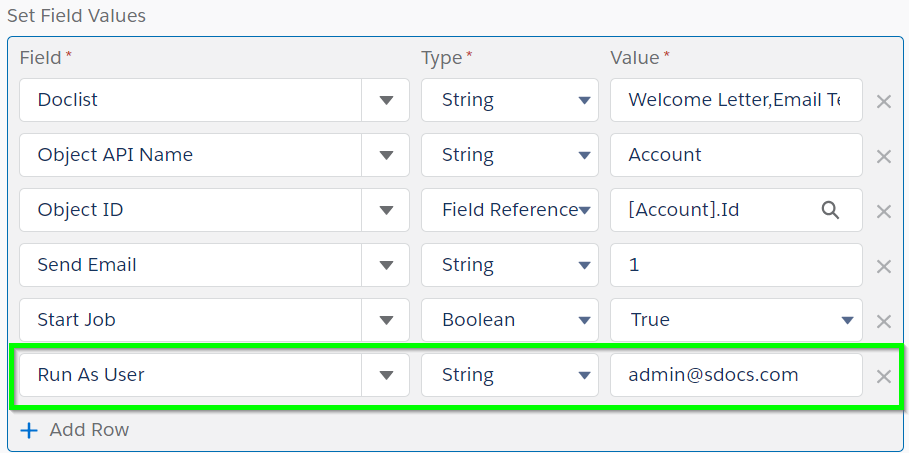
For example, if you were automating your document generation process with Process builder, you would need to add the Run As User field, set the Type to string, and enter the username of the user to be used as the running user. This is displayed in the following image:

Note: We recommend only setting system administrators to "Run As" users.

For more information on automation and S-Docs jobs, please refer to our automation guides for Salesforce Lightning or Salesforce Classic.

Upon completion, you should be able to invoke the call using any username. To verify the process, you can go to:

Setup > Administrations Setup > Monitoring > Apex Jobs.

If you require additional error handling, this should be done within your own code base.

My Self-Signed Certificate is Expiring Soon!

Several months after setting this up, you may get an email from Salesforce informing you that your self-signed certificate expired. If that is the case, you can follow the steps below to renew your certificate. We recommend doing this after hours.

1. From the setup menu, type "Certificate" into the Quick Find bar and click Certificate and Key Management in the dropdown menu.
2. Click Delete for SDocsCert.
3. Click Create Self-Signed Certificate.
4. Set Label to SDocsCert.
5. Set Unique Name to SDocsCert.
6. Click Save.
7. Click Download Certificate.

The next steps are different in Salesforce Classic and Salesforce Lightning.

For Classic:

1. From the setup menu, type "Apps" into the Quick Find bar, then click Apps (under Build > Create).
2. Scroll down to the Connected Apps section, find "Sdocs Connected Apps," and click the Edit link next to it.
3. Scroll down to Use digital signatures.
4. Click Choose File and select the previously downloaded certificate.
5. Click Save.
6 It may take several minutes for the new certificate to take affect.
7. Confirm that everything is working (test SDJobs with Mass Merge).

For Lightning:

1. From the setup menu, type "App Manager" into the Quick Find bar, then click App Manager in the dropdown menu.
2. Find the "Sdocs Connected Apps" connected app. Click the dropdown arrow on the right, and click View.
9. Click Edit at the top of the page.
11. Scroll down to Use digital signatures.
12. Click Choose File and select the previously downloaded certificate.
13. Click Save.
14. It may take several minutes for the new certificate to take affect.
15. Confirm that everything is working (test SDJobs with Mass Merge).

Troubleshooting

If you performed this setup but your S-Docs Jobs are stuck at Error - Run As User Failed, or 10%, please try the following:

  • Navigate to Setup > Custom Settings > SDocsSettings > Manage > SDocsSettings > Edit, and set ConnectedAppTokenUrl to the URL domain seen in your browser's URL bar when you're on the "home" page in Classic. Additionally, set the ConnectedAppLoginURL to one of the following:
    • Production: https://login.salesforce.com
    • Sandbox: https://test.salesforce.com
  • Navigate to Setup > Connected Apps > SDocs Connected Apps > Profiles, and verify that the profiles of the following users are added to the app's permitted profiles list:
    1. The user who inserted the job
    2. The 'Run As User'
  • Go to Setup > Remote Site Settings and verify that there are entries for the appropriate Salesforce production/sandbox URL and the customer’s home URL (Salesforce Classic). Additionally, verify that these entries are active.
  • Make sure the user's profile has the Apex REST Services permission checked.


Automation & Batch Processing Using S-Docs Jobs

By Documentation, S-Docs Automation: Jobs & REST API No Comments

Winter '20 Release Note: If you are using S-Docs below version 4.53, you may experience an "Attempt to de-reference a null object" error when interacting with various forms of automation in S-Docs. In order to fix this bug, you can create a new SDocs Settings custom settings set. To do this, type "Custom Settings" into the Quick Find / Search bar in the Setup menu, and click Custom Settings. Click SDocsSettings, then click Manage at the top of the page. From there, click New. Fill out the following information:

Name: SDocsSettings
ConnectedAppLoginURL:
Production: login.salesforce.com
Sandbox: test.salesforce.com
SD Jobs Batch Size: 45
SD Jobs Move to Top of Flex Queue:

Additionally, ensure that you have a Remote Site Setting for either login.salesforce.com (production), or test.salesforce.com (sandbox).

Introduction

If you're looking for a way to automate your document generation process--perhaps you want a document to be automatically generated and emailed when a field value has changed or a date has passed--this document will help you configure S-Docs to meet your requirements using the S-Docs Jobs object.

For example, when a user changes an opportunity stage field to “send quote,” you can configure S-Docs to generate a PDF quote along with a customized cover letter and email it to the opportunity contact. Users would not need to click on any buttons or choose any templates. Whenever the field value is changed, even from a mobile device, the process is invoked and the documents are generated and optionally emailed.

This document will show you how to use S-Docs Jobs to automate document generation in three different ways: with Salesforce Process Builder, APEX Triggers, and Visual Workflows.

If you are looking for a way to generate multiple S-Docs (in batch) from an object list view, you can accomplish this with S-Docs Jobs as well. For example, a user could select multiple records at once from a list view and send each record a custom invitation email to an event. The possibilities to further automate and distribute your documents are unlimited. Please refer to this documentation for more information about batch document generation.

Automatic Document Generation with S-Docs Jobs

An S-Docs Job is a simple, intuitive Salesforce object designed for automatically generating (and optionally emailing) documents with your custom code, Salesforce Processes, Salesforce Flows, and other integrations. We recommend you use S-Docs Jobs with Process Builder, which can do just about anything workflows can.

For use with your custom code, Salesforce Processes, or Salesforce Flows, the API name for S-Docs Jobs is SDOC__SDJob__c, and the API names for some of its relevant fields can be found in the following list. You'll use these fields later when configuring your document automation.

To automatically generate S-Docs with S-Docs Jobs, you'll be configuring your Salesforce Process, custom code, or Visual Workflow to do at least five things:

  1. Create an S-Docs Job record
  2. Specify the ID of the record you would like to generate these documents for
  3. Specify this record’s object API name (Opportunity, Account, etc.)
  4. Specify the name of the template you would like to use for document generation
  5. Optionally fill in the fields for emailing these documents. Finally, you will need to set the SDOC__Start__c field for this Job record to “true” in your APEX code or Salesforce flow to run this Job (i.e. to generate and optionally email the specified documents)

Before we see how to use S-Docs Jobs for automatic document generation, we’ll see what the Job records themselves look like.

Behind the Scenes of S-Docs Jobs

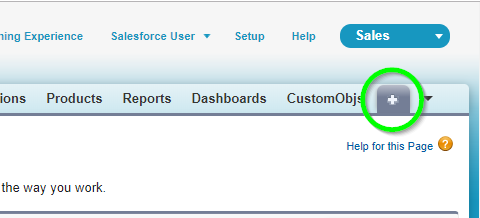
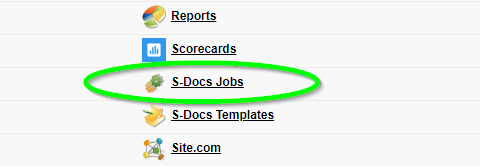
When one of the three methods (Salesforce Processes, APEX code, or Visual Workflows) creates an S-Docs Job, it is stored as an S-Docs Jobs record. To view these records, navigate to All Tabs ("+" icon), then scroll down and click S-Docs Jobs.

All S-Docs Jobs records appear here. In most (if not all) cases, we will not be creating Jobs records with the New button here; the records here should be created by your Salesforce Process, APEX triggers, Salesforce flows, etc. However, you can delete logs by opening a job record and clicking Delete (though this may also be done programmatically).


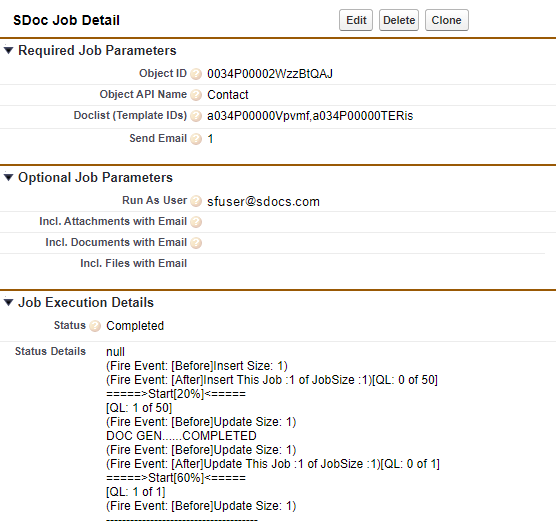
You can open a job record by clicking on the SDJob number on the left. The record will show you things like the IDs of the templates used to generate it (i.e. the Doclist), the ID of the record it generated documents for (i.e. the Object ID), and other relevant Jobs fields.


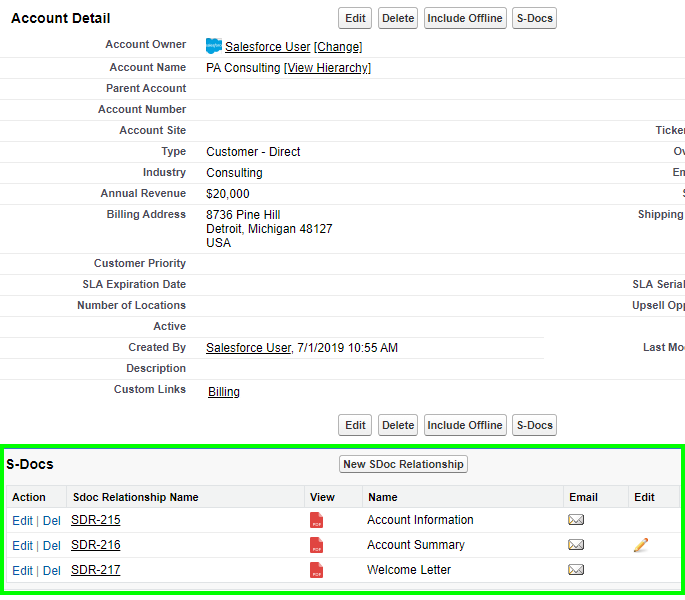
The documents the Job generated will also be included in the record. You can click on their icons under the Job Execution Details section to view them. You don't need to find the job record to view documents generated by a job, however. A related list for these documents will be automatically created on the page of the record you generated the documents for. For example, if we created an APEX trigger that would create a Job to generate three documents whenever an account record was created, we would see those three documents in that account record’s related list like so:

Note that these documents would still exist in the S-Docs related list on the account record page even if we deleted the Job that created these documents. If you wanted to delete these documents for good, you could delete them from the S-Docs related list.

Now that we’ve seen how S-Docs Jobs work behind the scenes, we can see how we might leverage their functionality with Salesforce Processes, APEX triggers, and Salesforce flows.

Use Case: Automatically Generating & Emailing a Welcome Letter Whenever an Account is Created

Consider the following use case: whenever an account is created, we would like S-Docs to generate a welcome letter for that account, and then email it to a contact associated with that account. This process can be automated in no time using S-Docs Jobs! In the three sections following this one, we will explore how to accomplish this in Process Builder, APEX triggers, and in Salesforce Flows (Visual Workflows). In all three of these scenarios, we will have to fill in the following fields in order to automate this particular case; you'll see how to use these fields once we get into each scenario.

Fields for our Use Case

SDOC__Start__c (Start Job)This will be set to ‘true’ so that the specified documents will automatically generate (and in this case, automatically email, as we have specified them to do so using the Job’s email fields) upon the creation of this particular S-Doc Job record.

SDOC__SendEmail__c (Send Email)If we set this to ‘0,’ an email will not be sent. If we set it to ‘1,’ this S-Doc Job record will email the document it generated. Thus, we will be setting this to ‘1.’

For this to work properly, our Doclist needs to include an S-Doc HTML email template. In our example, this template will use a merge field in the "Email SentTo" field (found under the Email Settings tab of the template editor) that will be dynamically populated with the appropriate contact's email address. Then, each Job record would generate a welcome letter PDF, generate an email using the HTML email template, attach the welcome letter PDF to that email, and then send that email.

SDOC__Oid__c (Object ID): This is the Object ID field, i.e. the place where we specify which object our Process/APEX Trigger/Flow should pull record IDs from. In our example, we will choose Account, since we want our process to use Account record IDs.

SDOC__ObjAPIName__c (Object API Name)This is the API name of our objects. In our example, we’re creating this trigger for new accounts, so we'll store Account in this field.

SDOC__Doclist__c (Doclist): This is the comma-delimited list of S-Docs template names that we will be using to generate our documents. Make sure there aren’t any spaces in your comma-delimited list. In our example use case, Welcome Letter is the name of our S-Docs PDF welcome letter template, and Email Template is the name of our S-Docs HTML email template. Thus, we will be using the following Doclist for our example use case Salesforce Process, APEX code, and Salesforce Flow:

Welcome Letter,Email Template

You can also use template IDs for the doclist parameter, however this is not recommended because these IDs will change between sandbox and production orgs, meaning that you will have to re-add the new template IDs into this parameter after transferring to production.

To find the template IDs for use in your Doclist field, go to the template record page for each template you're using.


The template ID can be found in the URL. You can then copy and paste this ID into your Doclist field for an S-Docs Job in your Process, APEX code, Flow, etc.

Note: If your org contains multiple templates with the same name, all of them will generate if one of them is referenced in one of your processes. In this case, you should use the template ID instead.

In the following three sections, we will see how to use S-Docs Jobs with Salesforce Processes, APEX triggers, and Salesforce Flows to automatically generate and email a welcome letter whenever an account is created.

Additional Fields

While the example use case in this article only uses 5 fields, S-Docs Jobs also support a number of other fields that you can use to further customize your process.

Email From

Email From allows you to set an org-wide email address as the From address when your S-Docs Job process includes emailing a document.

Email Params

Email Params allows you to add advanced email parameters to your process that are not available to access through standard fields on the S-Docs Job object, such as useExistingNoContactRecord=true.

Incl. Attachments with Email

Incl. Attachments with Email allows you to specify a comma-delimited list of Salesforce Attachment IDs to be included in the email sent out by the S-Docs Job.

Incl. Documents with Email

Incl. Documents with Email allows you to specify a comma-delimited list of Salesforce Document IDs to be included in the email sent out by the S-Docs Job.

Incl. Files with Email

Incl. Files with Email allows you to specify a comma-delimited list of Salesforce File IDs to be included in the email sent out by the S-Docs Job.

Include All Related Files

Include All Related Files allows you to opt to attach every file related to the base record to the email sent out by the S-Docs Job.

Using S-Docs Jobs with Process Builder

The easiest way to generate and email a welcome letter whenever an account is created is to use an S-Docs Job in a Salesforce Process. From the Setup menu, type "Process Builder" into the Quick Find / Search bar and click Process Builder.

Click New in the upper right corner to create a new process.

You can name the process whatever you want, then choose to have this process start when a record changes. Click Save.


Click Add Object, choose Account, and start the process only when a record is created.


Click Save. Then, click Add Criteria and set it to No Criteria, since we want our Job to execute every time a new account record is opened.

Then, click Add Action and choose Create a Record for our Action Type. For the Record Type, select SDoc Job. You may have to type it in to find it.

A Field Values menu will appear below. This is where you will add the five fields described above in the Fields for Our Use Case section. Click Add Row to add each new field.

Then, we click Save and click Activate at the top right of the screen.

All done! S-Docs will now automatically generate and email a welcome letter whenever an account is created.

Using S-Docs Jobs with APEX Triggers

S-Docs Jobs are also simple to use with APEX triggers. To get started, click your username in the upper right corner, then click Developer Console.

Then, navigate to File > New > Apex Trigger.

You can name the trigger whatever you want, then select Account for the sObject.

You'll see the following screen.

You can delete the text here, then copy and paste the following APEX trigger into the text field.

[code lang="html"]trigger SendWelcomeLetter on Account (after insert) {
List<SDOC__SDJob__c> jobList = new List<SDOC__SDJob__c> {};
for(Account acct : Trigger.New) {
SDOC__SDJob__c job =
new SDOC__SDJob__c(SDOC__Start__c=true,
SDOC__Oid__c=acct.Id,
SDOC__ObjApiName__c='Account',
SDOC__SendEmail__c='1',
SDOC__Doclist__c='Welcome Letter,Email Template');
jobList.add(job);
}
insert jobList;
}[/code]

This simply creates a Job Object in the APEX trigger, fills in its fields as previously discussed in the Fields for our Use Case section above, and inserts each Job into our Salesforce database. Note that SDOC__SendEmail__c is a string, so its value must be specified in single quotes. SDOC__Doclist__c and SDOC__ObjApiName__c must be specified in single quotes as well.

SDOC__Oid__c, the Object ID field, is given the value acct.Id. This means that for each account record in our loop, the S-Doc Job created for this particular account record will have this account record’s ID stored in its SDOC__Oid__c field.

Click File > Save to complete your APEX Trigger!

Using S-Docs Jobs with Salesforce Flows (Visual Workflows)

This option is a special case; say we don’t want to generate an email letter whenever an account is created anywhere in our org. Rather, we would like to generate and email a welcome letter only when an account record is created in a Salesforce Flow. Using S-Docs Jobs with Salesforce Flows is as simple as using any other object with Salesforce Flows, so this is easy to accomplish. To get to Flow Builder, type "Flows" into the QuickFind / Search bar in the Setup menu, click Flows, then click New Flow.

Create an Autolaunched Flow.

First, we need to create a new variable called “acct.” Select Manager in the Toolbox area, then click New Resource.

For the Resource Type, select Variable. Enter "acct" for the API name, and make sure the Data Type field is set to Text.

Now we need to create two Record Creates: one for an Account and one for an SDoc Job. We'll create the Record Create for an Account first. Navigate back to the Elements tab in the Toolbar, then drag Create Records into the Flow.

Insert the following information:

Label: Create Account
API Name: Create_Account
How Many Records to Create: One
How to Set the Field Records: Use separate variables, resources, and literal values
Object: Account
Field: Name
Value: New Account Example
Variable: {!acct}

Next, we need to add a Record Create for the SDoc Job. Drag Create Records into the flow again. Insert the following information:

Name: Automatically Generate and Email Welcome Letter
Label: Automatically_Generate_and_Email_Welcome_Letter
How Many Records to Create: One
How to Set the Record Fields: Use separate variables, resources, and literal values
Object: SDoc Job

Fields & Values:

SDOC__Start__c: {!$GlobalConstant.True}
SDOC__SendEmail__c: 1 (This specifies that we wish to email the document generated by this Job record (we would type in “0“ (without quotes) if we did not wish to send an email)
SDOC__Oid__c: {!acct} This variable stores the ID of the Account record created when the “Record Create” that we made for an Account executes.
SDOC__ObjApiName__c: Account
SDOC__Doclist__c: [Insert your template names here]

Once you've saved both record creates, attach them together by clicking the circle on "Create Account" and dragging the line to the circle on "Automatically Generate and Email Welcome Letter," and attach "Start" to "Create Account."

At this point, running this flow would result in an account called “New Account Example” being created, and documents for this account would automatically be generated and emailed by the S-Doc Job record created for this account.

If we wanted to, we could now start building a much larger flow involving these two Record Create boxes.

Batch Processing with S-Docs Jobs (Recommended)

S-Docs Jobs are also used to facilitate batch document processing. However, they are used behind the scenes throughout the entire process; batch processing is performed in a simple click-only interface, so you won’t have to worry about creating the Jobs themselves. This feature, in addition to the mass merge feature, is covered in detail in the S-Docs Mass Merge & Batch Document Feature documentation.

Top