Introduction
Certain S-Docs/S-Sign functions reference your org's domain/URLs. While these typically remain static, Salesforce will begin requiring the use of enhanced domains in the Winter '23 release (for Sandboxes and non-production orgs) and the Winter '24 release (for all orgs).
When your org updates to an enhanced domain, most of your application URLs change (see this Salesforce article for more information).
This article will detail the actions you need to take to take to ensure various S-Docs/S-Sign functions have access to your new enhanced domain.
How Do I Know If I'm Impacted?
When your org begins using enhanced domains, you need to take action if you're using the following S-Docs/S-Sign functionality:
- S-Docs templates that reference images stored in your Salesforce org
- S-Sign e-signatures
- S-Docs with Experience Cloud
- Certain automated processes
Please refer to each section of this article as it pertains to your usage of S-Docs/S-Sign.
How To Take Action
Images
If your S-Docs templates reference static images stored in your Salesforce org or other orgs, these image URLs may require updates in your template to reflect their new enhanced domain URLs, depending on where they are stored (local org or external org) and what template format is used.
Remote Site Settings
Regardless of template format, you need to add a new remote site setting for the base URL(s) of the static image format(s) being used in your templates. Refer to this Salesforce article for a comprehensive list of old and new base URL formats.
For example, Content (files) URLs are changing as follows:
| Old | MyDomainName--c.documentforce.com |
| New | MyDomainName.file.force.com |
If your org domain was MyOrg, you'd need to add the following remote site setting for this type of image:
https://myorg.file.force.com
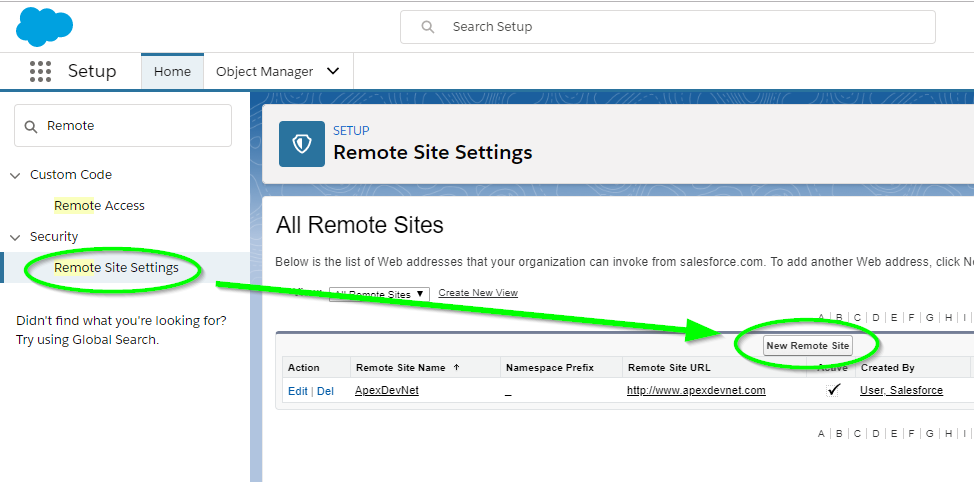
To add new Remote Site Settings, navigate to the Setup menu and type "Remote" in the Quick Find / Search bar, and click Remote Site Settings from the options that drop down. Then, click New Remote Site and add the appropriate base URL. Repeat this step for each type of image file that you use.
Images Stored In The Local Org
If your templates reference images stored in the local org, action is required based on the template format used.
PDF/HTML Templates
PDF/HTML templates with images stored in the local org require no action.
DOC/DOC-NEW Templates
DOC/DOC-NEW templates with images stored in the local org require updates. Each image URL needs to be updated with the new URL found in the Salesforce Documents folder.
The easiest way to update the URL is to first find the image(s) in your template source and copy the image ID.

Then, paste the image ID into your browser URL after lightning.force.com/, as shown below.

You will be redirected to the image's record in the Documents folder in Salesforce Classic. Right click on the image and click Copy Image Address.

Then, navigate back to your template and paste the new image URL in the image SRC tag in the template source.

Images Stored In Outside Orgs
If your templates reference images stored in outside orgs (for example, you're building a template in a Sandbox that references images stored in a Production org), action is required if the outside org has Enhanced Domains enabled.
The image URLs in your templates need to be updated with their new Enhanced Domain URLs.
To access these new image URLs, navigate to the org where the images are stored and complete the steps listed in the Images Stored in Your Local Org section of this article for DOC/DOC-NEW templates.
S-Sign
The S-Sign e-signature solution requires domain and application URLs in several places. Please take the following steps to ensure S-Sign has access to your enhanced domain.
Remote Site Settings
The S-Sign Configuration process requires adding a Remote Site Setting that references your Salesforce domain.
To update this Remote Site Setting, navigate to Setup and [1] type "Remote Site Settings" into the Quick Find bar, then [2] click Remote Site Settings in the dropdown menu. Find the Remote Site Setting created for your Salesforce domain and click Edit.

Update the Remote Site URL field with your enhanced domain.
 If you are using S-Sign with Salesforce Experience Cloud Sites, the Remote Site Setting for your Experience Cloud URL(s) needs to be updated as well.
Refer to the Experience Cloud section of this article for more information.
S-Docs Custom Settings
S-Sign references your Salesforce domain through fields in S-Docs Custom Settings to function properly.
To update these fields, navigate to Setup and type "Custom Settings" into the Quick Find bar, then click Custom Settings in the dropdown menu. Find SDocsSettings and click Manage.

Click Edit next to the SDocsSettings entry.

Update the ConnectedAppTokenURL field with your enhanced domain.

S-Sign Site
The S-Sign configuration process requires creating a Salesforce Site through which users can access and sign your documents.
When you update to an enhanced domain, the Site URL will change.
To access your new Site URL, navigate to the Setup menu and type "Sites" into the Quick Find bar, then click Sites in the dropdown menu (under User Interface > Sites and Domains).

Find your S-Sign Site and copy the URL from the Site URL field.

To provide S-Sign with your new Site URL, navigate to the S-Sign Setup page by accessing the S-Docs Setup page (App Launcher > S-Docs Setup) and clicking Go to S-Sign Setup Page.
Find the S-Sign Site URL field and [1] paste in your new Site URL, then [2] click Set Site Info & Assign Permissions.

S-Docs with Experience Cloud
If you are using S-Docs with Experience Cloud, there are a few fields to update to ensure your Connected App can successfully generate documents on behalf of your Experience Cloud users.
Remote Site Settings
The Connected App configuration process requires adding Remote Site Setting(s) that references your Experience Cloud Site URL(s) and one that references your Salesforce domain.
First, find and copy your updated Experience Cloud Site URL(s). You can find them by navigating to the Setup menu, typing "Sites" into the Quick Find bar, then clicking All Sites (under Feature Settings > Digital Experiences).

Copy the appropriate URLs from the list.

Next, navigate to Setup and [1] type "Remote Site Settings" into the Quick Find bar, then [2] click Remote Site Settings in the dropdown menu. Find the Remote Site Setting(s) created for your Experience Cloud Site URL(s) and [3] click Edit.

Paste your new Experience Cloud Site URL into the Remote Site URL field and click Save.

Navigate back to the Remote Site list and find the Remote Site Setting created for your Salesforce domain, then click Edit.
Update the Remote Site URL field with your enhanced domain.
Click Save.
S-Docs Custom Settings
Your Connected App references your Salesforce domain through fields in S-Docs Custom Settings to function properly.
To update these fields, navigate to Setup and type "Custom Settings" into the Quick Find bar, then click Custom Settings in the dropdown menu. Find SDocsSettings and click Manage.
Click Edit next to the SDocsSettings entry.
Update the ConnectedAppTokenURL field with your enhanced domain.