Introduction
When you leverage the S-Docs Mass Merge document feature, you have the power to generate a large number of documents for any object with just a few clicks. Once you enable this feature, all you have to do is select an object, select the records that you would like to generate documents for, and select the S-Docs templates for each document generated. For example, if you need to generate an account summary for every account in your Salesforce database, S-Docs can provide you with a solution in just a few simple clicks.
Additionally, the mass merge feature provides the ability to merge an entire batch of documents into a single document in a matter of seconds. As an example, if your task was to generate and print a large number of documents, you could simply perform a mass merge and print the resulting document, rather than generate a document for each record, having to download and print each one individually. When you take advantage of the S-Docs mass merge and batch documents feature, you eliminate tedious work and gain more time to focus on the bigger picture.
Video Tutorial
Preview: The Mass Merge & Batch Document Feature in Action
Before we get into the details of setting up and configuring a mass merge, we will explore this feature in action. In the following preview, we will be generating account summaries for contacts and combining the resulting batch of documents into a single printable PDF. We begin by creating a list view that lists all of our contacts with overdue accounts, and selecting all of the resulting contacts.
We then click the Add to Mass Merge List button at the top of the list view page to add these records to our mass merge list. We then click the View Mass Merge List button, bringing us to the mass merge page. Here, we can select up to 2 templates that we would like to use for this mass merge (note that the Combine All button only supports the selection of one template). In this case, we'll select the Account Past Due template, then click Go To Next Step.
On this page, we can review all of the records that we added to the mass merge list. We've added the mailing information for each of our contacts displayed in this list, but you can add any combination of relevant fields. Once we're satisfied with the records, we can click Start Mass Merge. A unique document will generate for each record in our list.
Note that there is a PDF icon next to each contact after generating the documents. A document can be downloaded by clicking on one of these icons. You can also download every document in the list by clicking Download All.
Each document is also attached to the record it was generated for; if we go to the contact record page for “Jack Rogers,” the documents will be included in the S-Docs related list on that page, where we can download and/or email each document whenever we’d like. Thus, we have generated a batch of documents for a group of contacts.
The pencil icon under the Edit Link column can be clicked to Live Edit any document in this list. This icon will only appear if the template you chose is Live Edit enabled.
At this point, we click the Combine All button in order to combine all of the generated documents into a single PDF file.
We can also print mailing labels for each of our contacts. Click here for a free mailing label template. In the "Print Labels/Envelopes" tab, all S-Docs Templates with a Document Category of "Mailing Label" will be available to choose from (if your version of S-Docs is missing "Mailing Label" from the "Document Category" picklist on the S-Docs Template object, you'll need to add it to the picklist values manually). To print mailing labels, we simply select a label template and click Print Labels/Envelopes to download a single DOC containing all of the mailing labels for easy printing.
Once we download our mass merged PDF and mailing label, we print them and that’s it! We have just printed cover letters, account summaries, and mailing labels for ten contacts with overdue accounts in just a few clicks, and we can now mail these documents to the contacts in question.
In the remainder of this guide, we will be setting up the buttons, pages, and lists that will enable the mass merge and batch document features for a particular Salesforce object.
STEP 1: Setting up S-Docs Mass Merge
Setting up mass merge in S-Docs requires a Visualforce page (one for each object used in mass merge) and a single Apex class, which we've provided here.
Note that you'll only have to create the page SDMassMerge once for all the objects you are setting up mass merge on. However, you will need to set up the Visualforce page for each object you are setting up mass merge on.
Create a new Apex class. To get this page, navigate to the Setup menu and type Apex Classes into the Quick Find bar. Click Apex Classes (under Custom Code) and then click New.
Paste in the following code (you only need to create this class once):
public class SDAddToMassMerge { private ApexPages.StandardSetController stdSetController; public SDAddToMassMerge(ApexPages.StandardSetController sscOther) { stdSetController = sscOther; } public PageReference createMassMergeJobs() { String objectName = ApexPages.currentPage().getParameters().get('objectName'); Boolean showHeader = ApexPages.currentPage().getParameters().get('showHeader') != 'false'; List<SDOC__SDJob__c> addToMassMerge = new List<SDOC__SDJob__c>(); List<SObject> selectedRecords = stdSetController.getSelected(); if (Test.isRunningTest()) { selectedRecords = new List<SObject> { new Contact(LastName='Test') }; } for (SObject selectedRecord : selectedRecords) { SDOC__SDJob__c massMergeJob = new SDOC__SDJob__c( SDOC__Oid__c = String.valueOf(selectedRecord.get('Id')), SDOC__runAs__c = UserInfo.getUserName(), SDOC__Status__c = 'Selected', SDOC__type__c = 'Bulk Job - List View', SDOC__objAPIName__c = objectName ); addToMassMerge.add(massMergeJob); } insert addToMassMerge; Integer batchSize = Database.countQuery( 'SELECT COUNT() FROM SDOC__SDJob__c WHERE ownerid=\'' + String.valueOf(UserInfo.getUserId()) + '\'' + ' AND SDOC__Type__c=\'Bulk Job - List View\'' + ' AND SDOC__ObjApiName__c=\'' + objectName + '\'' ); PageReference massMergePage = new PageReference( + '/apex/SDOC__SDJobContact' + '?numRecordsAdded=' + String.valueOf(addToMassMerge.size()) + '&batchSize=' + batchSize + '&objectName=' + objectName + '&showHeader=' + showHeader + '&sidebar=false' + '&tab=2' ); return massMergePage; } }
Your Apex Class should look like this:
Click Save.
Next, for each object that users will perform mass merge on, you'll need to create a Visualforce page. Navigate to the Setup menu and type Visualforce Pages into the Quick Find bar. Click Visualforce Pages, then click New.
Create a new Visualforce page called SDAddToMassMergeCHANGE_TO_YOUR_OBJECT_NAME using the following code:
<apex:page standardController="OBJECTAPINAME" showHeader="false" extensions="SDAddToMassMerge" recordSetVar="selected" action="{!createMassMergeJobs}"> <div style="display:none;"> <apex:pageBlock > <apex:pageBlockTable value="{!selected}" var="r"> <apex:column value="{!r.Id}" /> </apex:pageBlockTable> </apex:pageBlock> </div> </apex:page>
Make sure Available for Lightning Experience... is checked. For example, if your object API name is Check__c, your Visualforce Page should look like this:
If you require test coverage for the SDAddToMassMerge class, you can use the following test class (replacing all references to Opportunity with your object):
@isTest private class SDAddToMassMergeTest { @isTest private static void SDAddToMassMergeTest() { Integer numJobsToCreate = 20; List<Opportunity> selectedOpportunities = [ SELECT Id, Name FROM Opportunity LIMIT :numJobsToCreate ]; ApexPages.StandardSetController ssc = new ApexPages.StandardSetController(selectedOpportunities); ssc.setSelected(selectedOpportunities); SDAddToMassMerge sdatmm = new SDAddToMassMerge(ssc); String objectNameTest = '[SDAddToMassMerge Test]'; sdatmm.createMassMergeJobs(); Integer numJobsCreated = Database.countQuery( 'SELECT COUNT() ' + 'FROM SDOC__SDJob__c ' + 'WHERE SDOC__ObjApiName__c=\'' + objectNameTest + '\'' ); // System.assert(numJobsCreated == numJobsToCreate); } }
To recap:
- Create only one Apex class
- Create a Visualforce page for each object (and later a button for each object)
For example, after you performed these steps for 3 different objects, you would have created 3 Visualforce pages (one for each object), but just one Apex class (this class would control all 3 pages).
STEP 2: Create the Mass Merge button
1. Now, navigate to the “Buttons, Links, and Actions” page for the Salesforce object that you would like to use in a mass merge.
In Salesforce Lightning, simply navigate to Setup > Object Manager > Your Object > Buttons, Links, and Actions > New Button or Link.
In Salesforce classic, the instructions for custom and standard objects are a bit different.
a.) Custom Objects
Navigate to the Setup menu and type Objects into the Quick Find bar. Click objects, then find the name of the custom object that you would like to use in a mass merge. Click the name of the object (do not click the edit button). In this example, we will be creating an Add to Mass Merge List button for the Check object, a custom object representing the data for a standard business check.
Next, a page will display for your custom object.
On the page for your custom object, scroll down to “Buttons, Links, and Actions” and click New Button or Link. This concludes part (a).
b.) Standard Objects
Navigate to the Setup menu and type the name of your standard object into the Quick Find bar. Find and click on Buttons, Links, and Actions in the dropdown menu. Then, click New Button or Link.
At this point, please note the API name for your standard object:
Note that the API name is the same as the object name for all objects except for products; for a product, the API name will be Product2. This concludes part (b).
2. We will now define our button. For the fields listed on the “New Button or Link” page, please use the following:
Label: Add to Mass Merge List
Name: Add_to_Mass_Merge_List
Display type: List Button (please ensure that Display Checkboxes (for Multi-Record Selection) is checked as well)
Behavior: Display in Existing Window without Sidebar or Header
Content Source: URL
URL:
/apex/SDAddToMassMergeCHANGE_TO_YOUR_OBJECT_NAME?objectName=CHANGE_TO_YOUR_OBJECT_API_NAME
Once completed, the page should appear as follows:
STEP 3: Add Button to Search Layout
1. You will now need to edit the list view page for your object.
In Salesforce Lightning, simply navigate to the object manager page for your object and click Search Layout for Salesforce Classic in the sidebar. Find the List View layout and click Edit, then add the Add To Mass Merge List button to the layout.
In Salesforce classic, the instructions for custom and standard objects are a bit different.
a.) Search Layouts For Custom Objects
Navigate to the Setup menu and type Objects into the Quick Find bar. Click Objects, then find the name of the custom object that you would like to use in a mass merge. Click the name of the object (do not click the edit button). In this example, we will be using the Check object.
Now, scroll down to the Search Layouts table. Click Edit next to the layout titled “[Object Name] List View,” where [Object Name] is the name of your object (excluding brackets).
This concludes part (a).
b) Search Layouts for Standard Objects
Navigate to the Setup menu and type the name of your standard object into the Quick Find bar. Find and click on Search Layouts in the dropdown menu. Then, click Edit next to the layout titled “[Object Name] List View,” where [Object Name] is the name of your object (excluding brackets).
2. Now that you’re on the Edit List View page for your Object, select Add to Mass Merge List under “Available Buttons” and click the rightward-pointing arrow below Add to add your button to “Selected Buttons.” Repeat this step for “View Mass Merge List” if you created a button for it. Click Save.
The finished page should appear as:
This concludes part (b).
STEP 4 (Optional): Create a List View for Your Object
1. In Salesforce Lightning, navigate to your object's tab. In this example, we will be navigating to the tab for our Check object. Under List View Controls (represented by a cog), click New.
Enter a descriptive view name. The list API name will auto-populate.
The filters menu will pop up. Change the Filter By Owner field to All Checks.
Next, click New Filter. Set the Field to Amount, the Operator to less than, and the Value to 10000. Then click Save. This means that our list will only include Checks written for amounts of less than $10,000.
Next, click the List View Controls again, then click Select Fields To Display.
Choose your fields. In this case, we'll add Payable To and Amount.
To do the same in Salesforce classic, navigate to the tab for your object. Our Check object happens to be displayed as a default tab, but if it weren’t displayed, we could click the All Tabs button ("+" symbol) and find it from there:
Click Create New View on our Object’s page:
On this screen, you can enter your View Name, Filters, and Fields to Display.
You will be redirected to the resulting List View. In our Check Example, our list does not contain checks 2 or 3 as their “Amount” fields are greater than or equal to $10,000. Click the checkbox on the right if you would like to select all the records to be added to the mass merge. You can also select or deselect them individually.
Note that we have our “Payable To” and “Amount” fields displayed in case we want to manually exclude a certain Payee’s check or a check of a certain dollar amount from our mass merge list. If we didn’t want to include one of these checks in our mass merge, we uncheck it. In this example, suppose that after filtering out checks with values greater than or equal to $10,000, we decided not to include the check paid to the order of Salesforce User. Since we included the “Payable To” field as a column, we don’t have to open all three records to see which one will be paid to Salesforce User; we can simply eyeball the list and uncheck the record corresponding to him. Then, this check will not appear in the resulting mass merge.
STEP 5: Use the Mass Merge & Batch Document Feature
Before we use the mass merge and batch document feature, you should make sure that the list of S-Docs Jobs logs is clear. This isn't required, but helps keep the system clean. S-Docs Job records are created when you add records to a mass merge list; by default, they are not deleted after every mass merge. You can choose to enable this functionality in the template editor for the template that you're using with mass merge under the document options tab. Otherwise, let’s see how we can clean up the S-Docs Jobs log list manually. Navigate to the S-Docs app and click over to the S-Docs Jobs tab.
Select any jobs and click Delete Logs.
Now we can perform our mass merge. Navigate to your object and select a list view. In our Check example, we selected the list view “Checks Less Than $10,000” that we created in Step 5. Select the records that you would like to use for the mass merge and batch document feature. Then, click Add to Mass Merge List
This will bring you to the Mass Merge page. You'll begin on the Add Records tab, where you can modify the records you'd like to include in your mass merge. Note that records in your mass merge list won't be "checked" on this page; a complete list of records in the list can be viewed on the Generate Docs tab.
If everything looks correct, you can click over to the Choose Templates tab to choose your template.
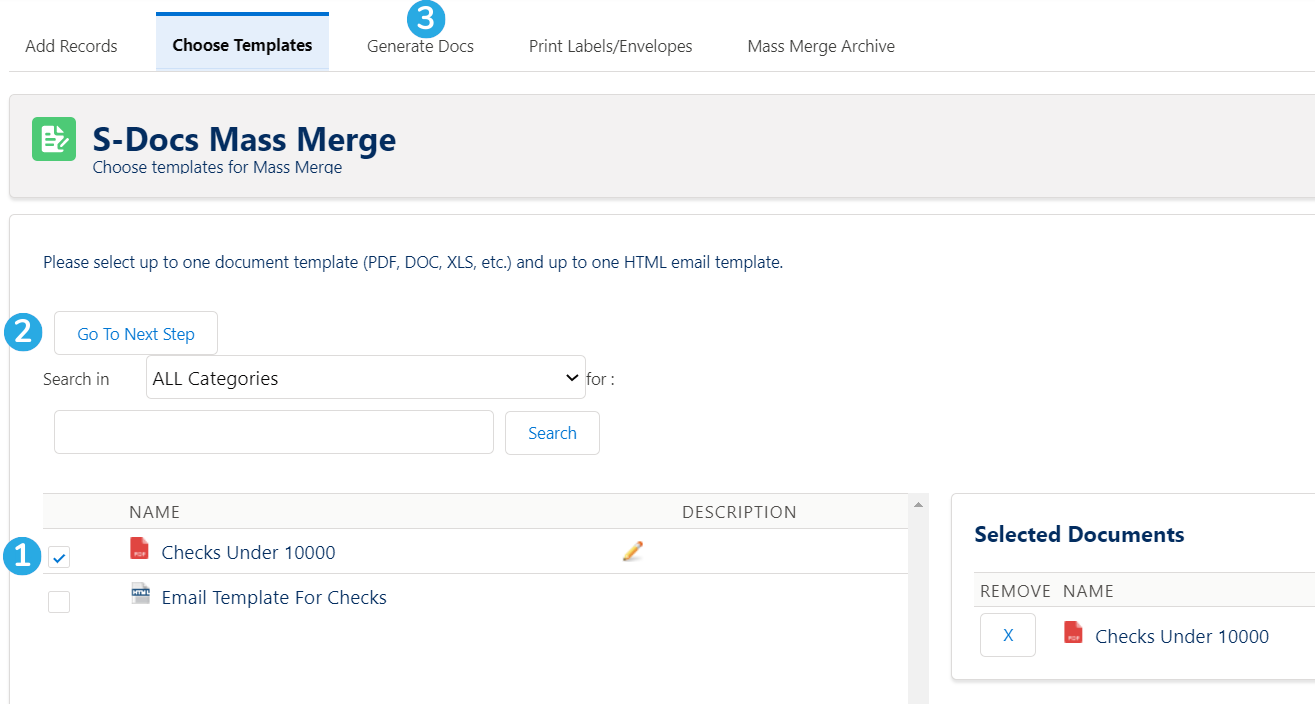
First, [1] select the template you would like to use. You can select one document template and one HTML email template. If your template list is extensive, use the tools above to filter templates by category or keyword. Then, [2] click Go To Next Step. You can also [3] click on the Generate Docs tab to go to the next step; both buttons will take you to the same place. The tabs make it convenient to jump between different steps. The Generate Docs tab will appear as follows.
As you can see, [1] the records we selected are listed in the mass merge list. To begin the process, [2] click Start Mass Merge. When you click this button, you'll be able to [3] view the status of each document as it generates. If the template is Live Edit enabled, [4] the Edit Link column will populate with pencil icons when the documents are finished generating, allowing you to edit each one individually.
If you want to log an activity on each record, [5] check this box.
Finally, [6] click Start over if you want to return to the beginning of this process.
Here's what your finished mass merge will look like.
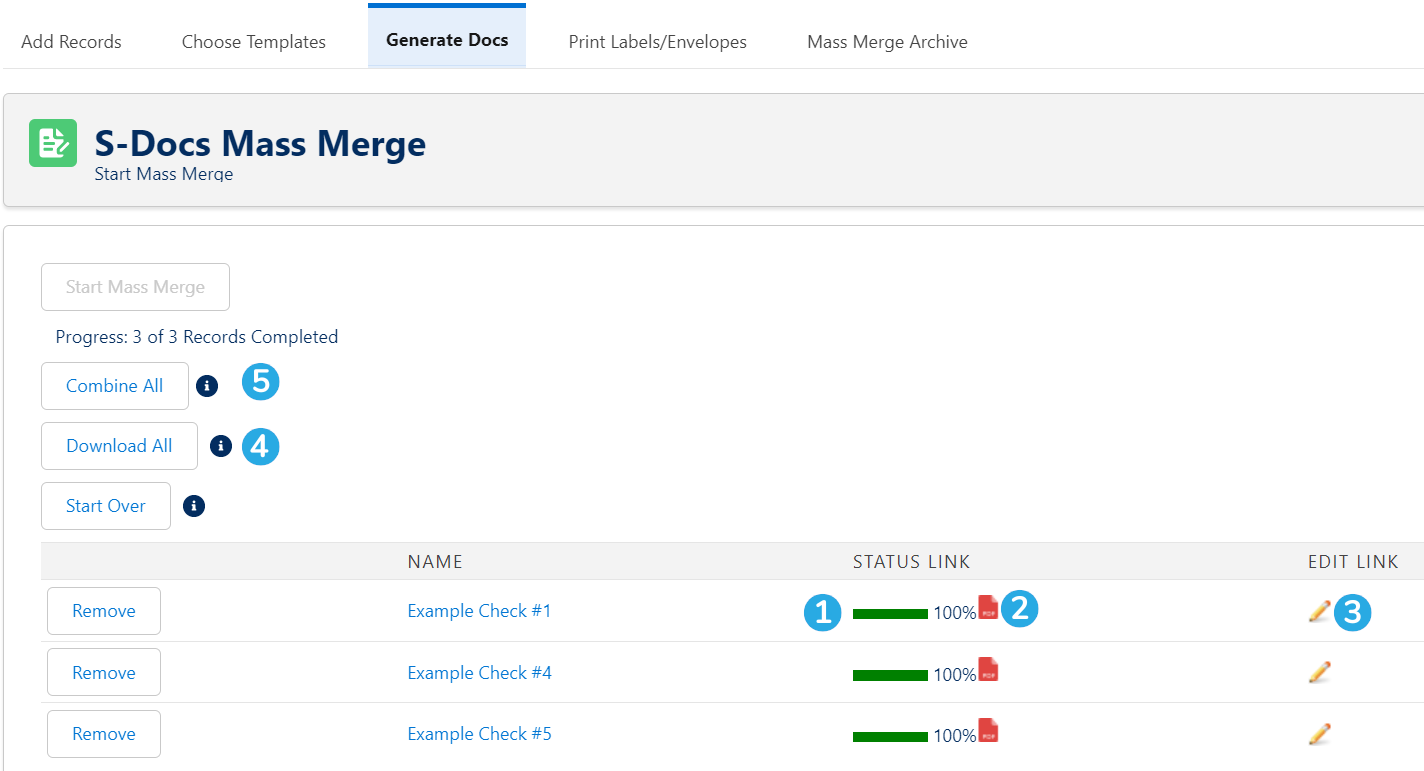
All records [1] have a Status Link of 100%, meaning the checks successfully generated. You can now [2] click the PDF icon next to each one to view the documents, or [3] click the pencil icon in the Edit Link column to edit the documents, since the template used was Live Edit enabled.
Additionally, you can now [4] click Download All to download each document separately, or [5] click Combine All to merge each document into a single PDF. Let's click this button.
In our check example, we will open the PDF that downloaded after clicking Combine All. As expected, the PDF contains both of our checks, each on its own page.
Special Use Cases
Customize Mass Merge with Apex Parameters
You can customize the behavior of the Add To Mass Merge List button by adding certain apex parameters to the pagereference section of your Mass Merge apex class. The table below explains the parameters. Refer to the image below the table for guidance on adding these parameters to your own mass merge class.
Generating and Emailing a Large Number of Documents
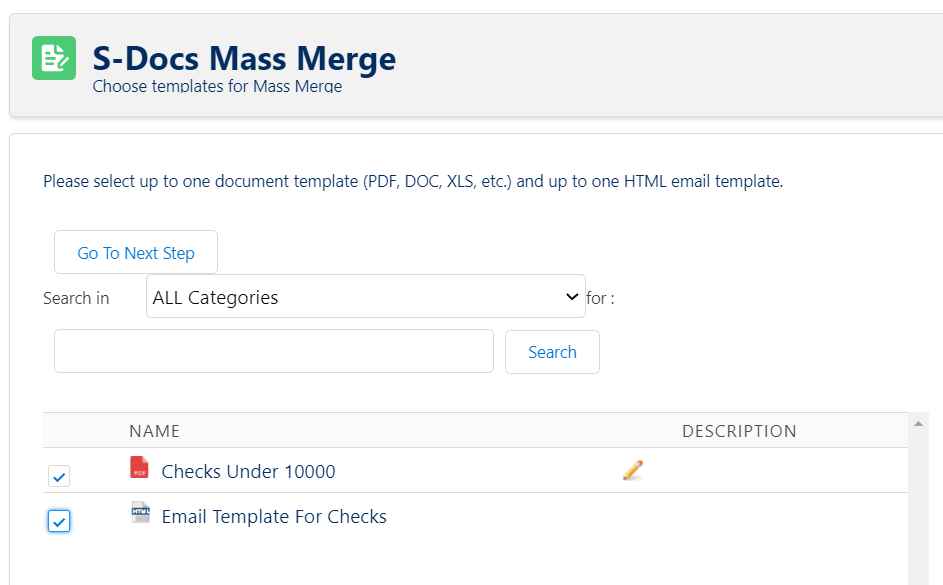
If you would like to generate and email a large number of documents, you can do so by selecting two templates in our mass merge: one template for the document you’d like to email, and another template for the email itself. Thus, to generate and email a large number of documents, all you have to do is select an S-Doc HTML email template and an S-Doc template for a PDF, Word document, etc. on our mass merge page, click Go to Next Step and then click Start Mass Merge. That’s it! S-Docs will then use the information in the HTML email template to send a personalized email to each record in our mass merge list; each of these emails will include the document that was generated for that particular record.
Generating and Printing Mailing Labels for your Mass Merge
If you plan on performing a mass merge, printing the resulting PDF, and mailing out the pages, you can use S-Docs to print off mailing labels for your letters. To do so, you first have to create a new S-Docs template for your mailing label (click here for a free mailing label template). Please make sure your template has the "Document Category" field set to "Mailing Label" (if your version of S-Docs is missing "Mailing Label" from the "Document Category" picklist on the S-Docs Template object, you'll need to add it to the picklist values manually), and that your mailing label template has User as its "Related To Type" and DOC or PDF as its output type; this is because S-Docs populates the mailing label list on the mass merge page with all S-Docs templates that meet these criteria.
You can copy and paste the following mailing label template into your label template’s source editor:
<!--{{! <LineItemsSOQL> <class>none</class> <prefix> <table> <tr> </prefix> <soql>Select name, mailingstreet,mailingcity, mailingstate, mailingpostalcode from contact where id in (select SDOC__Contact__c from SDOC__SDJob__c where ownerid = '{{!User.id}}')</soql> <column prefix="<td><div><table><tr><td>" nullprefix="<td><div><table><tr><td>" newrow="3">name</column> <column prefix="<br />" nullprefix="<br />">mailingstreet</column> <column prefix="<br />" nullprefix="<br />">mailingcity</column> <column prefix=", ">mailingstate</column> <column prefix=" " postfix="</td></tr></table></div></td>" nullpostfix="</td></tr></table></div></td>" >mailingpostalcode</column> <postfix> </tr> </table> </postfix> </LineItemsSOQL> }}-->
This template will print mailing labels for a list of contacts.
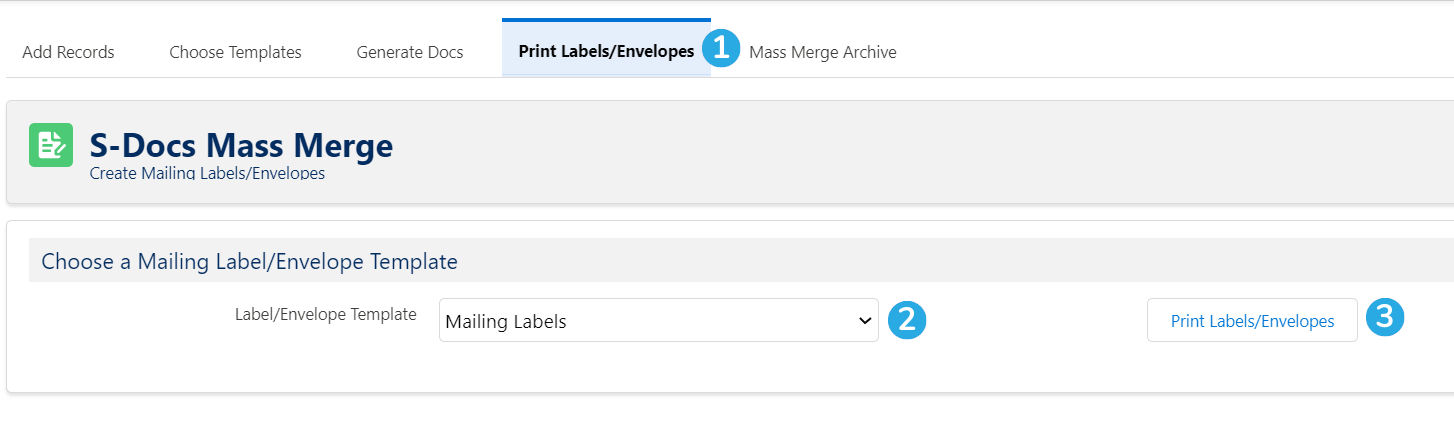
On the mass merge page, click over to the [1] Mailing Labels tab, [2] select your mailing label template, then [3] click Print Labels/Envelopes.
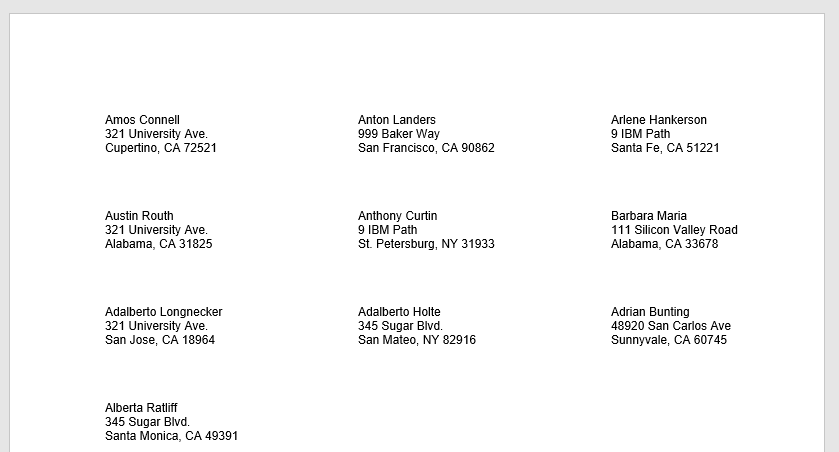
This will generate and download a printable mailing label.
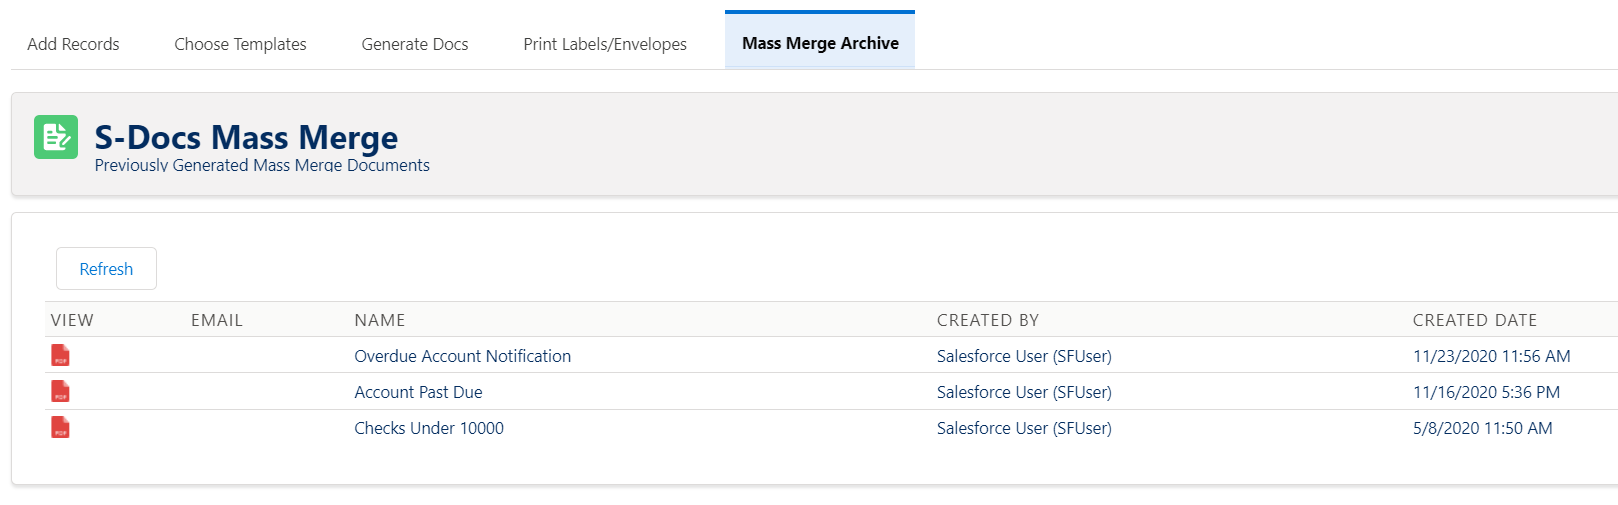
Mass Merge Archive
In the Mass Merge Archive tab, you can find previously generated and consolidated mass merge documents. You can click the PDF icon to view, print, or download these documents.
Automating The Mass Merge Process
If your use case involves:
- Selecting all records from a list view (not selecting certain records and excluding others)
- Combining the generated documents into a single document
You can automate this process by using a template with a special LineItemsSOQL statement that generates a component template for each record returned by the statement, in place of the Mass Merge feature.
For example, the following LineItemsSOQL statement would generate an Account Summary template for each overdue Account record.
<!--{{!<LineItemsSOQL> <component>Account Summary</component> <splitEvery>30</splitEvery> <soql>SELECT Id FROM Account WHERE Overdue__c=true</soql> </LineItemsSOQL>}}-->
Each Account Summary would be included in one single consolidated document. This template could then be used in an S-Docs Jobs workflow, or with a one click button to achieve the desired level of automation.
Click here to learn more about this feature.
Appendix
Finding the API names for Your Standard Object’s Fields
In Salesforce Lightning, navigate to the Setup Menu, then find your object in the Object Manager. Navigate to the Fields and Relationships tab. All of the field API names will be available under the Field Name column.
In Salesforce Classic, navigate to Setup > Build > Customize > YourObjectNameHere > Fields.
For standard field names, the API names are found under the Field Name column.
For Custom Fields, the API names are found under the “API name” column in the section below.
Finding the API names for Your Custom Object’s Fields
In Salesforce Lightning, navigate to the Setup Menu, then find your object in the Object Manager. Navigate to the Fields and Relationships tab. All of the field API names will be available under the Field Name column.
In Salesforce Classic, navigate to Setup > Build > Create > Objects and click the name of your object (do not click the Edit button).
On the page for your custom object, scroll down to the “Standard Fields” and “Custom Fields & Relationships.” The API names for [1] Standard Fields will be located under the Field Name column, and [2] the API names for Custom Fields will be located under the API name column.
Set Apex Class Access from Profiles
If users are unable to access the mass merge page, you may need to add their profile to the mass merge apex class. Click here for instructions on how to do so.
Tags: Automation, Mass Merge, S-Docs Jobs, Template Editor