All Posts By

S-Docs Team

Formatting Phone Fields

By Documentation, General Solutions, S-Docs Cookbook No Comments

Introduction

S-Docs provides a number of different options for formatting Salesforce phone fields in your documents.

You can use any of the formatting options described in the Syntax section of this article. Simply replace the formatting shown below with your desired formatting.

For merge fields, place your formatting within the curly braces after the field syntax, as shown below.

[code lang="html"]{{!Contact.mobilephone ###-###-####}}[/code]

For related lists, use the format-number column attribute to add your phone field formatting, as shown below.

[code lang="html"]<column format-number="###-###-####">Contact.mobilephone</column>[/code]

Syntax

S-Docs accepts the following phone field formatting:

For 10-Digit Numbers

[code lang="html"]###-###-####
(###)###-####
(###) ###-####
(###)-###-####
###.###.####
### ### ####[/code]

For 11-13 Digit Numbers

[code lang="html"]+### ###-###-####
+### (###)###-####
+### (###) ###-####
+### (###)-###-####
+### ###.###.####
+### ### ### ####[/code]

Note: You can use the formatting for 11-13 digit numbers with 10-digit phone number fields to add a +1 to the beginning of the number.

Considerations

  • If your phone field is populated with an 11-13 digit number, but the formatting doesn't include +### at the beginning, it will be merged into your document in its original formatting.
  • Only 10-13-digit numbers are supported. If your phone field is populated with a number that has less than 10 digits or greater than 13 digits, it will be merged into your document in its original formatting.


DOC-NEW

By Documentation, General Solutions, S-Docs Cookbook No Comments

Introduction

The DOC-NEW template format allows you to create .doc templates with separate sections that behave like next-page section breaks in Microsoft Word. Sections are subdivisions of a single document and can be formatted separately from one another; for example, one section can be landscape while the other is portrait. The DOC-NEW template format provides a section-based editor that makes it easy to create and edit different sections.

Access DOC-NEW

Note: DOC-NEW is available in S-Docs version 4.317 and above.

To access the DOC-NEW template format, you'll need to add it as a Template Format value on the SDoc Template object. From the setup menu, navigate to the Object Manager and find the SDoc Template object.

Next, navigate to the Fields and Relationships tab, and click on the Template Format field.

Scroll down to the Values section and click New. Type DOC-NEW into the text box, then click Save.

You've now successfully added the DOC-NEW option to the Template Format field. To create your first DOC-NEW template, simply select this option as your template format.

Convert DOC Templates to DOC-NEW

Note: The DOC-NEW conversion functions are available in S-Docs version 4.356 and above.

To quickly convert all existing DOC templates to the DOC-NEW format, you can run the following function in the Execute Anonymous window in the Developer Console:

[code lang="html"]SDOC.SDUtil.convertDOCTemplatesToDOCNEW();[/code]

Your original DOC templates will be cloned and saved as a backup.

To convert a subset of DOC templates to the DOC-NEW format, you can specify a WHERE clause as an input to the function. For example, the following function would convert all DOC templates with the string "to be converted" in their names.

[code lang="html"]SDOC.SDUtil.convertDOCTemplatesToDOCNEW('Name LIKE \'%to be converted%\'');[/code]

Using DOC-NEW

The DOC-NEW template editor is broken up into three elements: Page Settings, Section Content, and Conditional Logic. Let's examine each of these elements now.

Page Settings

The dedicated Page Settings tab is absent from the DOC-NEW template editor. Instead, the DOC-NEW template editor's page settings appear at the top of each section as follows:

The Page Settings element allows you to:

[1] Delete the section.
[2] Edit the section's units of measurements, page width, and page height. The page width and height can be used to change the section's orientation; for example, by default a section is set to 8.5 x 11 inches, or portrait orientation. Altering these measurements to 11 x 8.5 inches would change the section to landscape orientation.
[3] Edit the section's margins.

Note: The Unit of Measure setting applies to all measurements in the Page Settings.

Section Content

The Section Content element allows you to edit the header, body, and footer of each section. It appears as follows:

You can add content into a section's three editors just like you would in any other S-Docs template, including merge fields, related lists, and component templates. You can also edit the template source in each section's three editors.

Note: CSS applied in one editor will only apply to content in that editor. For example, if CSS is added to the footer of section 1, it will only affect content in the footer editor of section 1.

Conditional Logic

The Conditional Logic element allows you to input conditions that dictate whether or not a section is rendered in the final document. It appears as follows:

[1] Input your render conditions into this field using the same syntax as the S-Docs Conditional Logic feature, omitting the render tags. If conditions in this field evaluate to "true," the section will be included in the final document; otherwise, it will be omitted.
[2] This element also allows you to create a new section by clicking Add New Section.

Creating New Sections

When you create a new section by clicking Add New Section at the bottom of the section editor, you'll see a few more options appear for every section.

[1] Change a section's position in the document by using the Move Section Up and Move Section Down buttons.
[2] Reuse page settings defined in another section. Choosing another section's page settings will hide the page settings options in the current section.
[3] Reuse another section's header and footer. Choosing another section's header or footer will hide the header and footer editors in the current section, respectively.

Note: When using a header or footer across multiple sections, ensure the same page settings are applied to each section.

That's all there is to it! DOC-NEW gives you the flexibility of creating section-based templates without ever leaving Salesforce.


Automate S-Sign Requests

By Documentation, S-Sign No Comments

Introduction

S-Sign requests can be configured to automatically generate and send after any platform-triggering event in Salesforce. For example, when a user changes an opportunity Stage field to Proposal/Price Quote, you can configure S-Sign to generate and send an e-signature request to all of the Opportunity Contact Roles related to that Opportunity. Users would not need to click on any buttons or choose any templates; whenever the field value is changed, even from a mobile device, the process is invoked and the document is sent for signature.

This article will help you configure S-Docs to meet your requirements using the S-Docs Jobs object in conjunction with one of two Salesforce automation options: Process Builder and Apex triggers.

If you'd like to learn more about the S-Docs Job object and the different automation options offered by S-Docs, please visit our automation guide.

Note: Currently, automating S-Sign with S-Docs Jobs only supports sending 1 PDF for signature per request.

Example Use Case

To walk through setting up automation for S-Sign, we will be using the following example use case:

Whenever the custom checkbox field Send Renewal Agreement is checked on an Account record, S-Sign will automatically generate and send a renewal agreement PDF for signature to all Contacts related to that Account.

Note: While this article details setting up automation, there are a few more steps involved in configuring your S-Sign template to route to each Contact related to your Account record. Please visit Build Templates with a Dynamic Number of Signers to learn more.

This article will demonstrate how to accomplish this using S-Docs Jobs in conjunction with Process Builder and Apex triggers. Both automation options will utilize the following 5 fields on the S-Docs Job object.

Fields for Our Use Case

Field Description
Start Job

(SDOC__Start__c)

This field will invoke the S-Doc Job so that the documents included in the S-Sign request can generate. It will be set to ‘true’.
Doclist

(SDOC__Doclist__c)

This is the comma-delimited list of S-Docs template names that we will be using to generate our documents. Make sure there aren’t any spaces separating each template in your comma-delimited list. In our example use case, Renewal Contract is the name of our S-Sign PDF template, and Email Template is the name of our S-Sign HTML email template. Thus, we will be using the following Doclist for our example use case:

Renewal Contract,Email Template

Object ID

(SDOC__Oid__c)

This is the Object ID field, i.e. the place where we specify which object our Process/Apex Trigger should pull record IDs from. In our example, we will choose Account, since we want our process to use Account record IDs.
Object API Name

(SDOC__ObjAPIName__c)

This is the API name of our object. It will be set to Account.
Send Email

(SDOC__SendEmail__c)

This field will automatically email the S-Sign request. It will be set to '1.' If this field was set to '0,' the S-Sign request would not be emailed.

For this to work properly, our Doclist needs to include an S-Sign enabled HTML email template.

Note: You can also use template IDs for the doclist parameter, but this is not recommended because template IDs are not consistent between sandbox and production orgs, meaning that you will have to re-add new template IDs into this parameter after transferring your process to production. However, if you have multiple templates with the same name in your org, all of them will generate once your process/trigger is invoked. In this case, template IDs may be better suited.

Automate S-Sign with Process Builder

Process Builder is the easiest option for automating S-Sign requests. To begin, navigate to the Setup menu, type "Process Builder" into the Quick Find bar, and click Process Builder.
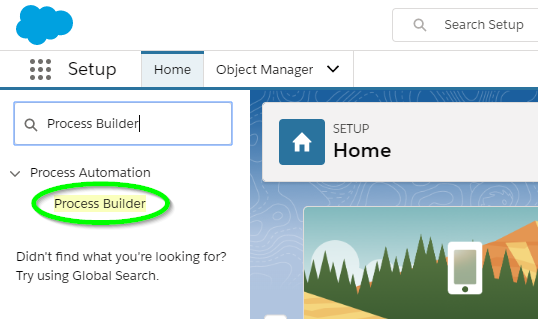
Click New in the top right corner to create a new process.

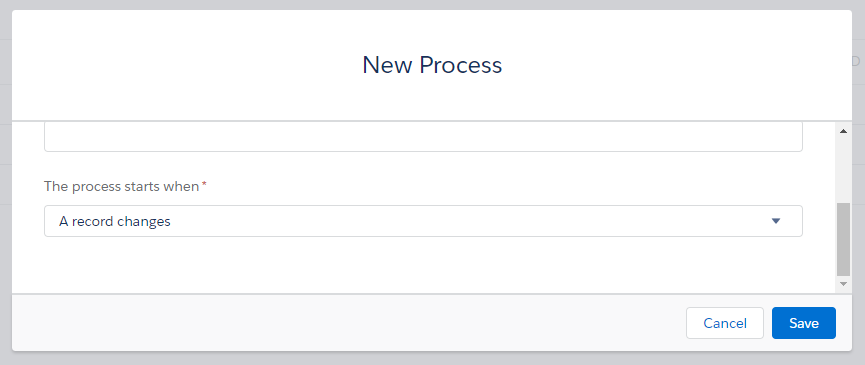
You can name the process whatever you'd like, then choose to start the process when a record changes. Click Save.
Click Add Object, choose Account, and start the process when a record is created or edited, since our process will be invoked when our custom checkbox field is checked. Then, click Save.

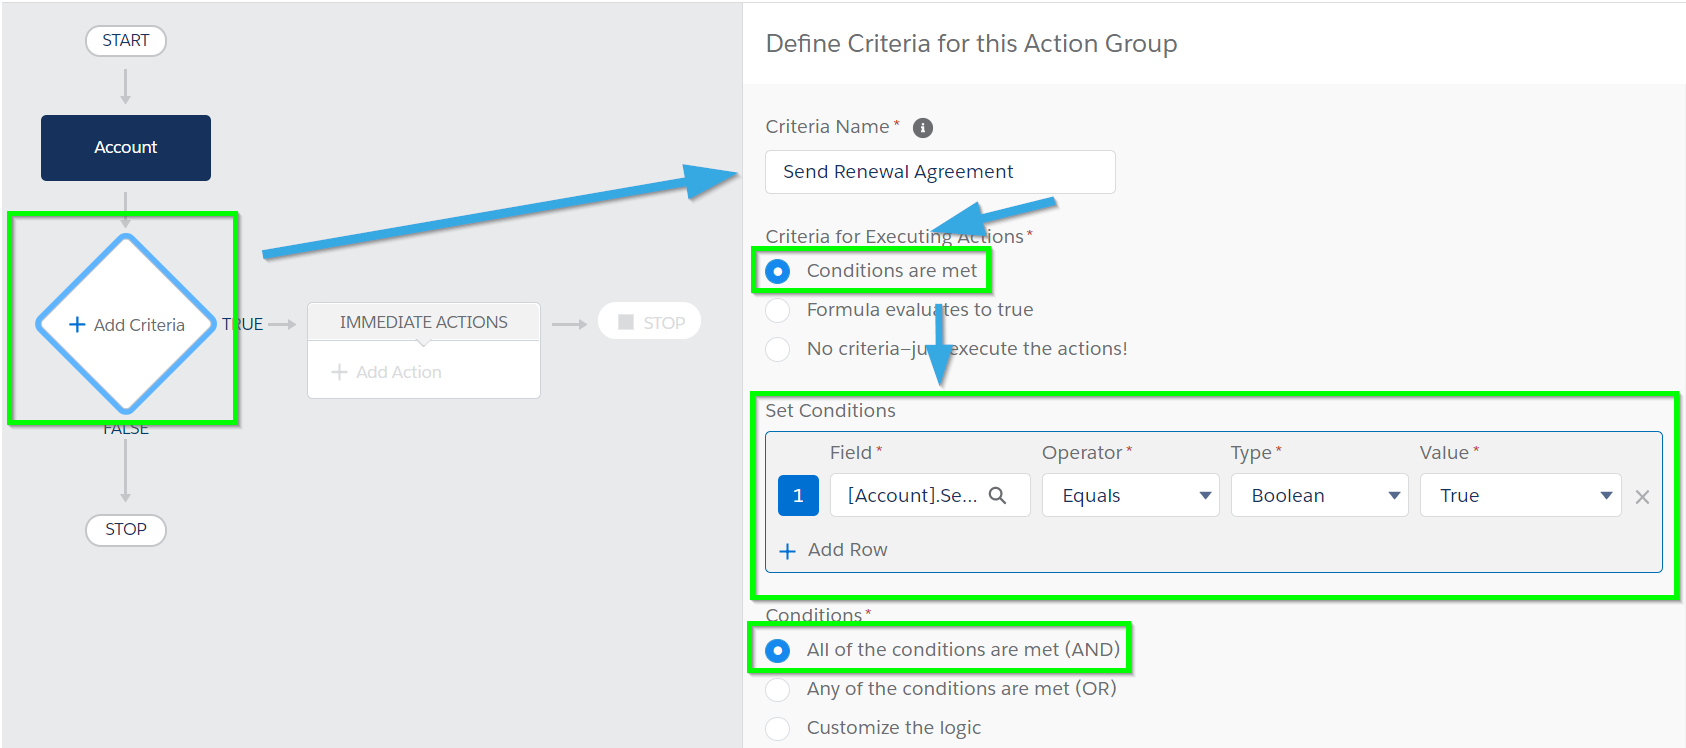
Next, click Add Criteria. Choose a name and select Conditions are met. Next, set the conditions -- in our case, we'll select the Send Renewal Agreement field, set the Operator to Equals, keep the Type set to Boolean (since it's a checkbox field) and set the Value to True. Finally, we'll choose to invoke the process when All of the conditions are met (AND). This will ensure that the process is invoked whenever the Send Renewal Agreement checkbox is checked. Click Save.
Then, click Add Action (under the Immediate Actions section). Choose Create a Record for the Action Type, enter an action name, and select SDoc Job for the Record Type. You may need to type it in to find it.

A Field Values menu will appear below. This is where you will add the five fields described in the Fields For Our Use Case table above. Click Add Row to add each new field.
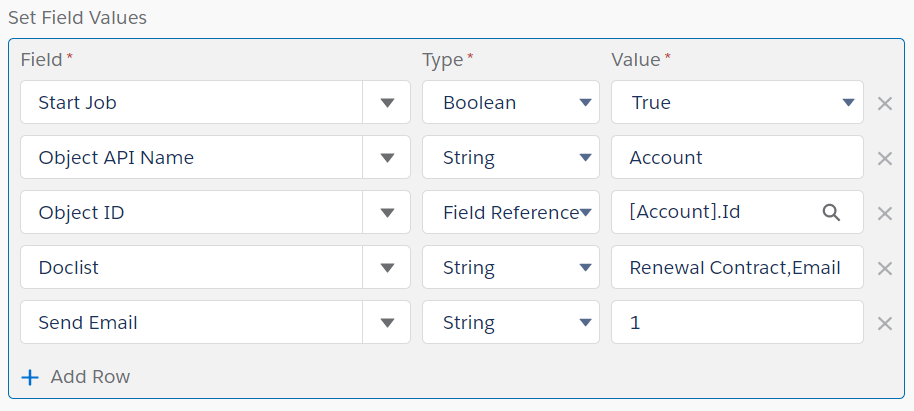
Click Save when you finish adding each field. Your process should look similar to this:
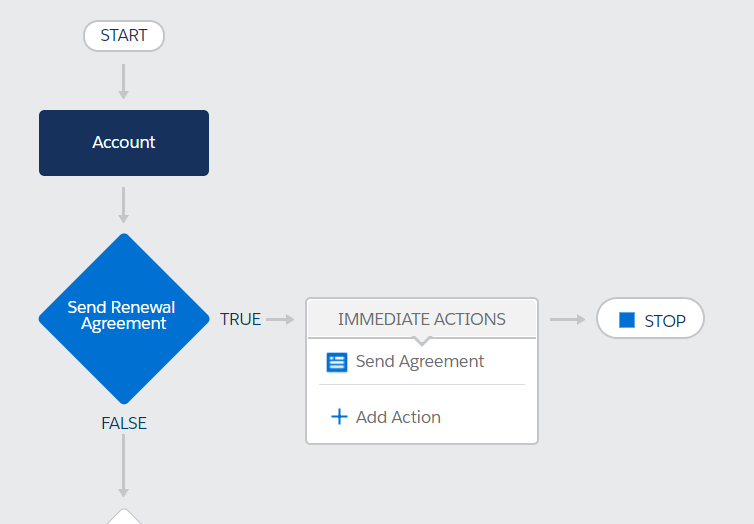
Click Activate at the top right to activate your process. S-Sign will now automatically generate and send a renewal agreement to all Contacts related to your Account whenever the Send Renewal Agreement checkbox is checked.

Automate S-Sign with Apex Triggers

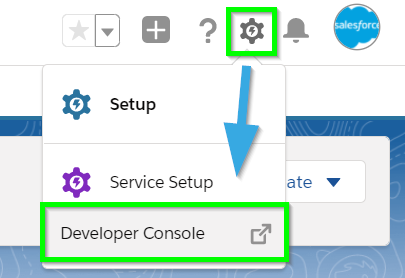
To automate S-Sign requests using Apex triggers, begin by navigating to the Developer Console (click the Cog in the upper right corner and select Developer Console).
Create a new trigger (File > New > Apex Trigger).
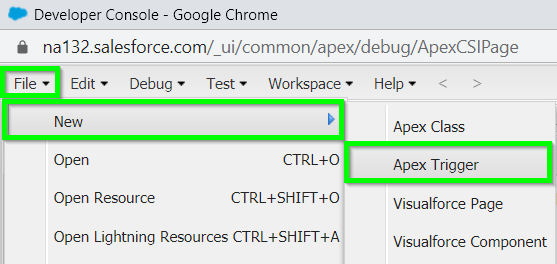
Name the trigger whatever you'd like, and select Account for the sObject.

Delete the text that was automatically inserted, and paste in the following trigger:
[code lang="html"]trigger RenewalAgreement on Account (after update) {
List<SDOC__SDJob__c> jobList = new List<SDOC__SDJob__c> {};
for (Account acct : Trigger.new) {
Account oldacct = Trigger.oldMap.get(acct.Id);
If (acct.Send_Renewal_Agreement__c == True){
SDOC__SDJob__c job =
new SDOC__SDJob__c(SDOC__Start__c=true,
SDOC__Oid__c=acct.Id,
SDOC__ObjApiName__c='Account',
SDOC__SendEmail__c='1',
SDOC__Doclist__c='Renewal Contract,Email Template');
jobList.add(job);
}
insert jobList;
}
}[/code]
Once you click Save, S-Sign will automatically generate and send a renewal agreement to all Contacts related to your Account whenever the Send Renewal Agreement checkbox is checked.

While this article detailed how to automate S-Sign to satisfy the requirements of a simple use case, you can combine these examples with much larger, more complex processes or triggers to meet any unique business requirement. To learn more about automating S-Docs, please visit our general automation guide, as well as our guide to generating S-Docs with one or zero clicks.


Adding Page Numbers to Your DOC Template

By Documentation, General Solutions, S-Docs Cookbook No Comments

Add Page Numbers in the Header or Footer

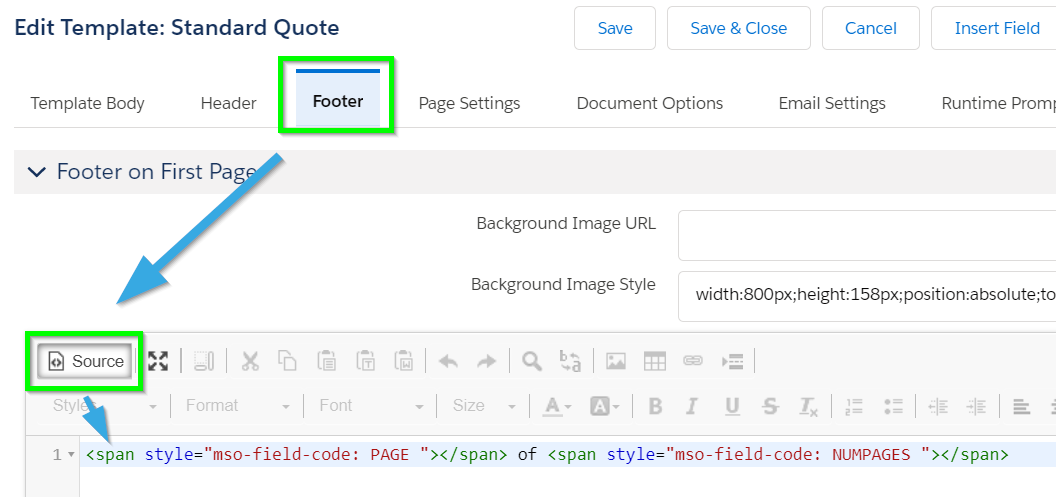
To add pagination to your DOC templates, you can insert the following code into the Source editor of the Header or Footer tabs in the template editor:

[code lang="html"]Page Number: <span style="mso-field-code: PAGE "></span>
Total Pages: <span style="mso-field-code: NUMPAGES "></span>[/code]

Note: This code is not functional in the template body and must be used in either the Header or Footer tabs.

Example

The following example code was inserted into the Footer tab.

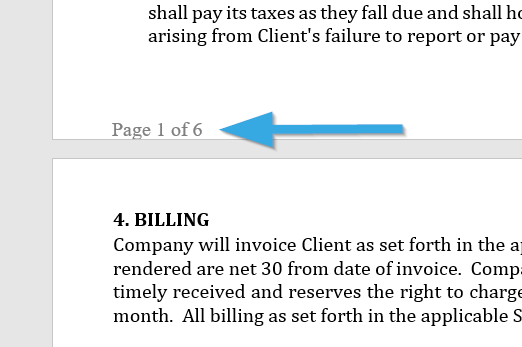
When the document is generated, the pagination appears as follows:


Input Field Groups

By Documentation, S-Sign No Comments

S-Sign Input Field Groups allow you to group checkbox fields together and set minimum and maximum requirements for the group as a whole. This feature is useful is you want users to choose a fixed or ranged number of options from a list. For example, let's say your document lists five different contact methods, and you want users to select at least 2 preferred methods from the list. S-Sign input field groups make this easy to implement.

This article will go over setting this feature up, as well as the end-user experience.

Locate the Input Field Group Settings

The S-Sign Input Field Group settings are located at the bottom of the S-Sign Template Settings menu (if you do not see the S-Sign panel on the left of the template editor, you need to enable S-Sign for your template).

Create an Input Field Group

To create an input field group, click Add Input Field Group. This will bring up the input field group menu.

[1] Input field group name: Add a name for your input field group. Once you save the template, this name will show up in the Input Field Group picklist on the S-Sign checkbox field menu. Any checkbox fields with this name selected will be included in this input field group and governed by its requirements.

[2] Minimum required for signing: Set a minimum number of checkboxes in this group that must be checked before the document can be submitted.
[3] Maximum required for signing: Set a maximum amount of checkboxes in this group that can be checked before the document can be submitted.
[4] Custom Warning Message: Enter a custom warning message that will be displayed as a popup when a user selects too many or too few options part of this group.
[5] Custom Error Message: Enter a custom error message that will be displayed on the document when a user selects too many or too few options part of this group.
[6] Custom error message styling: Enter custom styling for error messages that appear on the document when a user selects too many or too few options part of this group. This field accepts CSS syntax.
[7] Suppress Form Level Errors: Check this box to prevent error messages from being displayed on the document.

Note: This will not prevent custom warning messages from displaying as popups, if any have been defined.

[8] Remove input group: Remove this input field group and delete its settings.
[9] Add Input Field Group: Add another input field group.

Example Use Case

Let's say we want users to choose at least two preferred contact methods from a list of five contact methods in a document. The following input field group satisfies this requirement.

First, we named the input field group "Contact." If we wanted to create other input field groups later, descriptive names will help differentiate between them. Next, we set the minimum required inputs to 2 and the maximum to 5, since our group will include 5 checkboxes, and we want users to be able to select as many as they want (as long as it's more than 2). If we wanted them to select only 2 contact methods, we would set the maximum number to 2 as well.

We also input custom error messages and added styling to match our brand.

Next, we'll create five checkbox fields and assign them to the input field group that we just created by setting their Input Field Group field to Contact. Then, we'll paste the S-Sign tags into our template.

That's all there is to it! When we generate the document and send the S-Sign request, users will be able to select 2-5 contact options.

If a user tries to submit the document with less than 2 options selected, an error will appear and indicate how many options that they should select.

Although this is a simple example, you can create as many input field groups as you like and customize them as needed to satisfy your requirements.


The S-Sign Configuration Page

By Documentation, S-Sign No Comments

Navigate to the S-Sign Configuration Page

The S-Sign Configuration page provides you with a number of administrative configuration options for S-Sign, including licensing information and Salesforce site configuration. This article will go over each setting on this page. For more information on S-Sign template-level configurations, please view the S-Sign Template Settings.

If you are using S-Docs 4.381+, the S-Sign Configuration page can be accessed through the S-Docs Setup page (App Launcher > S-Docs Setup > Go to S-Sign Setup Page).

If you are using a version of S-Docs below 4.381, the S-Sign Configuration page can be accessed through one of the following links:

[Production]: https://login.salesforce.com/apex/SSIGN__SSConfig">https://login.salesforce.com/apex/SSIGN__SSConfig
[Sandbox]: https://test.salesforce.com/apex/SSIGN__SSConfig">https://test.salesforce.com/apex/SSIGN__SSConfig

The S-Sign Configuration page appears as follows:

S-Sign Licensing Page

The first section of the S-Sign Configuration page is where your S-Sign license key data is housed, as well as where you assign/remove licenses from your users. Click Go To S-Sign License Page to be routed to the S-Sign license page, which is shown below.

The S-Sign license page allows you to:

[1] Enter your license key for the first time, or update your license key
[2] View your org's license information, including the expiration date, total license count, and how many licenses have been used
[3] View which users have been assigned licenses, as well as remove them
[4] Assign licenses to additional users in your org

For more information about assigning S-Sign licenses, click here.

S-Sign Configurations

The S-Sign Configurations section appears as follows:

This section allows you to:

[1 & 2] Provide S-Sign with the Site Label and Site URL of the Salesforce site that you created during the initial configuration of S-Sign. These fields are automatically populated with this information when you create your S-Sign site, but you should still copy and paste your Site Label and Site URL here to ensure that they match. Click here for more information about ensuring that these values are correct.
[3] Confirm your Salesforce Site information and assign the S-Sign Guest User permission set. This is all completed in the background when you click the button.
[4] Enable reminder and expiration emails for your e-signature requests (these are disabled by default). You can configure expiration and reminder settings at the template level within the S-Sign template settings menu.
[5] Assign an S-Sign license to your S-Sign Internal User, if one has not already been assigned. Learn more about the S-Sign Internal User here.

S-Sign Custom Settings

The S-Sign Custom Settings section appears as follows:

This section allows you to:

[1] Display the S-Sign Audit Trail to each person who signs a document. By default, the audit trail is appended to the signed document after all signers have signed. Checking this box will display the audit trail throughout the signing process. For example, signer 2 will receive the document with an audit trail that includes details from signer 1, signer 3 will receive the document with an audit trail that includes details from signers 1 and 2, and so on.
[2] When using S-Sign with Salesforce Communities, open all Sign In Person requests in a new tab
[3] Select an org-wide email address as your email alias for all S-Sign notification emails.
[4] Insert the signed document with the audit trail as an attachment on your base record. By default, the signed document with the audit trail is saved as a Salesforce file on the S-Sign Envelope Document record, and then linked to the base record using ContentDocumentLink. This option will save the document as an attachment on the S-Sign Envelope Document record, and then save a cloned version of the attachment to the base record.
[5] Prevent signers from using the text-to-signature feature. This will require them to draw their signature.
[6] Replace the S-Sign logo with your organization's logo throughout the signing process (including the security verification splash screen and the S-Sign toolbar that appears at the bottom of the screen when users are signing a document).
[7] Specify the reply-to email address for all S-Sign emails. This field accepts any valid email address. If left blank, the reply-to email address for all S-Sign emails will be automatically set to the email of the user sending the request.
[8] Use a custom permission set for the S-Sign Site Guest User, in place of the permission set that is automatically assigned when you click Set Site Info & Assign Permissions in the S-Sign Configurations section of this page.
[9] Select a default font to use for for the text-to-signature feature.
[10] Save your settings.

For more information about configuring and customizing S-Sign, please visit our S-Sign General Configuration page.


S-Sign With PDF-Upload

By Documentation, S-Sign No Comments

S-Sign with PDF-Upload

The S-Docs PDF-Upload feature allows you to upload any PDF to the S-Docs template editor, then drag and drop merge fields onto the document. This feature is also compatible with S-Sign, allowing you to create S-Sign fields and drag & drop them onto your uploaded PDF. This article will demonstrate using S-Sign with the PDF-Upload feature.

Before using the PDF-Upload feature, you will need to add it as a value for the Template Format field on the SDoc Template object. Refer to the S-Docs PDF-Upload documentation (linked above) to learn how to do this.

Enable S-Sign For Your Template

After you create your PDF-Upload template, you'll need to enable S-Sign as your template's e-sign vendor. Navigate to the Advanced Options tab and choose S-Sign from the dropdown menu. Once you do this, you need to save your template before proceeding by clicking the Save button above.

Locate the S-Sign Settings

Once your template is saved, navigate back to the Upload PDF tab and click Create Another Field.

Here, unlike with regular PDF-Upload templates, you can now select "S-Sign Field" for the Type field. You'll notice that the regular S-Sign Settings menu didn't appear here like it does for regular S-Sign enabled templates; to access the S-Sign settings, click S-Sign Settings at the bottom of the PDF-Upload Settings menu.

Configure Your S-Sign Template

Clicking S-Sign Settings will open up the S-Sign Settings menu, where you can configure every aspect of your S-Sign template like normal, including field types, different signer profiles, and general settings. Click Field Settings to go back to the PDF-Upload settings and drag your S-Sign field onto your document.

Once you navigate back to the PDF-Upload settings, you can drag your S-Sign Input tag onto your document. A Re-Drag Merge Field button will appear, which you can click to reset the signature tag and drag it again.

Once you're finished configuring all of your fields, signer profiles, and template settings, you can use this template like you would any other S-Sign template.


Void A Contract Before It’s Signed

By Documentation, S-Sign No Comments

You may run into a situation where a contract that you've sent out for signature needs to be voided. As long as nobody has signed the document, S-Sign allows you to void contracts that you've sent right from the Salesforce record that they were sent from.

Add The "Void Contract" Field to the S-Sign Envelope Related List

Contract voiding is done from the S-Sign Envelope related list, so you'll need to add this field to that related list to begin. Navigate to Setup > Object Manager > Your Object. In this example, we're going to edit the Opportunity object's S-Sign Envelope related list.

Click on the Page Layouts tab, then click Edit for the appropriate page layout.

Scroll down to the related list section of the layout editor. Find the S-Sign Envelopes related list, and click the wrench icon.

Find the Void Contracts field in the related list properties menu, and click the Add arrow to add it to the related list. Click OK at the bottom of the menu.

Save your new layout. You'll now be able to void contracts from the S-Sign Envelopes related list.

Voiding Contracts

To void a contract, navigate to the object record that it was generated from. Scroll down to the S-Sign Envelopes related list, and click the Void Contracts link that appears there. If you don't see the link, click View All to open an expanded view.

Once you click the link, you'll be taken to the following page.

Here you can optionally enter a reason for voiding the contract, and then click Void The Above Contracts to void them. Note that all recipients of the contract will be notified when it is voided.


Build Templates With A Dynamic Number Of Signers

By Documentation, S-Sign No Comments

Introduction

S-Sign allows you to easily send e-signature requests that require multiple signers by building out multiple signer profiles in a template. However, it's not always practical to rely on a fixed number of signer profiles. Sometimes a document might require only one signer, while other times it might require five. Maybe a document always needs to be signed by every contact role related to an opportunity. In these situations, it's not efficient to constantly edit the number of signer profiles for a template.

Luckily, S-Sign allows you to set a dynamic number of signer profiles and signature inputs for a document. There are two primary ways to do this:

  1. Using the Render Feature
  2. Using Related Lists

Using the Render Feature

The S-Docs Render Feature allows you to conditionally show or hide portions of your documents based on conditions that you define, but it can also be used to conditionally render S-Sign elements, like specific signer profiles and different S-Sign input field types. Using the render feature, you can set up s-sign templates that include a different number of signers and input fields based on certain predefined conditions.

In the following example, we've written our render statement so that Signer 2's signer profile (and corresponding signature input field) will only get created if the Opportunity that this document is generated from has its stage field set to Closed.

[code lang="html"]<!--RENDER='{{!Opportunity.StageName}}' == 'Closed' -->
[[SSIGN_PROFILE Email='signer2@example.com' ProfileName='Signer 2' RoutingPosition='2']]
[[SSIGN_INPUT Profile='Signer 2' Type='Signature']]
<!--ENDRENDER-->[/code]

As you can see, using the render feature to set dynamic signer profiles requires you to write out your S-Sign elements, rather than set them in the S-Sign Template Settings menu. You can use the following attributes in your render statements, which are equivalent to the elements that you can set in the S-Sign Template Settings.

S-Sign Profile Attributes:

  • ProfileName
  • Email
  • RoutingPosition
  • DenyAudit
  • DenyConfirmation
  • SignerName
  • PrevSignerProvidesThisSignersEmail
Note: These attributes must be preceded by SSIGN_PROFILE, and the entire statement must be enclosed in double square brackets. For example: [[SSIGN_PROFILE Email='signer2@example.com']]

S-Sign Input Field Attributes:

  • Type
  • Profile
  • Required (Type='Text', Type='Checkbox', and Type='Date' only)
  • WriteTo (Type='Text' and Type='Date' only)
  • TextDefault (Type='Text' only)
  • Disabled (Type='Date' only)
  • DateFormat (Type='Date' only)
Note: These attributes must be preceded by SSIGN_INPUT, and the entire statement must be enclosed in double square brackets. For example: [[SSIGN_INPUT Profile='Signer 2' Type='Signature']]

Using Related Lists

You can also dynamically generate signer profiles and input fields using related list data (LineItems and LineItemsSOQL). This is useful if you need to generate S-Sign requests that automatically include signer profiles and input fields for each contact role related to a specific record.

In the following example, let's assume you have a contract that needs to be signed by each opportunity contact role and each account contact role related to your opportunity. Let's also assume that all opportunity contact roles need to sign before any account contact roles sign. Using LineItemsSOQL statements, S-Sign can easily accomplish this. For each object (opportunity and account), we'll create 2 LineItemsSOQL statements: one to generate signer profiles, and another to generate S-Sign input fields.

[code lang="html"]<!--{{!
<lineitemsSOQL>
<class>none</class>
<listname>opportunitycontactrole</listname>
<column prefix="[[SSIGN_PROFILE Email='" postfix="' ">Contact.email</column>
<column prefix="RoutingPosition='1" postfix="' ">rownum</column>
<column prefix="ProfileName='Signer C" postfix="']]">rownum</column>
<where>Opportunity.Id='{{!Opportunity.Id}}'</where>
</lineitemsSOQL>
}}-->
<!--{{!
<lineitemsSOQL>
<class>table239</class>
<listname>opportunitycontactrole</listname>
<column>Contact.Name</column>
<column prefix="<br /><div style='width:20pt;' />[[SSIGN_INPUT Type='Signature' Profile='Signer C" postfix="']]">rownum</column>
<where>Opportunity.Id='{{!Opportunity.Id}}'</where>
</lineitemsSOQL>
}}-->
<!--{{!
<lineitemsSOQL>
<class>none</class>
<listname>accountcontactrole</listname>
<column prefix="[[SSIGN_PROFILE Email='" postfix="' ">Contact.email</column>
<column prefix="RoutingPosition='2" postfix="' ">rownum</column>
<column prefix="ProfileName='Signer A" postfix="']]">rownum</column>
<where>Opportunity.Id='{{!Opportunity.Id}}'</where>
</lineitemsSOQL>
}}-->
<!--{{!
<lineitemsSOQL>
<class>table239</class>
<listname>accountcontactrole</listname>
<column>Contact.Name</column>
<column prefix="<br /><div style='width:20pt;' />[[SSIGN_INPUT Type='Signature' Profile='Signer A" postfix="']]">rownum</column>
<where>Opportunity.Id='{{!Opportunity.Id}}'</where>
</lineitemsSOQL>
}}-->[/code]

When you use the code listed above, each opportunity contact role will be designated an incrementing signer profile name starting at Signer C1, and each account contract role will be designated an incrementing signer profile name starting at Signer A1. Additionally, all opportunity contact roles will sign before any account contact roles sign because of how we set the RoutingPosition attribute. In this example, a signature input will be generated for each contact role, but you can customize this code to generate any number of different s-sign inputs.


Troubleshooting S-Sign

By Documentation, S-Sign No Comments

Troubleshooting The End-User Experience

This section of the S-Sign troubleshooting guide will focus on the end-user experience, which includes both users generating S-Sign requests in Salesforce, and users signing documents.

General Troubleshooting Steps

If you're running into problems while using S-Sign, it's always best practice to take note of the following general steps.

  1. Ensure that the domain listed for your S-Sign site in the S-Sign Configuration page is the same as the domain listed for your S-Sign site in the Salesforce sites list (Setup > Sites > Your Site).
    To get to the S-Sign Configuration page, navigate to one of the following links:
    [Production] https://login.salesforce.com/apex/SSIGN__SSConfig
    [Sandbox] https://test.salesforce.com/apex/SSIGN__SSConfig
    Make sure the URLs match. If they don't, copy the site URL from the Salesforce sites page and paste it into the box on the S-Sign Configuration page.


    Additionally, if there are two sites listed, make sure to use the one that ends with secure.force.com.
  2. Ensure that the active user has an S-Sign license assigned to them. You can view license assignments by navigating to the S-Sign Configuration page and clicking Click here to be redirected to the S-Sign License Page at the top.

    From there, scroll down to view license assignments or assign new licenses.
  3. Ensure that you have the correct Sharing Settings enabled for all of the S-Docs and S-Sign objects (Setup > Sharing Settings).
  4. Ensure that the active user's profile has all field-level permissions enabled for the S-Docs and S-Sign objects (make sure the "Read" field is checked as well).
  5. Ensure that the active user's profile has access to the S-Sign VisualForce pages. You can find a list of these in Step 2 of the S-Sign Installation and Configuration Guide.

Site is Down For Maintenance Error

If users are taken to a "site under construction" or "site down for maintenance" page when clicking the link that should take them to the signable document, this may be because there is a missing forward slash character in the S-Sign site URL.

In order to fix this, navigate to the S-Sign configuration page and ensure that the URL shown there has a forward slash character at the end.

Infinite Loading Spinner On The Signature Capture Page

You may run into an issue where signers are stuck on the loading screen after verifying their email and clicking Continue to proceed to the document. The screen would look similar to this:

There are several reasons that this may happen.

  1. The S-Sign input tag [[SSIGN_INPUT ID=X]] isn't present in the template. We recommend first going back to the template editor and making sure that the S-Sign input tag didn't get removed or accidentally left out of your document.
  2. The S-Sign input tag is breaking across two lines. When the S-Sign input tag breaks across two lines in the generated PDF, it cannot be read by the PDF reader. We recommend editing your S-Sign input tag so that it only occupies one line, either by making the font smaller, or making its container larger.
    Note: Your S-Sign input tag may only take up one line in the S-Docs template editor, but break across two lines when you generate the PDF. This is because the template editor spans the width of your browser, but the PDF body is the page width minus the left and right margins (as defined in the Page Settings tab of the template editor). If you want to make the template editor's width more accurate, you can wrap everything in a <div> tag with a width that's equivalent to the generated PDF's page width. For example, if the page width is 8.5 inches and the left and right margins are 1 inch each, you would wrap everything in <div style="width:6.5in;"></div>
  3. The S-Sign input tag is hidden by a narrow table cell. If your S-Sign input tag is in a table cell that is too narrow, the tag may not render at all and thus be unreadable by the PDF reader. To fix this, make the table cell that includes the S-Sign input tag wider. Again, ensure that the tag doesn't break across two lines.

Errors When Submitting Or Declining A Document

On newer versions of S-Docs and S-Sign, signers may receive error messages when they submit or decline a document if the S-Sign Site Guest User doesn't have access to all of the appropriate fields used in your email notification templates. To resolve this error, navigate to your S-Sign site's public access settings (Setup > Sites > Your Site > Public Access Settings) and give the Site Guest User profile Read access to all objects and fields referenced in your email notification templates.

Issues With The "Sign Here" Image or Broken Signature Images

If the blue "Sign Here" arrow image (shown below) on an S-Sign document appears as a broken image icon, or if there are broken signature images in your audit documents, it may be because of S-Sign site URL issues.

Verify that the URL listed on the S-Sign Configuration page matches the URL listed on your Salesforce sites page (as described in Step 1 of the General Troubleshooting Steps section above). If your sites list has two URLS, make sure to use the one that ends with secure.force.com.

If you are still having problems, ensure that your site URL is preceded by https://, as opposed to http://.

Troubleshooting The Admin Experience

This section of the S-Sign troubleshooting guide will focus on the admin experience, which includes building S-Sign enabled templates.

S-Sign Sidebar Issues

If the S-Sign sidebar panel is not loading correctly in the S-Docs template editor, there are two options to resolve this.

Option 1: Clickjack Protection

Navigate to Setup > Session Settings. Then, uncheck the following checkboxes:

  • Enable clickjack protection for customer Visualforce pages with standard headers
  • Enable clickjack protection for customer Visualforce pages with headers disabled

Option 2: Whitelisted Domains for Visualforce and Survey Inline Frames

If you need to keep clickjack protection enabled for Visualforce pages, you can also resolve this issue by whitelisting the domain of the template editor. To find the correct domain, navigate to an S-Docs template record and open the template editor by clicking the Template Editor button.

Note: You must be in Salesforce Classic to copy the correct domain. If you are working in Salesforce Lightning, switch to Salesforce Classic by clicking your user profile button in the upper right corner, and then click Switch to Salesforce Classic.

Once you have switched to Salesforce Classic, copy the domain from your browser's URL bar.

Next, navigate to Setup > Session Settings, and scroll down to the Whitelisted Domains for Visualforce and Survey Inline Frames section, and click Add Domain.

Then, paste the domain into the Domain field. Make sure that the IFrame Type field is set to Visualforce Pages.

The domain will now appear in the Whitelisted Domains section, and the S-Sign sidebar panel will now load correctly in the template editor.

Finding Site Guest User Profiles

Site Guest Users don't normally appear in the profiles page in the setup menu. If you need to access Site Guest User profiles, you can run the following query in the Dev Console (Setup Cog > Developer Console):
[code lang="html"]SELECT Name, Id FROM User WHERE Name LIKE '%Site Guest%'[/code]
This can be useful for ensuring that the correct permissions are assigned to S-Sign users -- specifically the S-Sign Site Guest User permission set.


Top