Introduction
S-Docs works great with the custom objects and even the Force.com platform edition, which is entirely comprised of custom objects. Your documents can span many relationships to include data from formula fields, rich text, parent records, child, grandchild and related objects--all within the same document.
Since every organization creates different custom objects to meet their unique requirements, you need to configure S-Docs to recognize which custom objects you want to leverage with S-Docs.
To learn how to configure S-Docs with custom objects in Salesforce Classic, you can watch the following tutorial video, which will walk you through the process. You can also refer to the written instructions below the video, which provide a detailed, step-by-step guide to configuring S-Docs with custom objects. Timestamps from the video are provided in the table of contents. To view the same guide for Salesforce Lightning Experience, click here.
For the purposes of this guide, we assume your custom object is named CustomObj and has an API name of CustomObj__c. (Note: the API name has two underscores.) Whenever you see "CustomObj" in this document, you can replace it with the name of your custom object. S-Docs can also integrate with other AppExchange apps. (Note: there are a few setup differences.) This document will walk you through the step-by-step configuration process. It is intended for Salesforce.com administrators who are familiar with standard configuration tasks.
Sample templates can be found here.
Tutorial Video
Step 1: Add a lookup field to allow relationship linking [00:56]
This step allows you to associate the S-Doc with the Custom object, so that users can see a related list of all S-Docs created on your Custom Objects page layout.
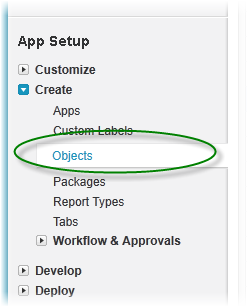
- Navigate to Setup ➤ Build ➤ Create ➤ Objects.

- Select SDOC_Relationship. Do not select Edit.

- Under Custom Fields and Relationships, click the New button.

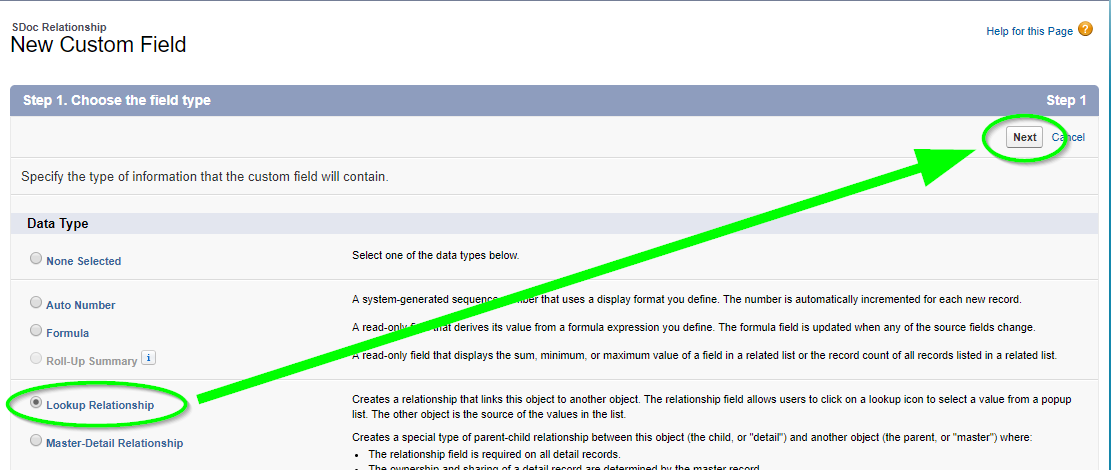
- Follow the New Custom Field steps:
Step 1 of 6 - Pick Lookup Relationship. Click Next.
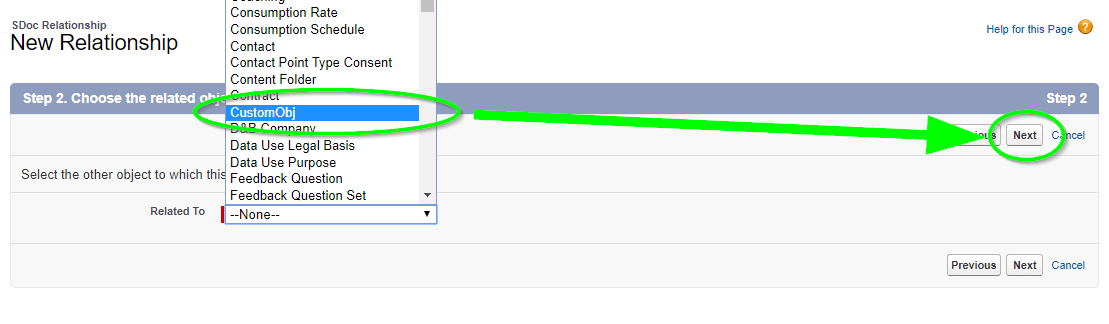
Step 2 of 6 - Select your Custom Object (e.g. CustomObj__c) from picklist values, then click Next.
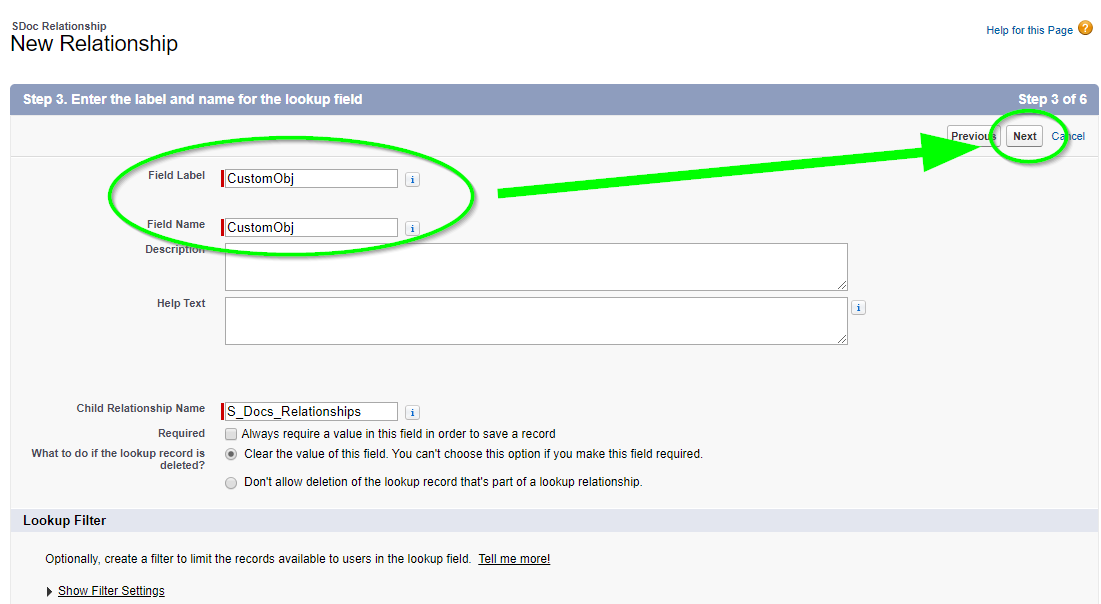
Step 3 of 6* - Field label and field name should be your custom object name without the “__c.” In our example it would be "CustomObj." Click Next.
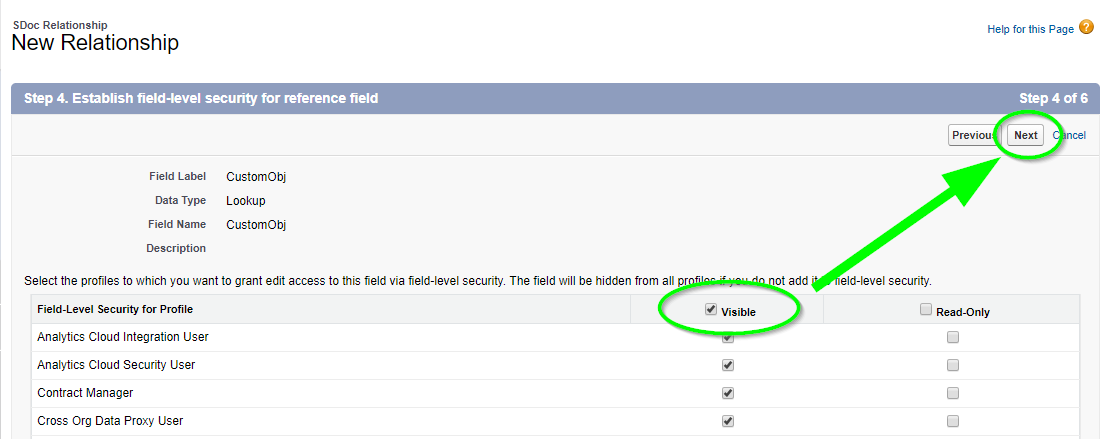
Step 4 of 6 - Checkbox should be visible for all users. Click Next.
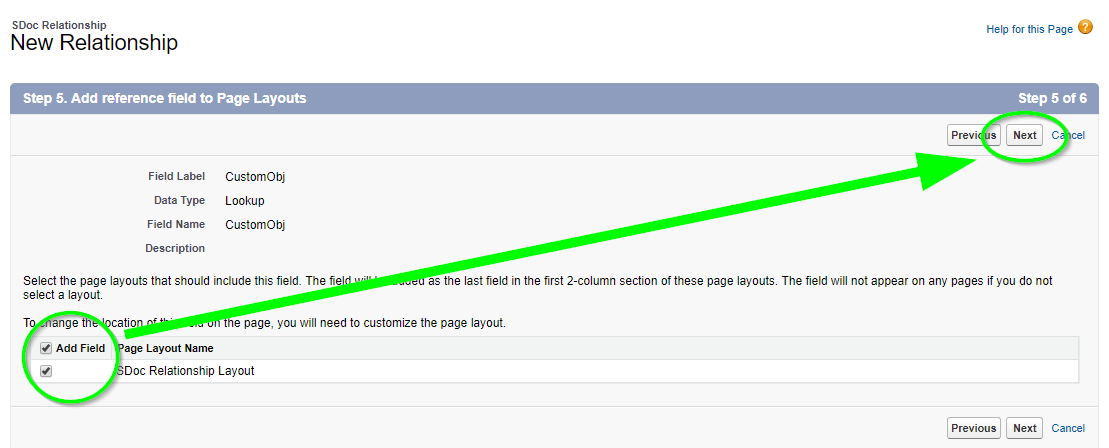
Step 5 of 6 - Checkbox should add the field for the layout.
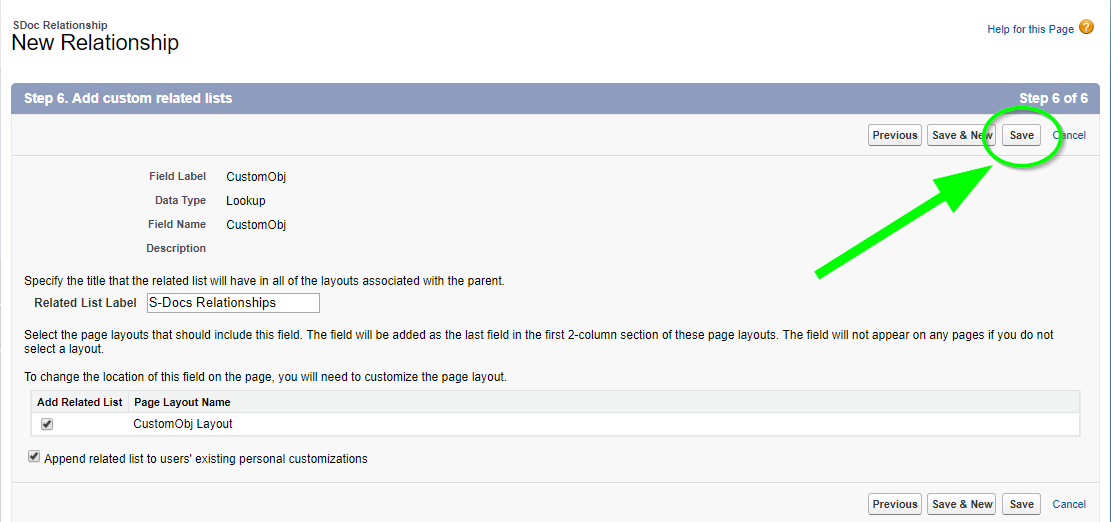
Step 6 of 6 - Accept default. Click Save.
Step 2: Create a button to place it on your Custom Object page Layout [02:17]
Just like using S-Docs with other objects, you need to place an S-Docs button on the record detail page layout. Users click the button to initiate creating a document from the record detail page.
Create the S-Docs button
- Navigate to Setup ➤ Build ➤ Create ➤ Objects.
- From the list of custom objects, click on your Custom Object link. Do not click on the Edit link.

- From the custom object definition page, scroll down to the “Buttons, Links, and Actions” related list, and click New Button or Link.

- Button Label: Choose a label (e.g. "S-Docs")
- Display Type: Detail Page Button
- Behavior: Display in existing window without sidebar or header
- Content Source: URL
- Use the following URL (note that double underscores are used in three places):
{!URLFOR('/apex/SDOC__SDCreate1', null,[id=CustomObj__c.Id, Object='CustomObj__c'])}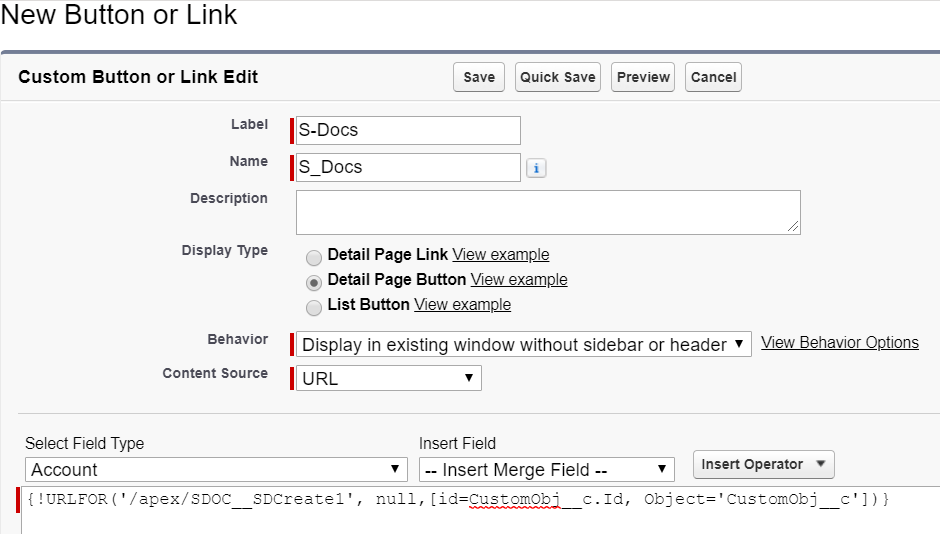
9. *Optional* You can have users save clicks by enabling the “One-Click” feature. Enabling this will bypass the document creation wizard. An administrator simply needs to change the button definition to include a list of pre-selected S-Docs template names that will be automatically generated. Placing this button will let users create all the documents encoded in the button without any additional interaction. The button syntax uses a parameter called “doclist,” which is followed by one or more template names to be auto-generated. Here is an example of the button syntax (replace the highlighted values with your own template names):
{!URLFOR('/apex/SDOC__SDCreate1', null,[id=CustomObj__c.Id, Object='CustomObj__c', doclist='Template1,Template2'])}
10. Click Save
Step 2b: Place button on your page layout [03:08]
- Navigate to the page layout: Setup ➤Build ➤ Create ➤ Objects.
- Click on your object name from the Label column (do not click on the Edit link).
- Scroll down to the page layout related list section, and click the Edit link next to the page layout where you want to add the S-Docs button (you will repeat this for each page layout that you want the S-Docs button to appear in).

- From the Salesforce page layout screen, click Buttons, located in the top left toolbar menu. Once clicked, the right panel will display available buttons, where you should see your new button.
- Click and begin dragging the S-Docs button that you just created into the lower portion of the page (your custom objects Detail Page Layout). Once you drag the button over the Custom Buttons section, you will see a green checkbox (indicating OK to drop) and you can release the button.

- Be sure to click Save to apply the changes to the page layout and repeat steps 3-6 for any other layouts where you would like to add the button.
To use this new S-Docs button, you first need to add your custom object as an available picklist value in the "Related to Type" field on the S-Docs template detail page, and then create at least one template to use with your custom object. The next two steps describe this process.
Step 3: Add Your Custom Object API Name to the "Related to type" field on the "SDoc Template" object [03:42]
- Navigate to Build ➤ Create ➤ Objects.
- Click on the SDoc Template link (not the Edit link).

- Scroll down to the "Custom Fields and Relationships" section. Click on the Related to Type link.

- Scroll down to the "Values" section and click on the New button.

- Add your custom object’s API name (e.g. CustomObj__c) as a picklist value, then click Save.

As a reminder, you should substitute your object’s API name (not use the example CustomObj__c shown above).
Step 4: Create your Custom Object Template [04:32]
- Go to the S-Docs template home page by clicking on All Tabs (+ icon), and then selecting S-Docs Templates.


- Click the New button from the S-Doc template object home page.

- Create your Custom Object template record. Be sure to select your Custom Object name from the “related to type” picklist values. Before you can first use this template, you should confirm you have also checked the Available for Use and Initially Visible checkboxes.

- Click Save, then click the Template Editor button.

- Once in the editor mode, you can design your quote template using the WYSIWYG editor. The editor allows you to add text, format styles, insert tables, insert images and merge Salesforce data by using the Insert Field and Insert Related List buttons.

- You can also edit the template HTML directly by clicking on the Source button. You can also paste pre-made template code here. Sample templates are available here.

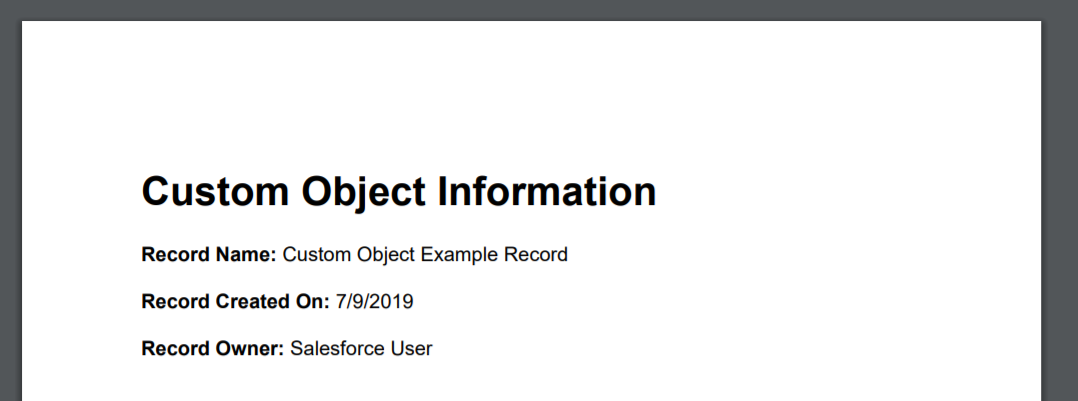
- Once your template is saved, you can test it by opening a sample custom object record, clicking on the S-Docs button, selecting your new template, and then clicking on Next Step.


- Click on the View PDF icon or the document number to view or download the document.

- The document will open in another tab with all of the fields filled in.