Whether you're sending documents for e-signature to one person or ten, S-Sign makes it easy to configure unique signer profiles for everyone involved.
Locate The Signer Profiles Menu
The S-Sign Signer Profiles Menu is found within the S-Sign menu on the left side of the template editor for templates that are S-Sign enabled.

Signer Profile Settings
The signer profile menu appears as follows.

1. Signer Profile ID: This denotes the signer profile number that you're working with. By default, the S-Sign menu will open with 2 profiles created. If you create another, its ID will be 3, and so on.
2. Profile Name: You can give a custom name to each signer profile here (this is independent of the actual name of each signer). The default name is "Signer [Profile ID #]."
3. Email Address: This field is where you specify the signer email address.
- If you leave this blank, users will be prompted with a screen that lets them enter this signer's email address (and any other email addresses that were left blank) when they generate this document and press Send Documents For Electronic Signature.
- You can specify multiple email addresses in a comma-delimited list here. Each email address will receive the signature request once it's sent. When the signer opens the request, they will be able to select which email is theirs, and this email will be sent a verification code. All email addresses that are listed here will receive S-Sign system emails if applicable (expiration/reminder notifications, etc.).
- This field supports merge fields for dynamic email selection. For example, you could write {{!Opportunity.email}} here.
4. Signer Name: You can optionally enter the name of your signer.
Note that these fields can only be used for signer profiles if they are also present in the main document. In addition, the template's Related To Type field must be either Opportunity or Account.
5. Signing Order: This field allows you to set the signing order of the document. For example, if your document needs to be signed by a borrower and a lender, but the borrower has to sign first, you can set the borrower's signing order to 1, and the lender's signing order to 2.
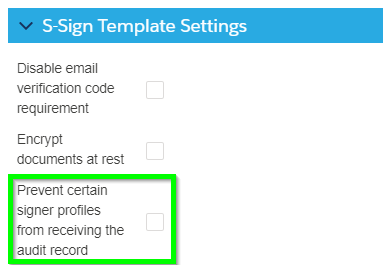
6. Prevent From Viewing Audit: By default, a secure audit trail is attached to the end of every finalized S-Sign document. This option allows you to prevent certain profiles from being able to see the audit trail. This checkbox is grayed-out by default; to enable it, navigate to the S-Sign Template Settings menu and select "Prevent Certain Signer Profiles From Receiving The Audit Record."
7. Prevent From Receiving Confirmation Emails of This Type: By default, every signer will receive a confirmation email after [1] they sign and [2] all signers after them finish signing. This picklist allows you to prevent certain signer profiles from receiving either or both of these confirmation emails.
8. Prevent From Receiving Document In Confirmation Email: By default, every signer will receive a copy of the finalized document after the last person has finished signing and submitted the document. This checkbox allows you to prevent signer profiles from receiving the finalized document.
9. Email Address is provided by previous signer if: By default, S-Sign requires each signer profile to have an email address linked to it before a document is sent for signature, whether it's filled in within the signer profile menu, during document generation, or dynamically with merge fields. However, you can use this field to allow certain signers to be able to specify the email address of the next signer of a document during the signing process.
This field requires a conditional statement using standard render notation (e.g. {{!Opportunity.StageName}} == ‘Closed Won’). If that expression evaluates to true, the person signing before this signer (e.g. the signer profile with a signing order that is 1 less than the profile you're working with) will be able to specify the email of the profile you're working with during the signing process.
For example, if you want signer 1 to be able to enter the email address of signer 2, you would enter an expression into this field on signer 2's signer profile (since this option allows the previous signer to specify this signer's email address). If that expression evaluates to true, signer 1 will be able to enter signer 2's email after they (signer 1) have finished signing.
10. Signer Profile is omitted if: Specify a condition that should prevent this signer profile from being included in the S-Sign request. If that condition evaluates to true, this profile will not be sent the S-Sign request. This field accepts conditional statements using standard render notation (e.g. {{!Opportunity.StageName}} == 'Closed Lost').
11. Delete Profile: Clicking this button will delete the signer profile.
12. Create Another Signer Profile: Clicking this button will create another signer profile.
You're now ready to start configuring unique signer profiles and tailoring S-Sign to any of your business needs.