Introduction
This article provides a comprehensive overview of creating and sending an e-signature request with S-Sign in Salesforce Lightning Experience, as well as explains what happens behind the scenes. To view this article for Salesforce Classic, click here.
Tutorial Video
Sending the E-Signature Request
Sending an E-Signature request with S-Sign is as simple as generating a document and sending an email. Once you have created an HTML E-Signature request template and an S-Sign PDF template, navigate to a Salesforce record and click the S-Docs button. If you don't see the S-Docs button, review the S-Docs Installation & Configuration guide.

Next, select your HTML E-Signature request template and your PDF template. S-Sign enabled templates have an S-Sign logo next to the template name. Click Next Step to generate documents with these templates.

When the documents generate, click Send Documents for Electronic Signature.

If you didn't specify the email of the signer in the template editor, you will be prompted to enter their email now. If your template requires multiple signers, you will be able to enter the email address of each signer here.
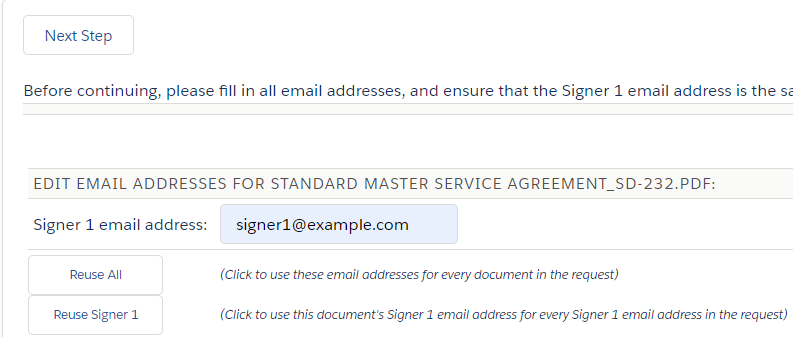
Upon clicking Next Step, you will be brought to the the email page. Here, you have the option to edit the usual email fields (To, CC, BCC, Subject).

Note that you also have the option to edit the body of the email.
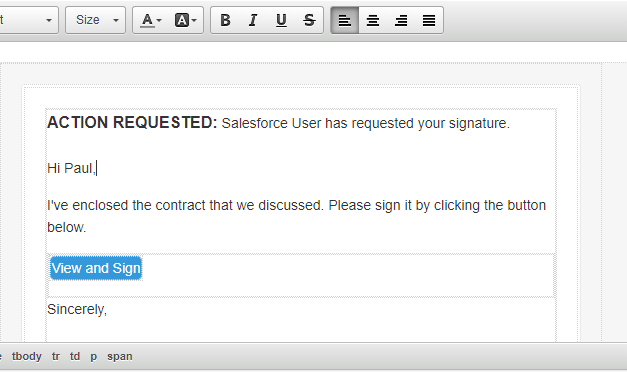
Note that the PDF is not included on this email as an attachment; this is because the email contains a link to the document(s) for signature. Click Send to send the document for e-Signature.
What the Signer Will See
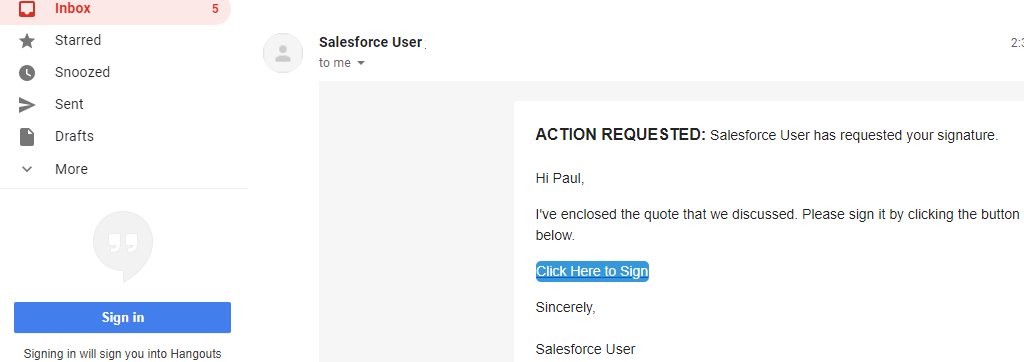
The recipient then receives the email that you created with your HTML template:
When the recipient clicks the sign link, they will be routed to the S-Sign Consent screen, which will optionally prompt them to verify their identity by entering a code and consenting to do business electronically.

After clicking Continue, they will then be taken to the signable document.

From here, the recipient can [1] use the navigation bar at the top to move through required inputs, as well as decline or submit the document. To sign the document, the recipient can [2] click Sign Here to bring up the signature pad.

The recipient can [1] draw their signature, or [2] type their name and select the Text-To-Signature checkbox to replace their signature with a cursive font. Once their signature is ready, they can [3] click Add Signature to add it to the document, or Add Signature & Submit Document (if the signature is the only input required).

Once the signer clicks Submit, S-Sign will generate the finalized document and append an audit trail to the end of it. The signer can then download the signed document or exit the page.

The signer and the user that requested the signature will receive a confirmation email containing the signed document.

Behind the Scenes - Before Signature
What happened in Salesforce while all of this was going on? Immediately after you clicked Send Documents for Electronic Signature, an S-Sign Envelope record was created, which can be viewed under the Related tab on the object record that you created the e-signature request for.

Click on the blue link to view the S-Sign Envelope record.

Under the Details tab, you can [1] view and track the sign status of your request; since the recipient hasn't opened the email yet, it's status is "Created." This will change to "Viewed" when the recipient opens the document, and "Signed" once they sign it. You can also [2] view the template ID used for the email, [3] the number of documents that need to be signed, and [4] the HTML email page itself.
Under the Related tab, you'll be able to see S-Sign Envelope Document records, one for each signable PDF that was included in our E-Signature request (in this case, only 1).

You can [1] click on the PDF icon to view the document that is going to be signed, or [2] click on the Envelope Doc Number to view the envelope document record. We'll click this number now.
On the S-Sign Envelope Document record, you'll be able to see more details.

You can [1] view the Sign Status again, as well as [2] the current signer identity (this is useful when your documents require multiple signatures). If necessary, you can [3] click the envelope icon in the Resend Contract field to navigate back to the S-Docs email page and send the e-signature request again. Once the document has been signed, you'll be able to [4] view the finished product on this page, as well as [5] the original document before signature. Finally, you can [6] click the Continue as Active Signer icon to access the document as the current signer (useful for troubleshooting purposes).
Under the Related tab, only the original document is visible.

Behind the Scenes - After Signature
Now let’s take a step forward in time to when our recipient has signed the document. Again, head to the object record you generated the e-signature request from, and click on the S-Sign Request link under S-Sign Envelopes.
At this point, the S-Sign Envelope's status has been updated to "Completed."

Under the Related tab, a link has appeared to view the signed document.

When you click on the Envelope Doc Number to access the S-Sign Envelope Document record, the Related tab now contains files for the document audit trail, the raw signature file, the signed document, and the original document.

The signed document file will also appear in the Notes & Attachments related list on the base record.
That's all there is to it!
Tags: E-Signature, Email, S-Docs Button, Sign In-Person, Signing Process