Introduction
S-Sign excels when it comes to sending and receiving e-signature requests, but it can do much more than just accept signatures. By utilizing the template editor, you can add a variety of different input fields to your S-Sign documents to capture user input like title, department, phone number, or any number of things that fit your organization's needs. Once the user fills these fields in, the data will be automatically written back to Salesforce, and the appropriate fields on the base record will be updated.
Additionally, S-Sign will automatically run your Salesforce validation rules and display your error messages directly on the document(s) users are signing. This is useful when there are certain field values that you want to restrict users from inputting.
Creating a Sample Validation Rule
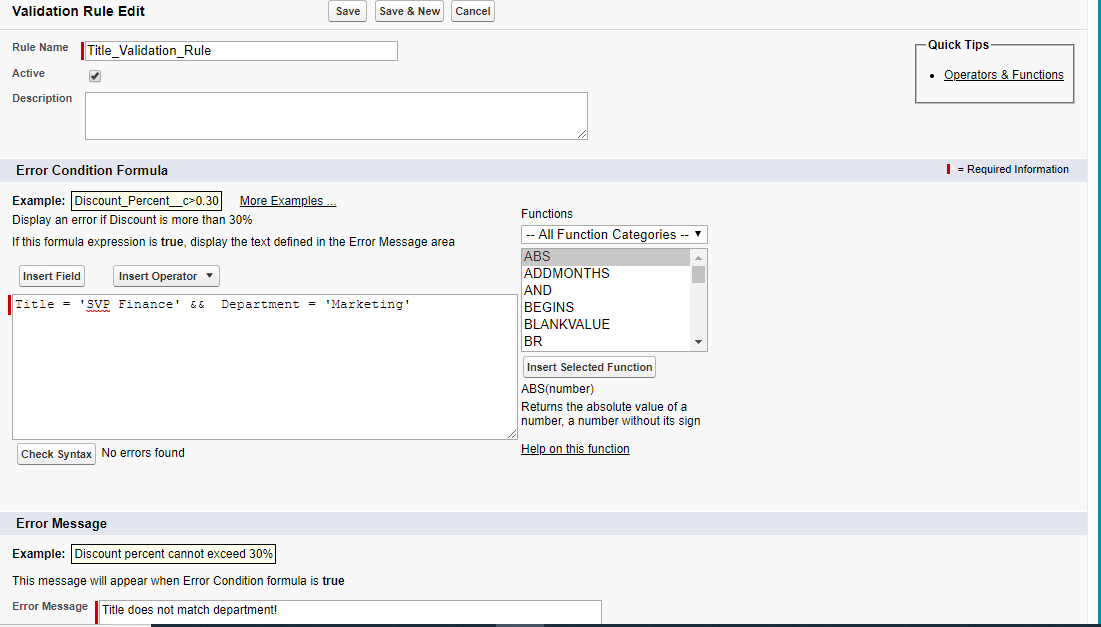
To showcase these features, we will start by creating a validation rule that prevents individuals from entering a title of "Finance" and a department of "Marketing," but S-Sign will run any validation rules you have in place. You'll see this in action later. There is no configuration necessary for S-Sign to run your validation rules; this happens automatically.
Writing User Input Back to Salesforce - Configuration
Now that we have written our validation rule, we will showcase how S-Sign writes data back to Salesforce fields based on what users input into your e-signature documents.
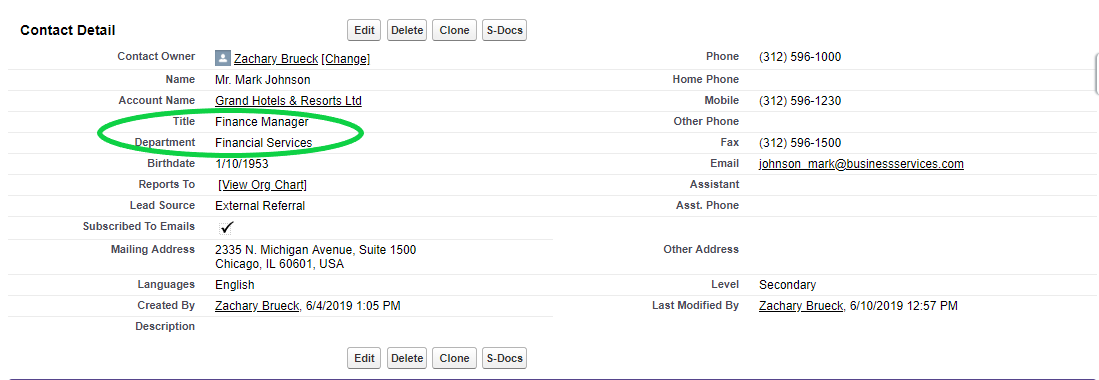
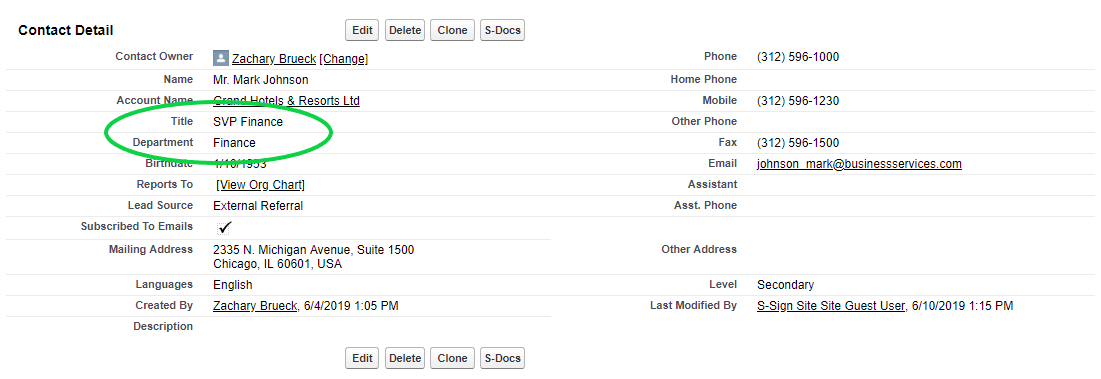
In this example, we will send a purchase agreement to a contact in Salesforce. Note that the contact’s title is “Financial Manager” and their department is “Financial Services” in the Salesforce contact record. These are the fields that will be updated when the contact signs the document and enters their information. To begin, there are a few configuration steps we need to take.
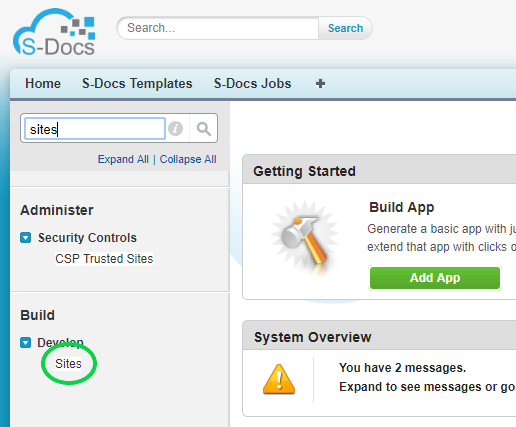
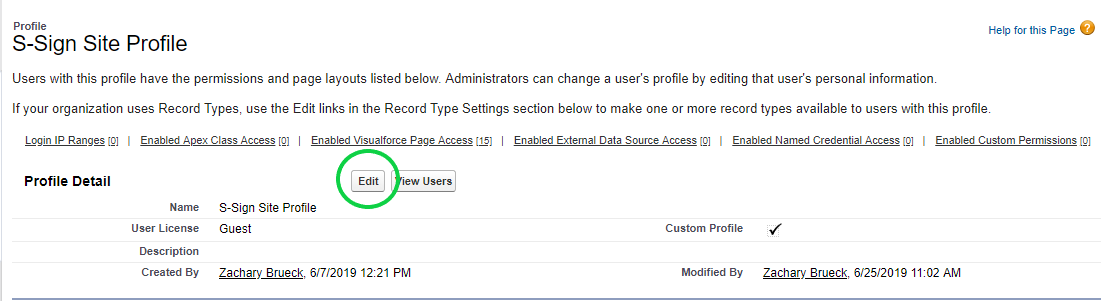
Step 1: Edit Your S-Sign Site's Public Access Settings
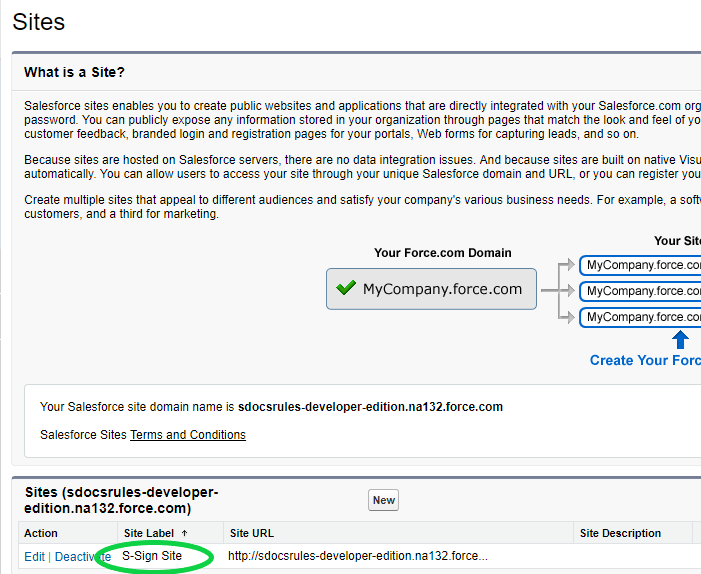
First, you will need to edit the Public Access Settings of your S-Sign Site (The site you set up when you first installed and configured S-Sign). To do this, click Setup in the upper right corner, then type "Sites" into the "Quick Find/Search" bar. Click Sites (under Build > Develop) from the list that drops down.
From there, click S-Sign Site under "Site Label."
Click Public Access Settings.

Click Edit at the top of the page.
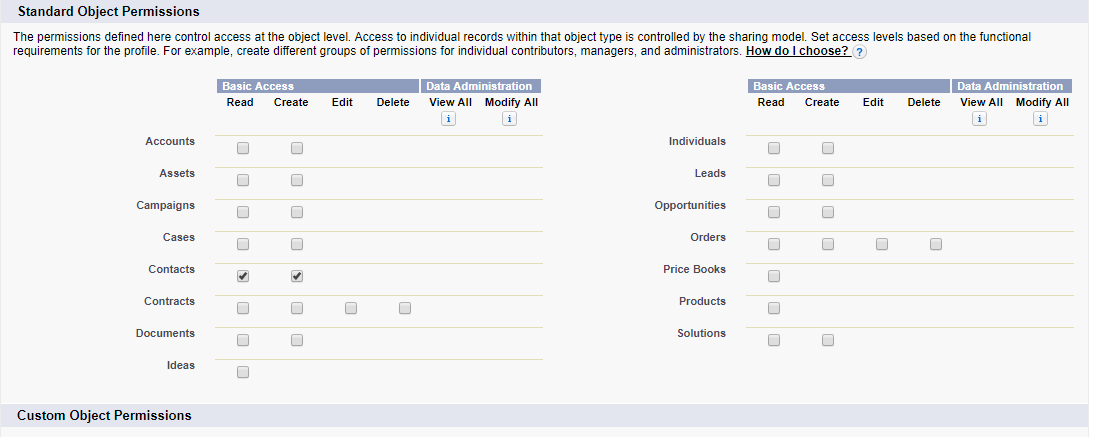
Scroll down to "Standard Object Permissions" and check the Read and Create boxes for the base object of your S-Sign template(s) (in this case, we're using the Contact object).
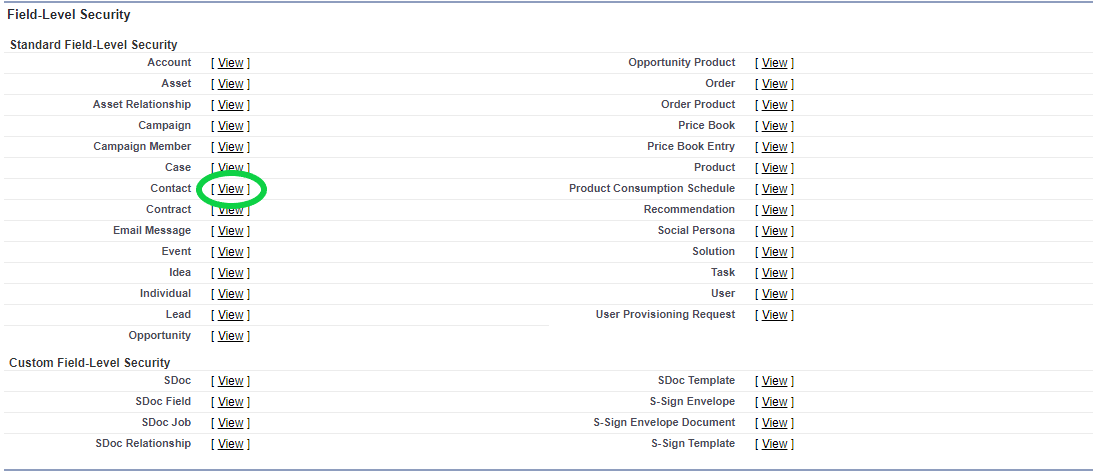
Click Save. You will be taken back to the Public Access Settings page. Scroll down to "Field Level Security" and click the View link next to the base object of your S-Sign template(s) (Contact in this case).
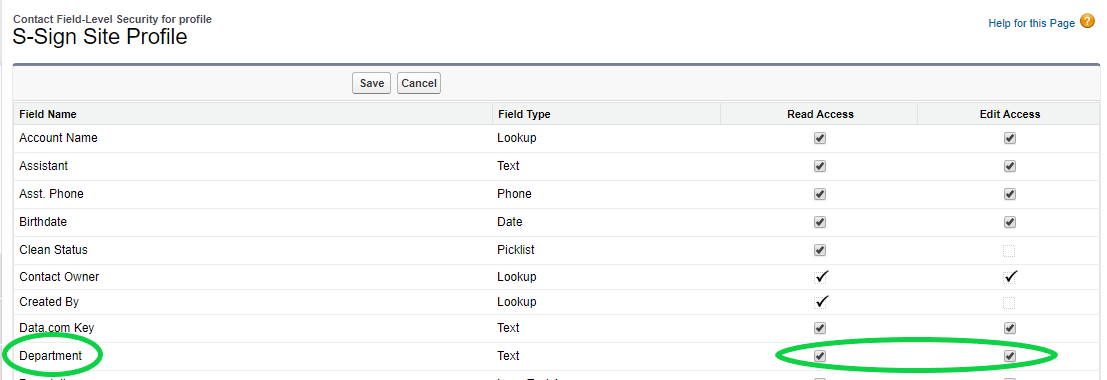
On the next page, click Edit and check the boxes for Read Access and Edit Access for all of the fields that you want S-Sign to write data back to.
Click Save. This concludes part 1.
Part 2: Associate S-Sign Fields to Salesforce Fields
Now that you've given S-Sign permission to write user input back to your Salesforce records, you must now associate S-Sign input fields to the Salesforce fields that they will write data back to. This is done in the S-Docs template editor. To begin, navigate to the template editor by clicking on All tabs (“+” symbol). Click on S-Docs Templates, choose your template, then click Template Editor. To learn how to create S-Sign-enabled templates, click here.
In our purchase agreement, we’re going to include three fields: a signature field where the user can sign their name, and two text fields where the user can enter their title and department. We do this by adding three S-Sign fields into the document. We set the type of field 1 to Signature, and the types of fields 2 and 3 to Text.
Since field 1 is just a signature, it is ready to go: we simply copy the S-Sign Field tag and paste it into our template wherever we want the recipient to sign.
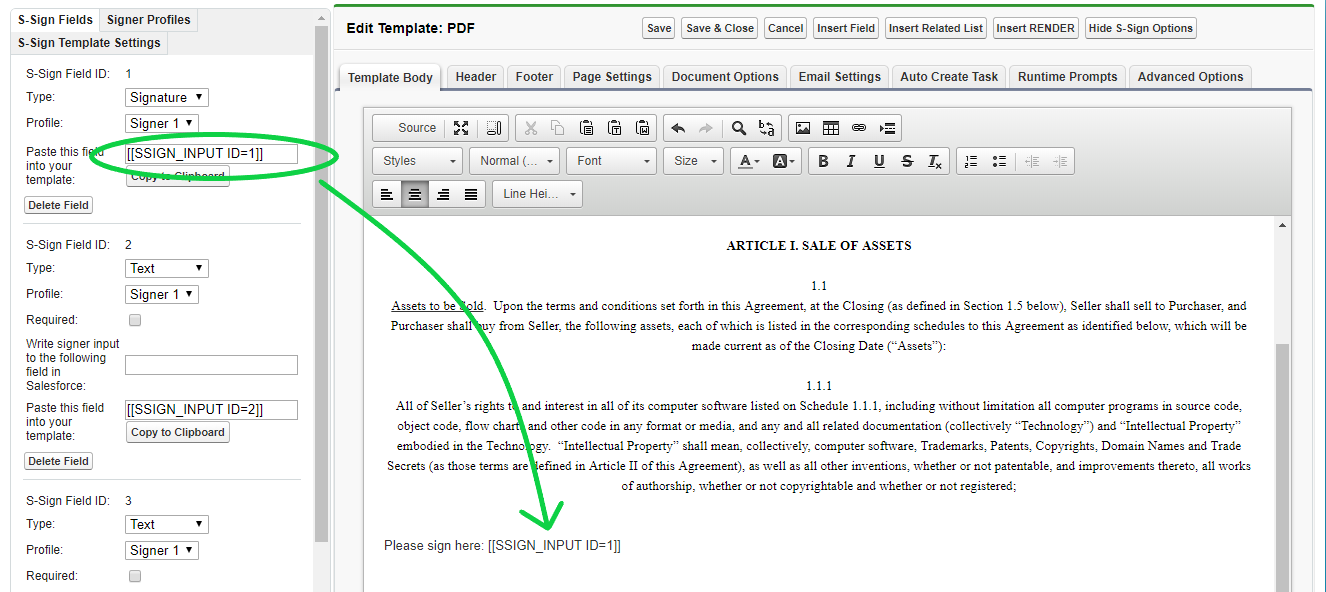
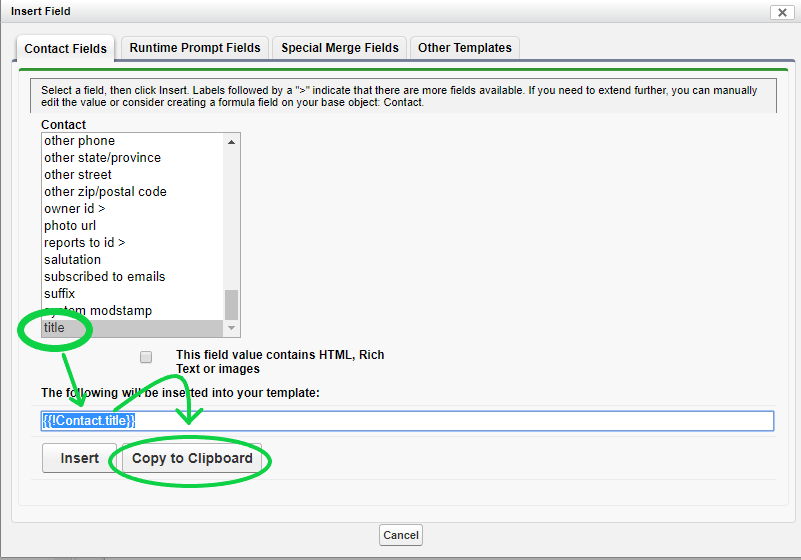
We will now associate text fields 2 and 3 to specific Salesforce fields; this will enable S-Sign to write the data back to Salesforce and update the contact record when the user fills in their information. To do this, we click Insert Field at the top of the template. This will bring up a list of numerous fields to choose from. Select the field you want, then click Copy to Clipboard.
Next, we paste this merge field into the Write signer input to the following field in Salesforce field in the S-Sign menu. From there, we can copy the S-Sign Field tag and insert it wherever we want. It will now write user-inputted data back to the appropriate Salesforce field.
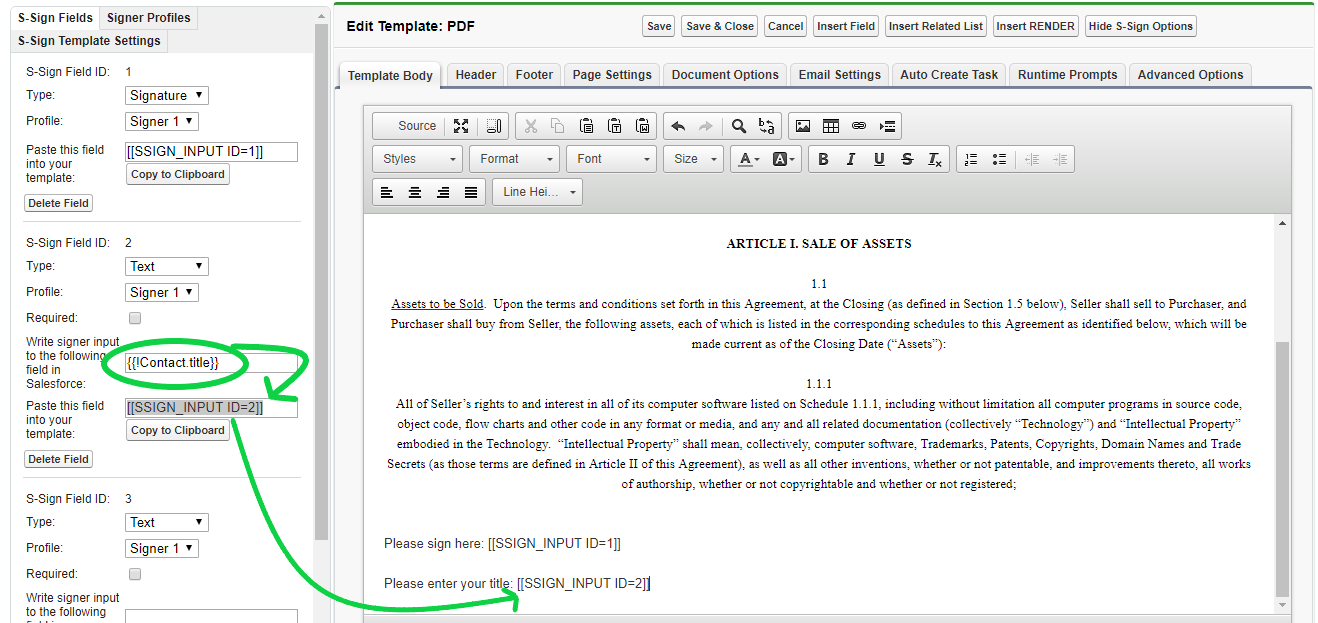
This step is repeated for however many fields are desired. After we save this template, it is now ready to be sent to our contact to be signed. To learn how to send e-signature requests with S-Sign, click here.
Let's See it in Action
Once the recipient receives your S-Sign request and opens the document, they can enter their information and sign. Here’s where the validation rule comes into play. If they enter values not allowed by your validation rule, they will see the error message you wrote.
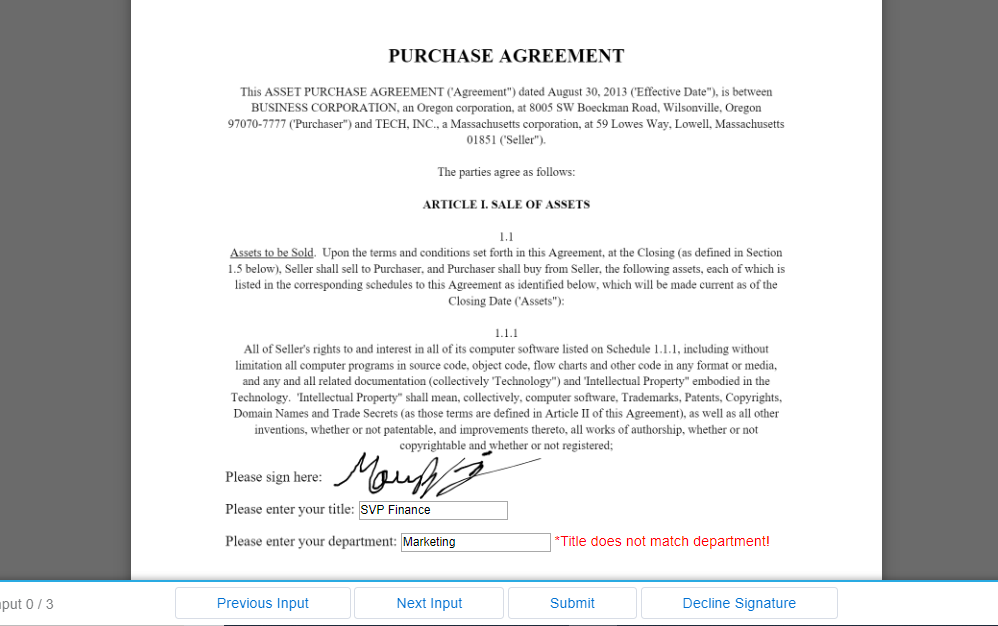
However, if the recipient enters their information correctly, they will be able to submit the signed document.
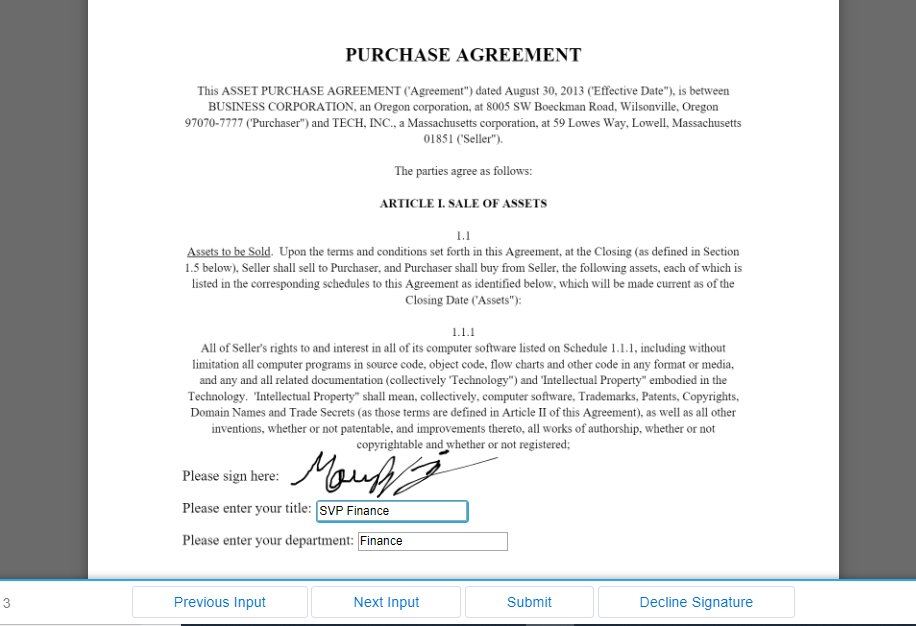
Notice that this user input “SVP Finance” into the Title field and “Finance” into the Department field. These values differ from what was previously written in the Salesforce contact record for this person (“Financial Manager” for title and “Financial Services” for department). As you can see, S-Sign automatically updated these fields in Salesforce when the user signed the document. No manual updates needed!
Tags: Access/Permissions, Merge Fields, S-Sign Fields, Signing Process