Defining Your Own Translations
Translating the user experience of S-Sign is simple. Currently, only Spanish and German translations are available to download; this process is explained in the section below. If you want to define your own translations, you can do so on the S-Sign translation page. If you are using S-Docs 4.381+, navigate to this page by clicking the App Launcher, typing in "S-Docs Setup," and clicking S-Docs Setup in the dropdown menu. From there, scroll down to the Translate UI section and click Go To S-Sign UI Translation Page.
![]()
If you are using a version of S-Docs below 4.381, the S-Sign Translation page can be accessed by adding the following URL after "salesforce.com" in your browser:
[code lang="html"]/apex/SDOC__SDConfig?translateSSign=true[/code]
The S-Sign Translation page appears as follows:
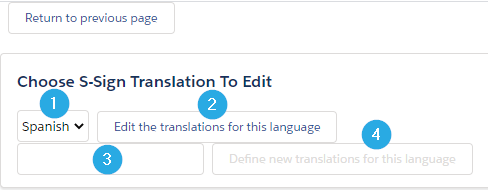
If you've defined translations for a language on this page before, you'll be able to [1] choose a language and [2] edit the translations for that language. If you haven't accessed this page before, you'll need to [3] enter the name of a language and then [4] click Define new translations for this language to bring up a list of available S-Sign fields that you can translate.
![]()
[1] The English version of each S-Sign field that can be translated appears on the left. You can translate the text in the text box on the right. Make sure to [2] click Save when you are done entering your translations.
Using S-Docs Translation Templates
1. Import The Template
To use the translations we provide, begin by importing either the Spanish or German translation template. To do this, create a new template. You can set whatever values you want for "Related to Type" and "Template Format," as these will be overwritten when you import the translation template. ![]()
Next, navigate to the template editor and paste in the code from one of the links below, then click Save & Close.
Spanish: S-Sign Translation Spanish v1.960
German: S-Sign Translation German v1.960
![]()
![]()
Once you click Save & Close, the template record should look like this.
![]()
Notice that Available for Use and Initially Visible have been unchecked, since this isn't a template that can be used for document generation; it's simply providing the translation for the S-Sign user experience.
2. Add The Translate Parameter to Your S-Docs Button
Next, you need to add the following parameter to the S-Docs button you will be using with S-Sign (replace Spanish for German if using the German translation):
[code lang="html"]ssignParams='language:Spanish'[/code]
In this example, we'll add it to the S-Docs button for the Contact object. Navigate to Setup by clicking the cog in the upper right of your screen, then go to the Object Manager tab. Click your object.
![]()
Then, navigate to the Buttons, Links, and Actions tab. Find your S-Docs button and click Edit.
![]()
Add the parameter to your button.
[code lang="html"]{!URLFOR('/apex/SDOC__SDCreate1', null,[id=Contact.Id, Object='Contact',
ssignParams='language:Spanish'])}[/code]
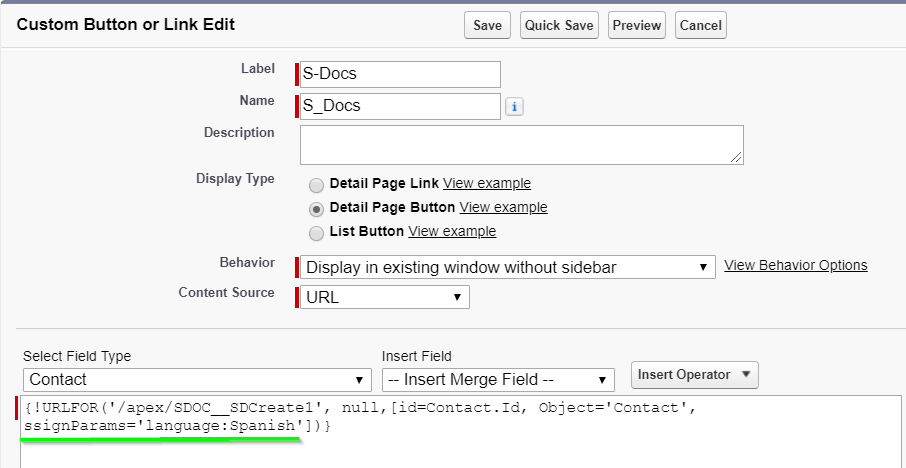
Click Save, and you're all set! The S-Sign user experience will now be translated.
Setting Language on a Per-Document-Envelope Basis
You can also set the S-Sign language for individual document envelopes through the SSIGN__Language__c field. When building automation using the S-Docs Job object in conjunction with Salesforce Process Builder or Apex, set the S-Doc Job field SSign Language to your chosen language. This will cause the S-Doc Job record to set the S-Sign Envelope Document field SSIGN__Language__c to that language.