Category

S-Docs Cookbook

Restrict A Template From Being Emailed

By Best Practices, Documentation, S-Docs Cookbook No Comments

Use Email Settings To Restrict A Template From Being Emailed

Although S-Docs will show the Email Selected Docs button by default after a document has been generated, it is possible to hide this button and disable a template's ability to be emailed. There are many reasons that an admin might want to restrict templates from being emailed; for example, if a document contains potentially sensitive information, it might be easier to avoid mistakes by taking away the email option entirely.

To accomplish this, navigate to the template editor for the template that you want to restrict from being emailed.

Next, navigate to the Email Settings tab.

Finally, check the Lock To box, and leave the To field blank. Once you click Save, the template will no longer be able to be emailed.

What The End User Will See

When the document is generated, the Email Selected Docs button will be gone.

If multiple S-Docs are generated, and some of them can be emailed, the ones that you restrict will have a lock icon.

Keep in mind that this must be done for every template you want to restrict from being emailed. If you would like to learn more about the S-Docs template editor, please visit our template editor guide and our guide to email templates in S-Docs.


Translate Merge Fields & Field Labels

By Documentation, General Solutions, S-Docs Cookbook No Comments

Introduction

S-Docs can translate field labels and field data within your S-Docs templates as long as the translations are already defined within the Salesforce Translation Workbench.

Currently, all field labels are able to be translated (you only need to define translations for custom field labels, as standard field labels already have translations stored within Salesforce), but the only type of merge field data that can be translated are picklist values, since the Translation Workbench doesn't allow you to translate things like text field data.

There are three steps to translating field labels and picklist field data within your S-Docs templates, which we will go over in detail below.

Defining Translations

S-Docs pulls translations from the Salesforce Translation Workbench, so the first step to translating field data is defining your own translations. From the Setup menu, type "Translation" into the Quick Find / Search bar, then click Translate. In this example, we will be translating the Lead Source picklist into German for the Contact object, so we set Language to German, Setup Component to Picklist Value, and Object to Contact. Then, we scroll down and add our own German translations for the Lead Source picklist.

You can also translate field labels within the Translation Workbench. All standard field labels already have translations stored within Salesforce, so you only need to translate custom field labels yourself. To do so, set the Setup Component to Custom Field, and set the Aspect to Field Label, then enter your translations below.

Enabling Translations

After you've defined your translations, you need to enable the translate feature within S-Docs. There are two different ways you can do this.

Option 1: Add the translation parameter to the S-Docs button

From the setup menu, navigate to the Object Manager and click the object you've defined translations for. In this example, we are using the Contact object.

Navigate to the Buttons, Links, & Actions tab, find your S-Docs button, and click Edit.

If you're using the Contract, Opportunity, Account, Contact, Lead, Task, or Event objects, the S-Docs button comes as part of the S-Docs package and is therefore managed & unable to be edited. You'll need to create a new S-Docs button with the same parameters as the managed button, and add it to your object's page layout in place of the original button. Click here to learn more about creating an S-Docs button.

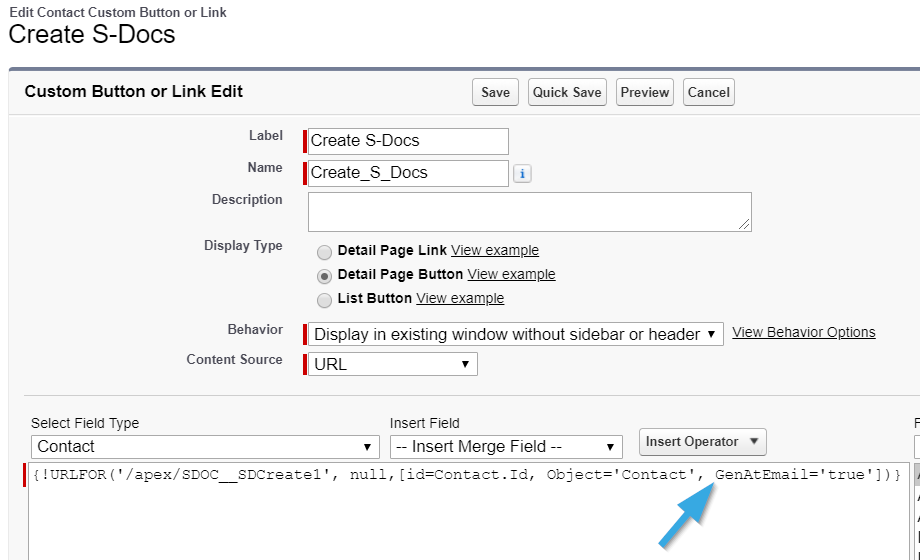
Then, add the following parameter to your S-Docs button URL: language='LANGUAGE_CODE'. You'll need to replace LANGUAGE_CODE with the appropriate Salesforce language code.

Since we're translating to German in our example, our button code will look like this for the Contact object:

[code lang="html"]{!URLFOR('/apex/SDOC__SDCreate1', null,[id=Contact.Id, Object='Contact',
language='DE'])}[/code]

Click Save.

Option 2: Change the Template Language

For this option, you'll need to add the language field to the template detail page layout, and then add the appropriate Salesforce language codes as picklist values for this field. From the Setup menu, navigate to the Object Manager and click the SDoc Template object.

Then, go to the Page Layouts tab and click Edit for the appropriate page layout.

In the Fields menu, scroll over to find the Language field. Drag it down into the SDoc Template Detail section. Click Save.

Next, navigate to the Fields & Relationships tab and click Language (not the Edit button).

Scroll down to the Values section and click New.

Add the appropriate Salesforce language code, then click Save.

When you navigate to any template detail page, you'll now be able to set the language for that template.

Add the Translate Attribute to Your Merge Fields

The last step is adding the "translate" attribute to the merge fields/field labels you want to be translated within your documents. Note that once you add the "translate" attribute to one instance of a merge field, all other instances of the same merge field within that document will also be translated, regardless of if they have the translate tag or not. Since we translated the Lead Source picklist in the Translation Workbench, we'll add add the "translate" attribute to this merge field.

For reference, the regular Contact Lead Source merge field looks like this:
[code lang="html"]{{!Contact.leadsource}}[/code]

The translated Contact Lead Source merge field looks like this:
[code lang="html"]{{!Contact.leadsource translate="true"}}[/code]

Translating field labels works in the same way:

The regular field label for Lead Source looks like this:
[code lang="html"]{{!Label.Contact.leadsource}}[/code]

The translated field label for contact Lead Source looks like this:
[code lang="html"]{{!Label.Contact.leadsource translate="true"}[/code]

In the template editor, it looks like this:

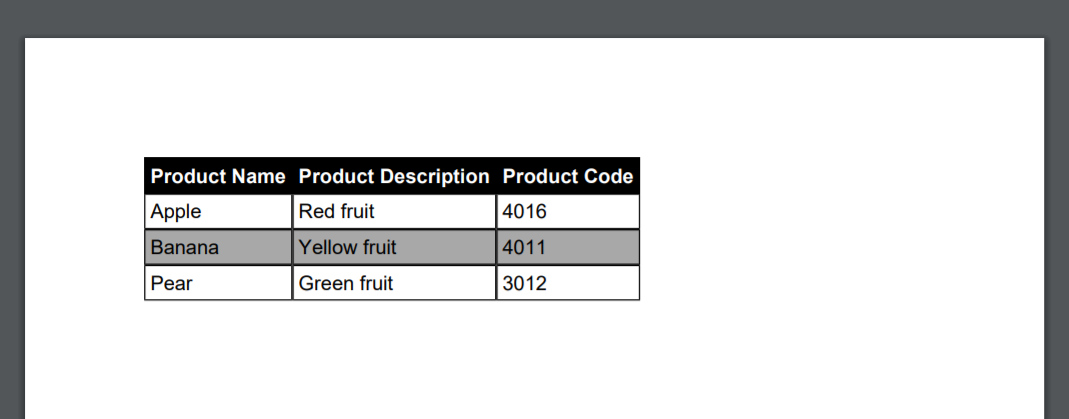
When you generate the document, the fields will be translated!


Translate The S-Docs UI

By Documentation, General Solutions, S-Docs Cookbook No Comments

Defining Your Own Translations

Translating the user experience of S-Docs is simple. Currently, only Spanish and German translations are available to download; this process is explained in the next section. If you want to define your own translations, you can do so on the S-Docs translation page. If you are using S-Docs 4.381+, navigate to this page by clicking the App Launcher, typing in "S-Docs Setup," and clicking S-Docs Setup in the dropdown menu. From there, scroll down to the Translate UI section and click Go To S-Docs UI Translation Page.

If you are using a version of S-Docs below 4.381, the S-Docs Translation page can be accessed by adding the following URL after "salesforce.com" in your browser:

[code lang="html"]/apex/SDOC__SDConfig?translateSDocs=true[/code]

The S-Docs translation page appears as follows:

If you've defined translations for a language on this page before, you'll be able to [1] choose a language and [2] edit the translations for that language. If you haven't accessed this page before, you'll need to [3] enter the name of a language and then [4] click Define new translations for this language to bring up a list of available S-Docs fields that you can translate.

Translation options are [1] broken up into different sections. The following S-Docs pages can be translated on this page:

  • The Generate Documents page (where templates are selected and generated)
  • The Edit Document page (where generated documents can be edited using the Live Edit feature)
  • The Send Email page
  • The Contact Lookup window (this appears when users click inside of the Contact/User Lookup field on the Send Email page)
  • The Attach Files window (this appears when users click Attach or Remove Files on the Send Email page)
  • The Upload Files tab within the Attach Files window

[2] The English version of each field that can be translated appears on the left. You can translate the text in the text box on the right. Make sure to [3] click Save when you are done entering your translations.

Using S-Docs Translation Templates

1. Import The Template

To use the translations we provide, begin by importing either the Spanish or German translation template. To do this, create a new template. You can set whatever values you want for "Related to Type" and "Template Format," as these will be overwritten when you import the translation template.

Navigate to the template editor and paste in the code from one of the links below, then click Save & Close.

Spanish: S-Docs Translation Spanish v2.955
German: S-Docs Translation German v2.955

Once you click Save & Close, the template record should look like this.

Notice that Available for Use and Initially Visible have been unchecked, since this isn't a template that can be used for document generation; it's simply providing the translation for the S-Docs user experience.

2. Add The Translation Parameter To Your S-Docs Button

Note: The S-Docs button comes prepackaged for the following standard objects: Contract, Opportunity, Account, Contact, Lead, Task, and Event. Because of this, the button will be managed and therefore unable to be edited for these objects. You will need to create a new S-Docs button (and replace the old button on the object's page layout) to make edits.

Next, you need to add the following parameter to the S-Docs button for each object you're using S-Docs with (replace Spanish for German if using the German translation):

[code lang="html"]UILanguage='Spanish'[/code]

In this example, we'll add it to the S-Docs button for the Contact object. Navigate to Setup by clicking the cog in the upper right corner of your screen, then go to the Object Manager tab. Click your object.

Then, navigate to the Buttons, Links, and Actions tab. Find your S-Docs button and click Edit.

Add the parameter to your button.

[code lang="html"]{!URLFOR('/apex/SDOC__SDCreate1', null,[id=Contact.Id, Object='Contact',
UILanguage='Spanish'])}[/code]


Click Save and you're all set! The S-Docs user experience will now be translated.


Generate And Attach A New Document To Your Current Email

By Documentation, General Solutions, S-Docs Cookbook No Comments
S-Docs allows you to generate and attach new documents to your current email right from the email page in Salesforce. This is useful if you forgot about certain documents you wanted to send but don't want to exit the email page and start all over.

Add The GenAtEmail Parameter To Your S-Docs Button

To enable the ability to generate and attach new documents to your current email, all you have to do is add the  GenAtEmail='true' parameter to the S-Docs button for your object.

Use The Generate New Documents Button

After adding the GenAtEmail parameter to your S-Docs button, you'll see a Generate New Documents button appear on the email page whenever you click the S-Docs button that you edited. You can click it to select more documents to generate and automatically attach to your current email.
Note that the S-Docs button comes prepackaged for certain standard objects, such as the Contact object in the example above, and that this button cannot be edited. If you wish to enable the Generate New Documents on Email Page feature for these objects, you will need to create a new custom S-Docs button and add it to your page layout, and remove the prepackaged button from the page layout (if it's already there). Visit the Quick Install & Configuration Guide to learn about how to create an S-Docs button.
For information about other apex parameters that you can use to modify your S-Docs button, click here.

The Template Editor “Insert Conditional Logic” Button

By Documentation, General Solutions, S-Docs Cookbook No Comments

Introduction

S-Docs allows you to easily leverage conditional logic within your templates using the Insert Conditional Logic button. You can insert conditional statements with the click of a button in the WYSIWYG template editor without any HTML code. Watch the video below for a quick tutorial, or refer to the written instructions under the video.

Video Tutorial

Use The Insert Conditional Logic Button

Go to the template for which you would like to add conditional statements, and click the Insert Conditional Logic button.

Using this button, you can add a variety of conditional statements into your template.

The Insert Conditional Logic Menu

This is the Insert Conditional Logic menu. Using this interface, we will build our conditional statement by simply pointing and clicking, and then enter the content that will be conditionally rendered based on our conditions. Let's start with step 1: Select your conditions.

Start by [1] selecting a field. This picklist will let you choose from any field available on your template's base object. Then, [2] choose your operator. You can choose from equal-to, not-equal-to, greater-than, less-than, greater than or equal to, less than or equal to, contains, and not contains. Next, [3] choose the field value that you want your statement to evaluate. Then, [4] add the condition to the conditional statement.

Your condition will [1] be added to the conditional statement below. After you add your first condition, you can [2] add additional ones using AND/OR. Once your conditions are added into Step 2, you can edit them manually by simply clicking within the text box. After completing your conditional statement, you can move on to Step 3 to enter your conditionally rendered contents.

As you can see here, we've [1] finished our conditional statement, which will evaluate whether or not this contact has mobile and business phone information available. Now it's time to tell S-Docs what to render if the statement evaluates to true. To make this easier, you can [2] select fields from your object to include in your conditionally rendered contents. When you select a field, [3] the merge field syntax will be added to the text box underneath the field picker. Click Add Field to [4] add the merge field into the bottom text box, which contains the content that will be conditionally rendered if your conditional statement evaluates to true. As you can see here, if a contact has both a mobile and business phone on record, the document will include a small paragraph that provides this information.

Once you finish entering your conditionally rendered contents, click Insert. The template editor will format your conditional statement in the correct syntax, as follows:

[code lang="html"]<!--RENDER= '{{!Contact.mobilephone}}' != 'NULL' && '{{!Contact.phone}}' != 'NULL' -->
This contact has phone information available. Their mobile number is {{!Contact.mobilephone}} and their business number is {{!Contact.phone}}.
<!--ENDRENDER-->[/code]

From here, you can continue formatting your document however you like, or edit the conditional statement itself. For more information on conditional logic within a template and nested conditional statements (including writing conditional statements yourself), click here.

Note: If any fields in your conditional statement contain words and have a field type anything other than a basic string type (rich text, textarea, longtext, function, etc.) you will need to add the merge field attribute render. For example, if your merge field looked like this: {{!MyTestField}}
The field with the attribute added would look like this: {{!MyTestField render}} Within a conditional statement, it would look like this:
<!--RENDER= '{{!MyTestField render}}' == 'Test' -->{{!Opportunity.closedate M/d/yyyy}}<!--ENDRENDER-->
Note that this attribute should only be added to merge fields within render tags (e.g. enclosed by <!-- and -->). In the above example, the attribute is not added to the {{!Opportunity.closedate M/d/yyyy}} because this merge field is outside of the render tags (e.g. not used as a condition in your conditional statement).
Additionally, note that the Insert RENDER button will not add this attribute automatically. This functionality was added in version 4.48

Add Custom Filters When Selecting Your Templates

By Documentation, General Solutions, S-Docs Cookbook No Comments

Create A New S-Doc Relationship

S-Docs makes sorting through your templates easier by allowing you to create custom filters.

In this example, the filter we're creating is a picklist that will help us sort through templates by region. This can be done by creating a new S-Doc Relationship. You can learn more about custom relationships here.

When you reach the third step of creating your object, make sure to check the Visible checkbox.

Create A New S-Docs Button

Once you finish creating your relationship, proceed to making your new custom button. Be sure to check Detail Page Button, and choose Display in existing window without sidebar or header for its behavior. Append  AdditionalFields='Region__c', to your button's apex command. You can learn more about creating custom objects, such as buttons, here.

{!URLFOR('/apex/SDOC__SDCreate1', null,[id=Task.Id, Object='Task',
AdditionalFields='Region c'])}


Add the button to your page's layout. Since we named this button S-Docs, it can replace the previous S-Docs button on your page's layout.

Now, click your S-Docs button and see your picklist at work!

Merge External Data Into Your Documents

By Documentation, General Solutions, S-Docs Cookbook No Comments

Merge in External Data: XML Strings

To merge external data (in the form of an XML string) into an S-Docs document, you can create an S-Docs Job record and write the external data to the S-Docs Job record. You can then reference the XML data values as merge fields in your template.

For example, if you have {{!MyXXXField}} in your template and you write <MyXXXField>Tutorial</MyXXXField> to the S-Docs Job, you will see "Tutorial" in your generated document.

Nested XML Tags

This feature also supported nested XML tags, with the * character used as a delimiter between each level:

[code lang="html" highlight="1,19,25"]XML STRING
<aaa1>
<bbb1>
<ccc>test1</ccc>
</bbb1>
<bbb2>
<ccc>test2</ccc>
</bbb2>
</aaa1>
<aaa2>
<bbb1>
<ccc>test3</ccc>
</bbb1>
<bbb2>
<ccc>test4</ccc>
</bbb2>
</aaa2>

TEMPLATE
Field 1: {{!aaa1*bbb1*ccc}}
Field 2: {{!aaa1*bbb2*ccc}}
Field 3: {{!aaa2*bbb1*ccc}}
Field 4: {{!aaa2*bbb2*ccc}}

GENERATED DOCUMENT
Field 1: test1
Field 2: test2
Field 3: test3
Field 4: test4[/code]

Apex Code

You can also use this feature in your Apex code (for example, in an Apex class that does a webservice callout to retrieve the XML data string). In your Apex code, you can use the function SDBatch.writeRecordDataXML(SDJob__c sdjob, String xml) to write the XML string to an S-Docs Job record (this will store the XML string in the S-Docs Job's SDOC__RecordDataXML__c field, as well as the SDOC__RecordData2XML__c field if the string is too large to fit in the first field alone). For example:

[code lang="html"]String xmlData; // Your XML data goes here
SDOC__SDJob__c sdjob = new SDOC__SDJob__c(
SDOC__ObjAPIName__c='Opportunity', // Object API Name
SDOC__OID__c='006000000018HK6', // Object ID
SDOC__Doclist__c='a15000000012GQ2', // Template ID
SDOC__Start__c=true // Generate document upon insertion of S-Docs Job
);
SDBatch.writeRecordDataXML(sdjob, xmlData); // Write XML Data to S-Docs Job record
insert sdjob;[/code]

Given that you've configured your template to use merge fields referencing the XML data values, this code should generate a document that has your XML data merged into the specified locations.

Merge in External Table Data

You can also merge in external table data into your S-Docs documents. This involves formatting your external table data into an XML string and using Apex code to pass that string into an S-Docs Job record. This will allow the external table data to populate a table within an S-Docs document. Let's take a look at an example to see how this works.

Note: You can also merge XML table data into your documents synchronously via callable apex. Learn more here.

First, we built out a table within the S-Docs template editor that includes three columns -- one for product name, product description, and product code -- information that we'll assume is currently stored outside of Salesforce. Here's the source code for our table:

[code lang="html"]<img src="data:image/gif;base64,R0lGODlhAQABAIAAAAAAAP///yH5BAEAAAAALAAAAAABAAEAAAIBRAA7" data-wp-preserve="%3Cstyle%20type%3D%22text%2Fcss%22%3Etable%0A%20%20.table499%20%7Bborder%3Asolid%20black%201px%3B%20border-collapse%3Acollapse%3B%20border-spacing%3A0px%3Bfont-family%3AArial%20Unicode%20MS%2CArial%2CHelvetica%2Csans-serif%3B%20font-size%3A10pt%3B%20width%3A100%25%20%7D%0A%20%20.table499header%20%7Btext-align%3Acenter%3Bfont-weight%3Abold%3Bborder%3Asolid%20black%201px%3Bcolor%3A%23FFFFFF%3Bbackground-color%3A%23000000%3B%7D%0A%20%20.table499footer%20%7Btext-align%3Aright%3Bfont-weight%3Abold%3Bborder%3Asolid%20black%201px%3B%20height%3A%2030px%7D%0A%20%20.table499RowEven%7Bborder%3Asolid%20black%201px%3B%7D%0A%20%20.table499RowOdd%7Bbackground-color%3A%23cdcdcd%3Bbackground-color%3A%23a8a8a8%3Bborder%3Asolid%20black%201px%3B%7D%0A%20%20.table499col0%2C%20.table499col1%2C%20.table499col2%20%7Bborder%3Asolid%20black%201px%3Btext-align%3Aleft%3Bfont-weight%3Anormal%3Bfont-size%3A12pt%3Bfont-family%3AArial%2C%20Helvetica%2C%20sans-serif%3B%7D%0A%3C%2Fstyle%3E" data-mce-resize="false" data-mce-placeholder="1" class="mce-object" width="20" height="20" alt="&lt;style&gt;" title="&lt;style&gt;" />
<table cellpadding="4" cellspacing="0" class="table499">
<thead>
<tr>
<th class="table499header">Product Name</th>
<th class="table499header">Product Description</th>
<th class="table499header">Product Code</th>
</tr>
</thead>
<tbody><!--{{!
<LineItems>
<class>table499</class>
<listname externalList="true">products</listname>
<column>productname</column>
<column>productdescription</column>
<column>productcode</column>
</LineItems>
}}-->
</tbody>
</table>[/code]

As you can see, we've included some styling CSS within the <style> tags, and then defined our three table columns within <th> tags. Next, we added a LineItems statement within the <tbody> tags -- this statement will use your XML string to populate the table. Note that the <listname> tags include the externalList="true" attribute to denote that we will be merging in external data.

To ensure that our external table data will merge in correctly, we first need to format it into an XML string. You can write Apex code to format your table data into XML that follows the format below. Each product record includes one XML tag for each table column (in our example, 3 per record), and is enclosed within parent tags that have the same name as the <listname> in our S-Docs template.

[code lang="html"]<products>
<productname>Apple</productname>
<productdescription>Red fruit</productdescription>
<productcode>4016</productcode>
</products>
<products>
<productname>Banana</productname>
<productdescription>Yellow fruit</productdescription>
<productcode>4011</productcode>
</products>
<products>
<productname>Pear</productname>
<productdescription>Green fruit</productdescription>
<productcode>3012</productcode>
</products>[/code]

Once your external table data is formatted correctly, the last step is to write Apex code similar to the following so that your XML string can be written to an S-Docs Job record and merged into your S-Docs template.

[code lang="html"]String lineItemDataXML = ''; // Your XML data goes here
SDOC__SDJob__c sdjob = new SDOC__SDJob__c(
SDOC__ObjAPIName__c='Opportunity', //Object API name
SDOC__OID__c='006000000018HK6', // Object ID
SDOC__Doclist__c='a15000000012GQ2', //Template ID
SDOC__Start__c='true' // Generate document upon insertion of S-Docs Job
);
SDOC.SDBatch.writeLineItemDataXML(sdjob, lineItemDataXML); // Write XML Data to S-Docs Job record
insert sdjob;[/code]

This code will generate a document with your XML data merged into the table. Using the data listed above, the generated document will look like this:

Specify Coloration on Even and Odd Rows in Subquery Records

By Documentation, General Solutions, S-Docs Cookbook No Comments

Row Coloration Syntax

S-Docs offers support to specify coloration on even and odd rows in subquery records.

The syntax, which is tableXXXsubRowEven and tableXXXsubRowOdd, is case-sensitive, and if not specified, will revert to the CSS that's specified by tableXXXRowEven and tableXXXRowOdd.

Coloration in LineItemsSOQL can be specified by <rowcoloration>tablerow</rowcoloration> and <rowcoloration>record</rowcoloration>.

If <rowcoloration>tablerow</rowcoloration> is specified, the table row class is changed from tableXXXRowOdd to tableXXXRowEven (and vice versa) every time a new table row (<tr>) is insertedThis is also true for table rows inserted by newrow="true"groupbysum, etc.

Example Table & Code

In this case, the table would look something like the following, given the sample code below:

[code lang="html" collapse="1"]<span style="font-family:arial,helvetica,sans-serif;"><span style="color:#FF0000;"><span style="font-family:arial,helvetica,sans-serif;"><span style="color:#FF0000;"><strong>&lt;rowcoloration&gt;record&lt;/rowcoloration&gt; w</strong></span></span><strong>ith newrow="true" </strong></span></span>
<ul>
<li><span style="color:#000000;"><span style="font-family:arial,helvetica,sans-serif;"><em>Row colors change every other record.</em></span></span></li>
<li><span style="color:#000000;"><span style="font-family:arial,helvetica,sans-serif;"><span style="font-family:arial,helvetica,sans-serif;"><em>The body of each chatter post/comment record is inserted in a new row after the the record's other columns.</em></span></span></span></li>
</ul>
<br />
<!-- ******************** START RELATED LIST SECTION UNIQUEID:876********************-->
<style type="text/css">table.table876 {border:solid black 1px; border-collapse:collapse; border-spacing:0px;font-family:Arial Unicode MS,Arial,Helvetica,sans-serif; font-size:10pt; width:100% }
.table876header {text-align:center;font-weight:bold;border:solid black 1px;color:#FFFFFF;background-color:#000000;}
.table876footer {text-align:right;font-weight:bold;border:solid black 1px; height: 30px}
.table876subheader {text-align:center;font-weight:bold;border:solid black 1px;color:#FFFFFF;background-color:#000000;}
.table876RowEven{border:solid black 1px;background-color:#2ecc71;}
.table876RowOdd{background-color:#cdcdcd;border:solid black 1px;}
.table876subRowEven{border:solid black 1px;background-color:#f1c40f;}
.table876subRowOdd{background-color:#8e44ad;border:solid black 1px;}
.table876col0{border:solid black 1px;text-align:left;}
.table876col1{border:solid black 1px;text-align:left;}
.table876col2{border:solid black 1px;text-align:left;}
.table876col3{border:solid black 1px;text-align:left;}
.table876col4{border:solid black 1px;text-align:left;}
.table876col5{border:solid black 1px;text-align:left;}
</style>
<table class="table876">
<tbody><!--{{!
<lineitemsSOQL><class>table876</class>
<listname>feeds</listname>
<soql>
SELECT createdby.name, Body, createdby.phone,
(SELECT createdby.name, createdby.phone,CommentBody FROM FeedComments)
FROM FeedItem WHERE ParentId = '{{!ObjectID15}}'
ORDER BY createddate desc</soql>
<column header="Created By Name">createdby.name</column>
<column header="Created By Phone">createdby.phone</column>
<column newrow="true" colspan="2" type="text">body</column>
<column header="(Subquery Header) Created By Name" prefix="(Subquery Column) " nullprefix="(Subquery Column) ">sub.FeedComments.createdby.name</column>
<column header="(Subquery Header) Created By Phone" prefix="(Subquery Column) " nullprefix="(Subquery Column) ">sub.FeedComments.createdby.phone</column>
<column newrow="true" colspan="2" type="text">sub.FeedComments.CommentBody</column>
</lineitemsSOQL>
}}-->
</tbody>
</table>
<span style="font-family:arial,helvetica,sans-serif;"> </span><!-- ******************** END RELATED LIST SECTION UNIQUEID:876********************-->

<div style="page-break-after: always"><span style="display: none;">&nbsp;</span></div>
<span style="color:#FF0000;"> </span><span style="font-family:arial,helvetica,sans-serif;"><span style="color:#FF0000;"> </span><strong><span style="color:#FF0000;"></span></strong><span style="font-family:arial,helvetica,sans-serif;"><span style="color:#FF0000;"><strong>&lt;rowcoloration&gt;record&lt;/rowcoloration&gt; w</strong></span></span><strong><span style="color:#FF0000;">ithout newrow="true" </span></strong></span>

<ul>
<li><span style="font-family:arial,helvetica,sans-serif;"><span style="font-family:arial,helvetica,sans-serif;"><em>Row colors change every other record. </em></span></span></li>
<li><span style="font-family:arial,helvetica,sans-serif;"><em>The body of each chatter post/comment record is inserted in the same row as the the record's other columns.</em></span></li>
</ul>
<br />
<!-- ******************** START RELATED LIST SECTION UNIQUEID:876********************-->
<table class="table876">
<tbody><!--{{!
<lineitemsSOQL><class>table876</class>
<listname>feeds</listname>
<soql>
SELECT createdby.name, Body, createdby.phone,
(SELECT createdby.name, createdby.phone,CommentBody FROM FeedComments)
FROM FeedItem WHERE ParentId = '{{!ObjectID15}}'
ORDER BY createddate desc</soql>
<column header="Created By Name">createdby.name</column>
<column header="Created By Phone">createdby.phone</column>
<column header="Body" type="text">body</column>
<column header="(Subquery Header) Created By Name" prefix="(Subquery Column) " nullprefix="(Subquery Column) ">sub.FeedComments.createdby.name</column>
<column header="(Subquery Header) Created By Phone" prefix="(Subquery Column) " nullprefix="(Subquery Column) ">sub.FeedComments.createdby.phone</column>
<column header="(Subquery Header) Comments" type="text">sub.FeedComments.CommentBody</column>
</lineitemsSOQL>
}}-->
</tbody>
</table>
<span style="font-family:arial,helvetica,sans-serif;"> <!-- ******************** END RELATED LIST SECTION UNIQUEID:876********************--></span><br />
<br />
<style type="text/css">
</style>
<div style="page-break-after: always"><span style="display: none;">&nbsp;</span></div>
<span style="font-family:arial,helvetica,sans-serif;"><span style="color:#FF0000;"><span style="font-family:arial,helvetica,sans-serif;"><span style="color:#FF0000;"><span style="font-family:arial,helvetica,sans-serif;"><span style="color:#FF0000;"><strong>&lt;rowcoloration&gt;tablerow&lt;/rowcoloration&gt; w</strong></span></span></span></span><strong>ith newrow="true"</strong></span></span>

<ul>
<li><span style="font-family:arial,helvetica,sans-serif;"><span style="font-family:arial,helvetica,sans-serif;"><em>Row colors change every other table row. </em></span></span></li>
<li><span style="font-family:arial,helvetica,sans-serif;"><em>The body of each chatter post/comment record is inserted in a new row after the the record's other columns.</em></span></li>
</ul>
<br />
<!-- ******************** START RELATED LIST SECTION UNIQUEID:876********************-->
<table class="table876">
<tbody><!--{{!
<lineitemsSOQL><class>table876</class>
<listname>feeds</listname>
<rowcoloration>tablerow</rowcoloration>
<soql>
SELECT createdby.name, Body, createdby.phone,
(SELECT createdby.name, createdby.phone,CommentBody FROM FeedComments)
FROM FeedItem WHERE ParentId = '{{!ObjectID15}}'
ORDER BY createddate desc</soql>
<column header="Created By Name">createdby.name</column>
<column header="Created By Phone">createdby.phone</column>
<column newrow="true" colspan="2" type="text">body</column>
<column header="(Subquery Header) Created By Name" prefix="(Subquery Column) " nullprefix="(Subquery Column) ">sub.FeedComments.createdby.name</column>
<column header="(Subquery Header) Created By Phone" prefix="(Subquery Column) " nullprefix="(Subquery Column) ">sub.FeedComments.createdby.phone</column>
<column newrow="true" colspan="2" type="text">sub.FeedComments.CommentBody</column>
</lineitemsSOQL>
}}-->
</tbody>
</table>
<span style="font-family:arial,helvetica,sans-serif;"> </span><!-- ******************** END RELATED LIST SECTION UNIQUEID:876********************-->

<div style="page-break-after: always"><span style="display: none;">&nbsp;</span></div>
<span style="color:#FF0000;"> </span><span style="font-family:arial,helvetica,sans-serif;"><span style="color:#FF0000;"> </span><strong><span style="color:#FF0000;"></span></strong><span style="font-family:arial,helvetica,sans-serif;"><span style="font-family:arial,helvetica,sans-serif;"><span style="color:#FF0000;"><span style="font-family:arial,helvetica,sans-serif;"><span style="color:#FF0000;"><strong>&lt;rowcoloration&gt;tablerow&lt;/rowcoloration&gt; w</strong></span></span></span></span></span><strong><span style="color:#FF0000;">ithout newrow="true"</span></strong></span>

<ul>
<li><span style="font-family:arial,helvetica,sans-serif;"></span><span style="font-family:arial,helvetica,sans-serif;"><span style="font-family:arial,helvetica,sans-serif;"><span style="font-family:arial,helvetica,sans-serif;"><em>Row colors change every other table row. </em></span></span></span></li>
<li><span style="font-family:arial,helvetica,sans-serif;"><em>The body of each chatter post/comment record is inserted in the same row as the the record's other columns.</em></span></li>
</ul>
<br />
<!-- ******************** START RELATED LIST SECTION UNIQUEID:876********************-->
<table class="table876">
<tbody><!--{{!
<lineitemsSOQL><class>table876</class>
<listname>feeds</listname>
<rowcoloration>tablerow</rowcoloration>
<soql>
SELECT createdby.name, Body, createdby.phone,
(SELECT createdby.name, createdby.phone,CommentBody FROM FeedComments)
FROM FeedItem WHERE ParentId = '{{!ObjectID15}}'
ORDER BY createddate desc</soql>
<column header="Created By Name">createdby.name</column>
<column header="Created By Phone">createdby.phone</column>
<column header="Body" type="text">body</column>
<column header="(Subquery Header) Created By Name" prefix="(Subquery Column) " nullprefix="(Subquery Column) ">sub.FeedComments.createdby.name</column>
<column header="(Subquery Header) Created By Phone" prefix="(Subquery Column) " nullprefix="(Subquery Column) ">sub.FeedComments.createdby.phone</column>
<column header="(Subquery Header) Comments" type="text">sub.FeedComments.CommentBody</column>
</lineitemsSOQL>
}}-->
</tbody>
</table>
<span style="font-family:arial,helvetica,sans-serif;"> <!-- ******************** END RELATED LIST SECTION UNIQUEID:876********************--></span><br />
<br />
<style type="text/css">
</style>[/code]
If <rowcoloration>record</rowcoloration> is specified, the table row class changes from tableXXXRowEven to tableXXXRowOdd (and vice versa) upon iterating through all of the columns for the current record, regardless of how many table rows (<tr>) were inserted during that time.

If neither are specified, the default will be <rowcoloration>record</rowcoloration>.


Adding Page Breaks to Your PDF

By Documentation, General Solutions, S-Docs Cookbook No Comments

Insert Page Breaks With The Template Editor

When creating visually pleasing PDFs, it is essential to have control over exactly where the content of one page ends and the content of another begins. To insert a page break into your document, simply place your cursor where you want the page to break and click the Page Break button.

Insert Page Breaks With Code

You can also insert the following code into the Source of the template editor wherever you would like a page break:

[code lang="html"]<p style="page-break-after:always;"> </p>[/code]


Adding Page Numbers to Your PDF

By Documentation, General Solutions, S-Docs Cookbook No Comments

Add Page Numbers Using The Template Editor

To insert page numbers in your PDF's header or footer, use the {{!PageNumber}} and {{!PageCount}} merge fields. To do this, go to  Template Editor > Insert Field > Special Merge Fields.


Top