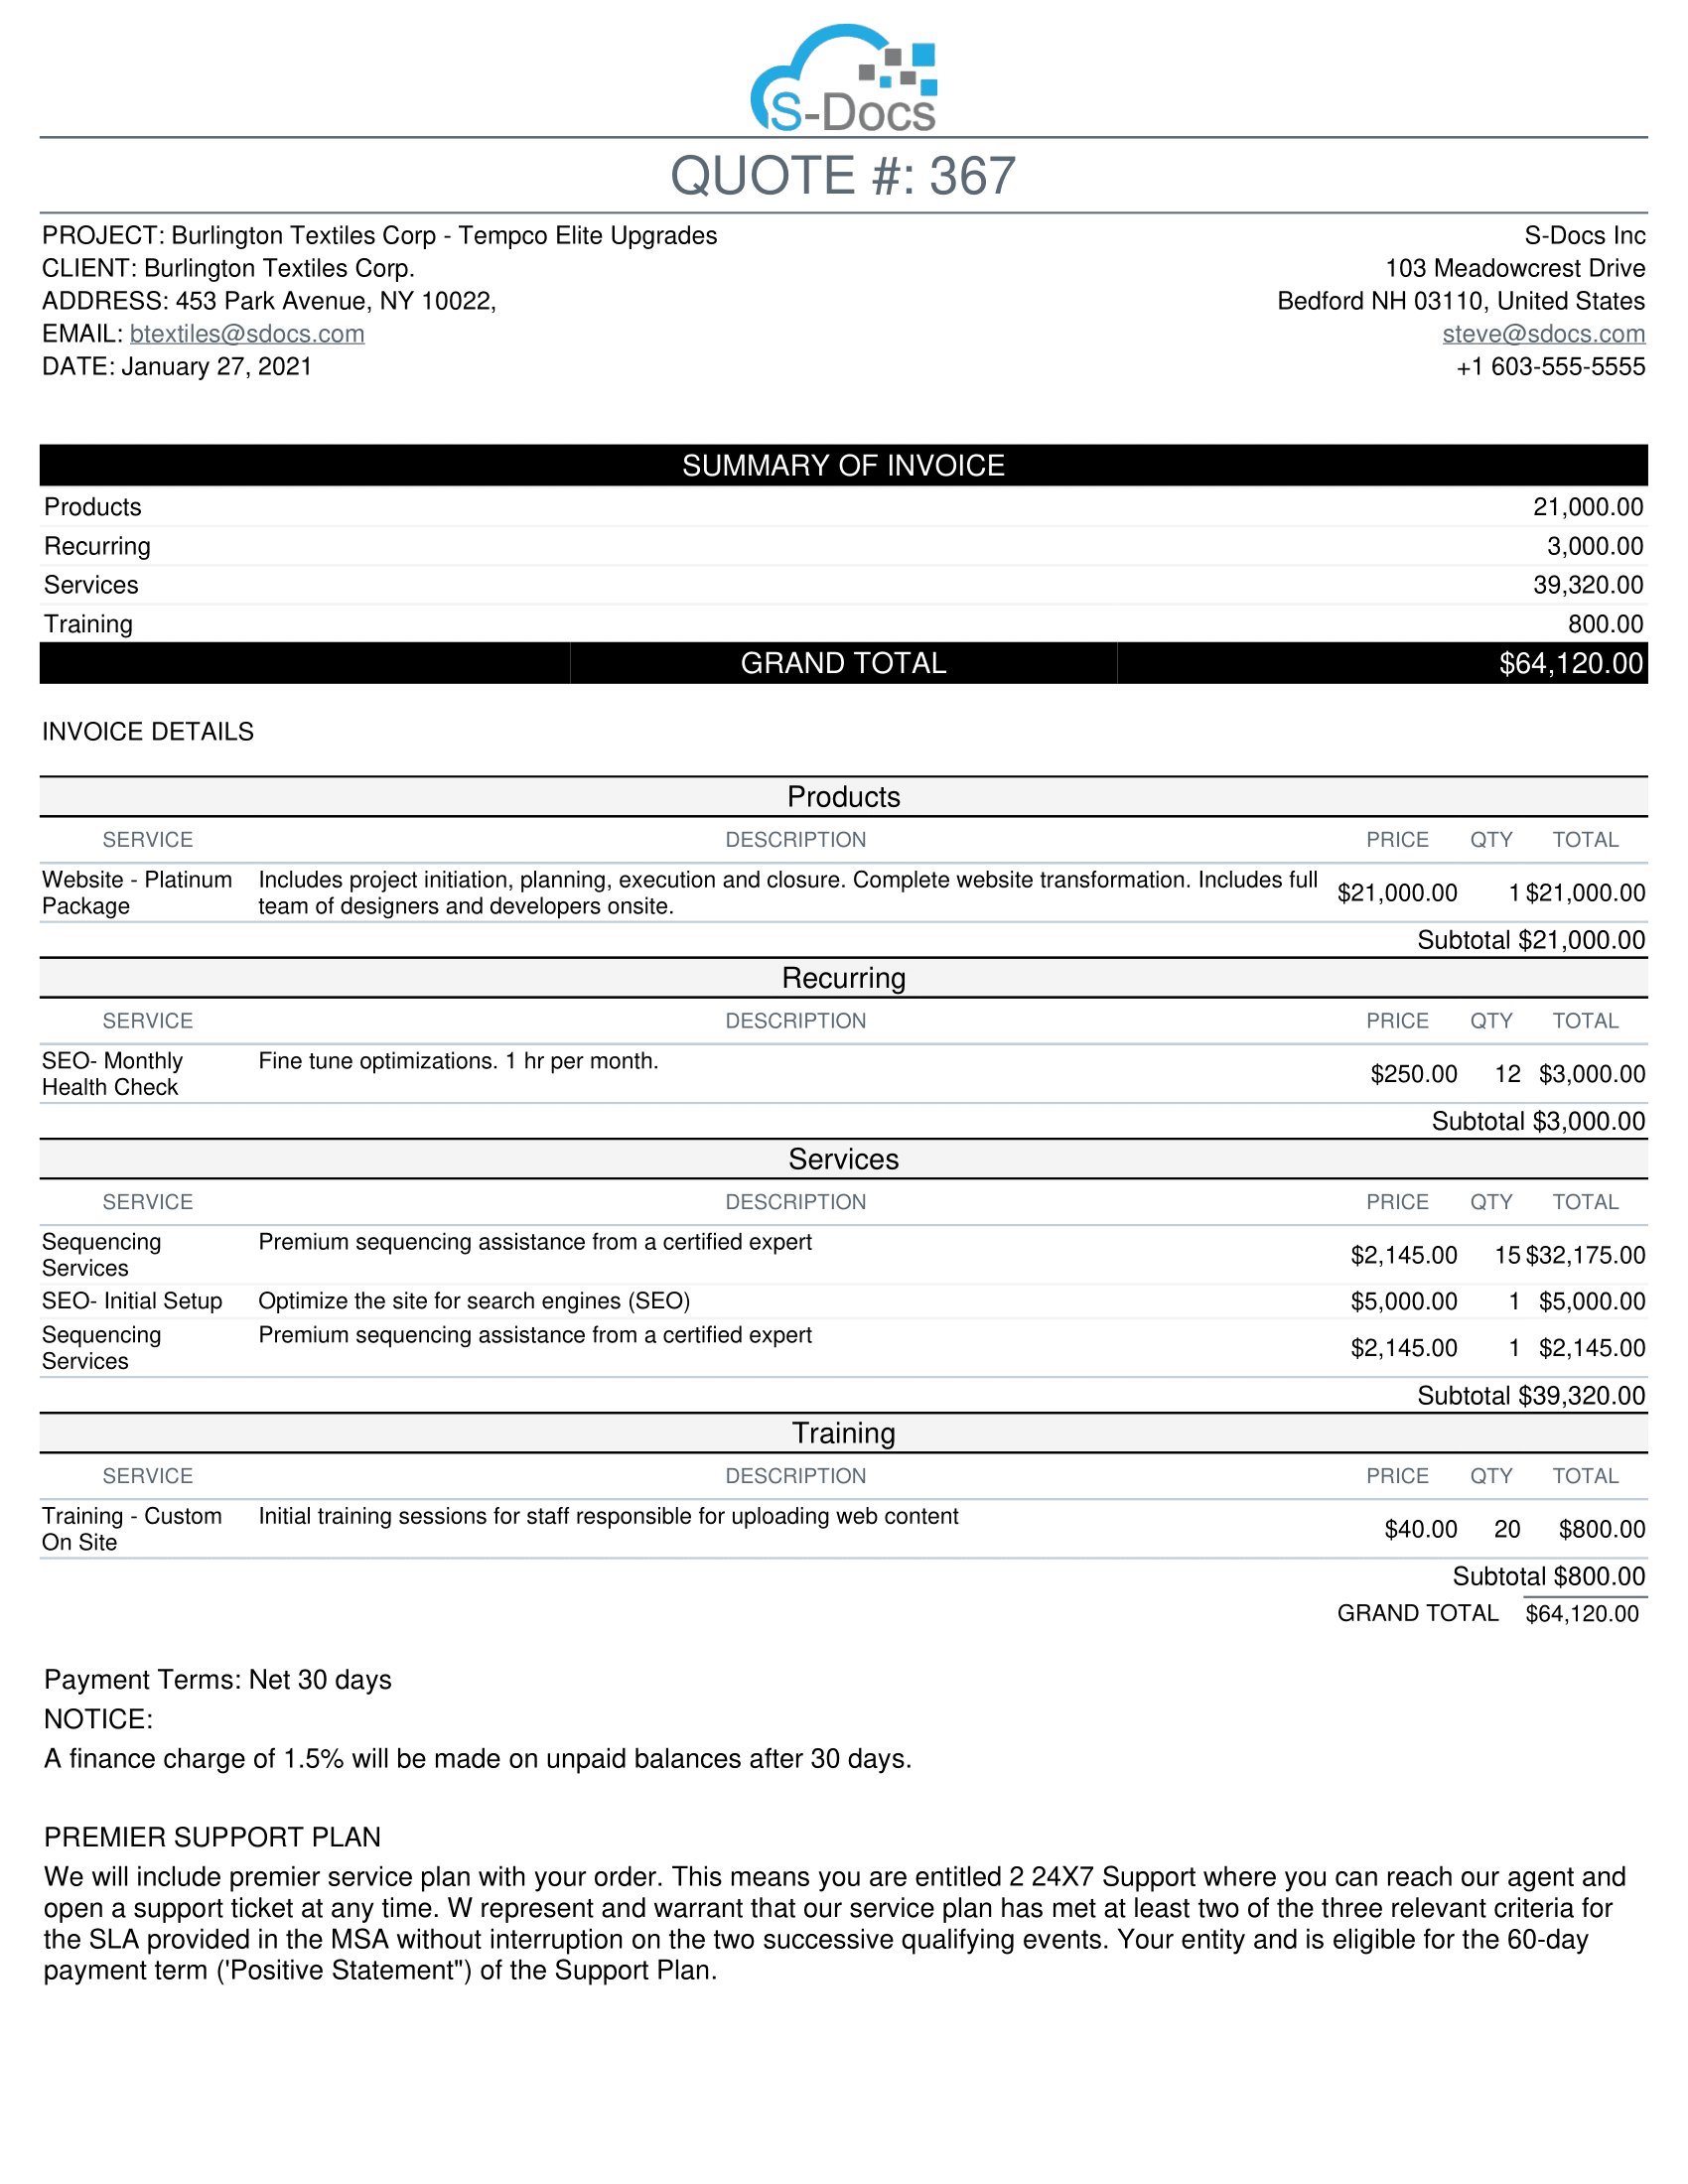
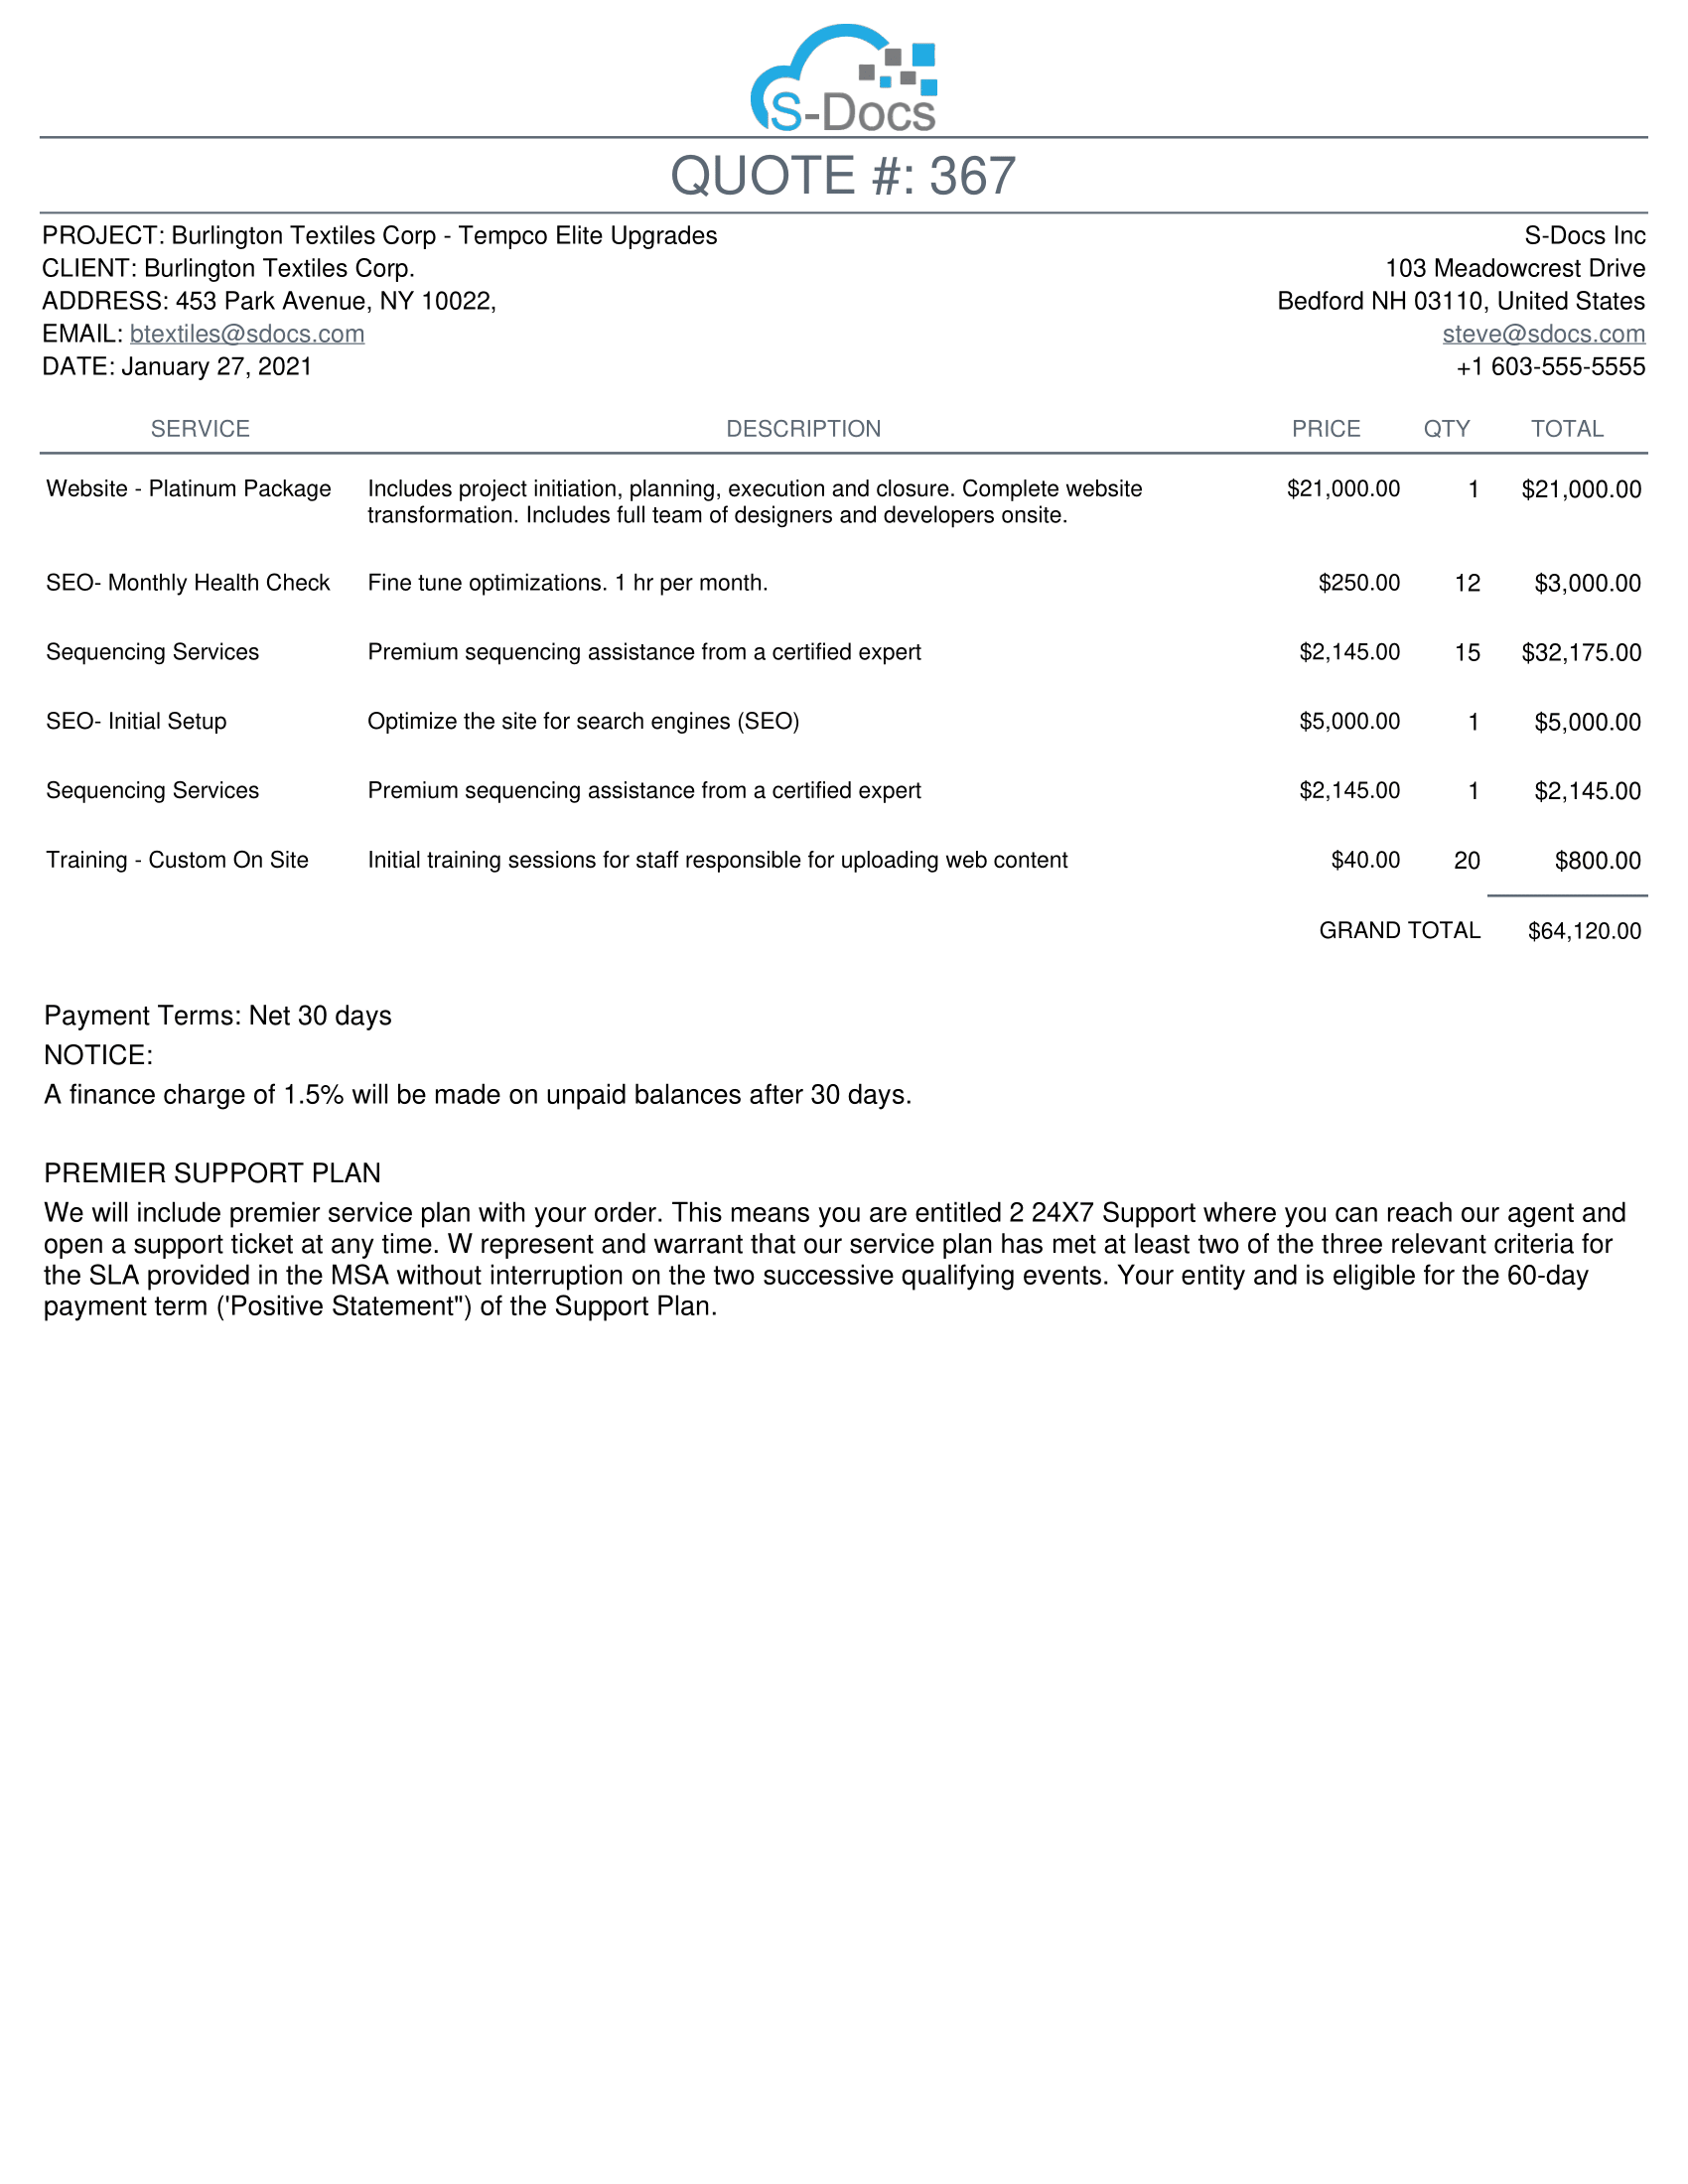
Introduction
This article will detail the 3 steps needed to create an S-Docs Connected App to use with S-Sign e-signatures.
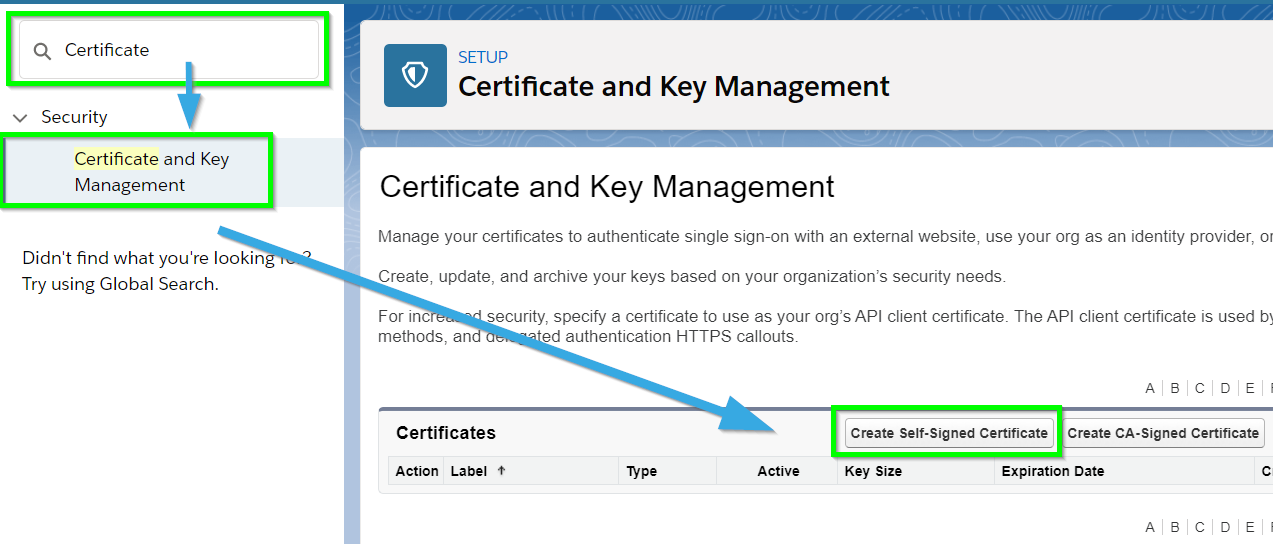
Step 1: Create a Self-Signed Certificate
From the setup menu, type "Certificate" into the Quick Find bar, then click Certificate and Key Management in the dropdown menu. Click Create Self-Signed Certificate.
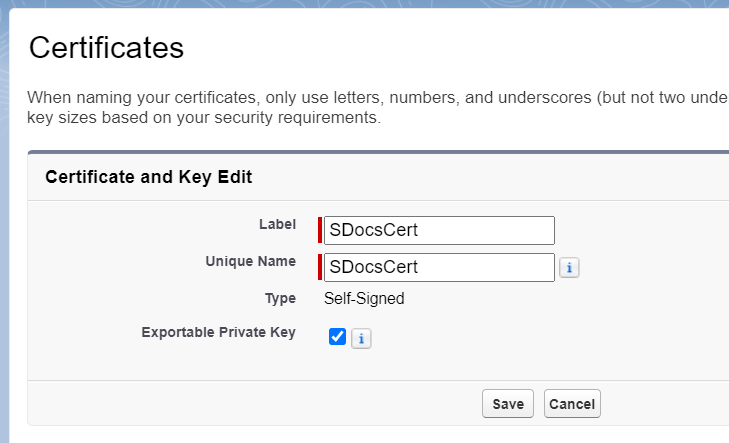
Name your certificate SDocsCert. Click Save.
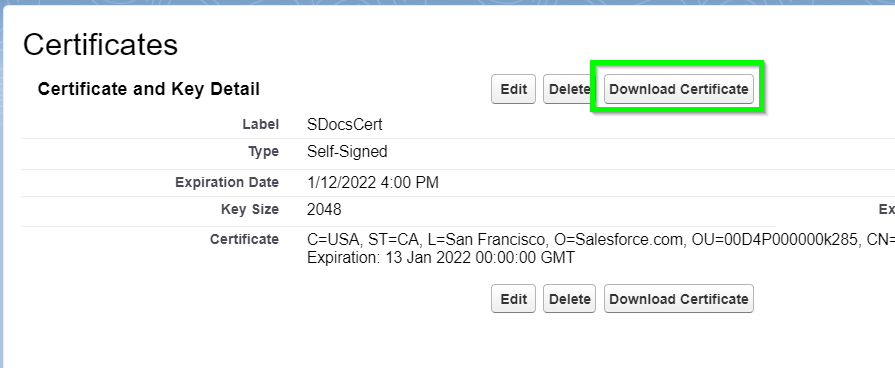
Click Download Certificate, and keep track of where the file is stored. We will use this in the next step.
Step 2: Create A New Connected App
Navigating to the Connected App creation page is a bit different in Classic and Lightning. In Lightning, type "App Manager" into the Quick Find bar in the setup menu, then click App Manager in the dropdown menu. Click New Connected App in the top right.

In Classic, type "Apps" into the Quick Find bar in the setup menu, then click Apps in the dropdown menu (under Build > Create). Scroll down to the Connected Apps section and click New.

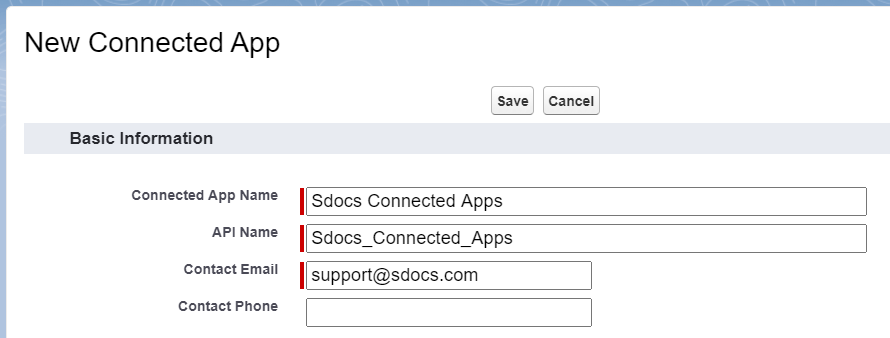
In the Basic Information section, fill in the following fields:
Connected App Name: Sdocs Connected Apps
API Name: Sdocs_Connected_Apps
Contact Email: support@sdocs.com
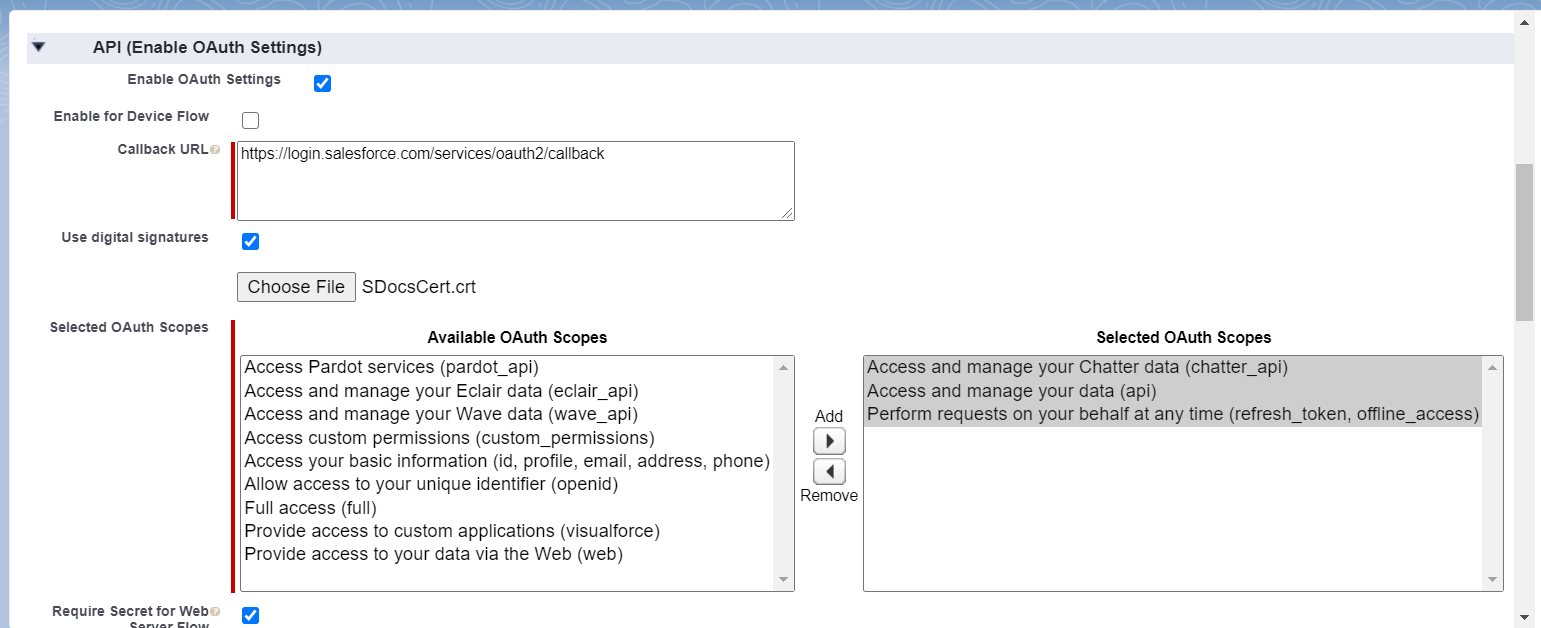
Scroll down to the API (Enable OAuth Settings) section and check Enable OAuth Settings. Then, enter one of the following URLs into the Callback URL field, depending on if you're working in a sandbox or production environment:
Production: https://login.salesforce.com/services/oauth2/callback
Sandbox: https://test.salesforce.com/services/oauth2/callback
Next, check the Use Digital Signatures checkbox and upload the self-signed certificate that you downloaded in step 2.
Then, scroll down to the Selected OAuth Scopes field. Add the following scopes to your selected scopes:
- Perform requests on your behalf at any time
- Access and manage your data
- Access and manage your Chatter data
This section should look similar to the following image when you are finished:
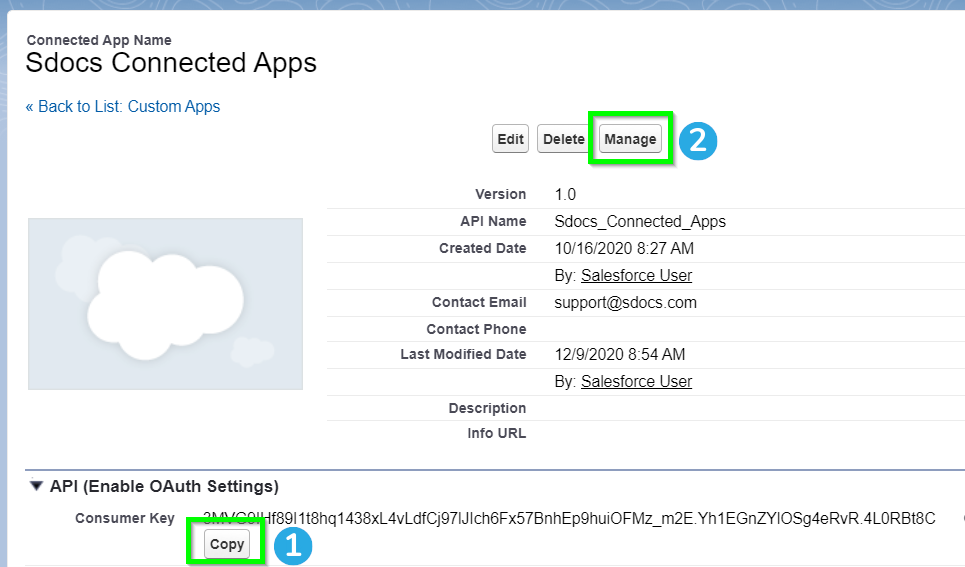
Leave the rest of the fields at their default settings, and click Save. You will be redirected to the Connected App detail page. Scroll down to the API (Enable OAuth Settings) section and click Copy next to the Consumer Key field. Paste this somewhere you can access later. You will use this key in Step 3. Then, click Manage at the top of the page.
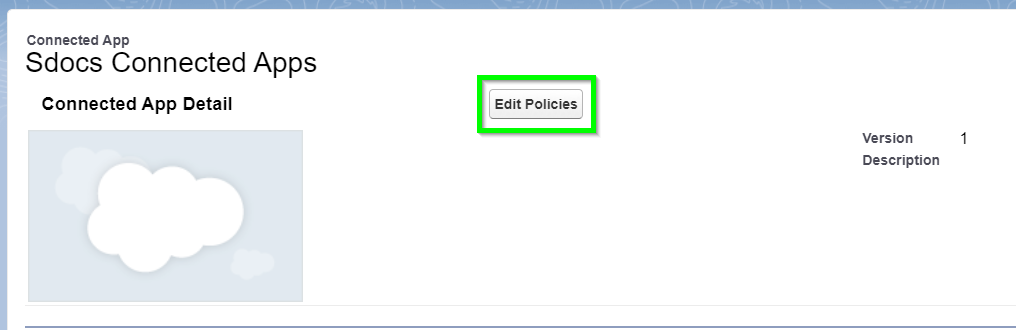
On the next page, click Edit Policies.
Scroll down to the OAuth Policies section. Set the Permitted Users field to Admin approved users are pre-authorized. Set the IP Relaxation field in accordance with your organization's policies. Keep the Refresh Token Policy set to Refresh token is valid until revoked. Then, click Save.

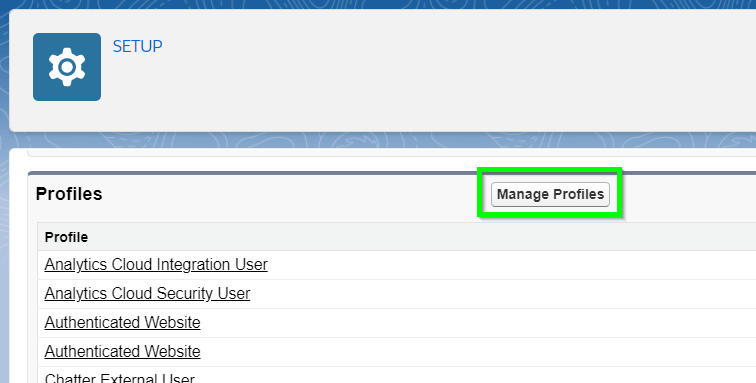
Next, scroll down to the Profiles section and click Manage Profiles.
Add the profile for the user that will be used as the S-Sign Internal User (we recommend using an administrator as the S-Sign Internal User). The S-Sign Internal User is a Salesforce user which all S-Sign operations will be conducted by through the secure S-Docs Connected App. Click Save.
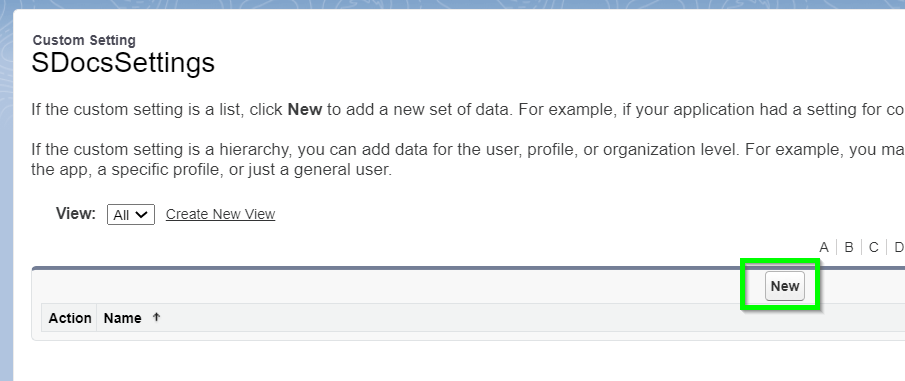
Step 3: Create A New Custom Setting Entry
From the setup menu, type "Custom Settings" into the Quick Find bar, then click Custom Settings in the dropdown menu. Find SDocsSettings and click Manage.

If you've created an S-DocsSettings entry in the past, you can click the Edit link next to its name to edit it now. Otherwise, click New to create a new SDocsSettings entry.
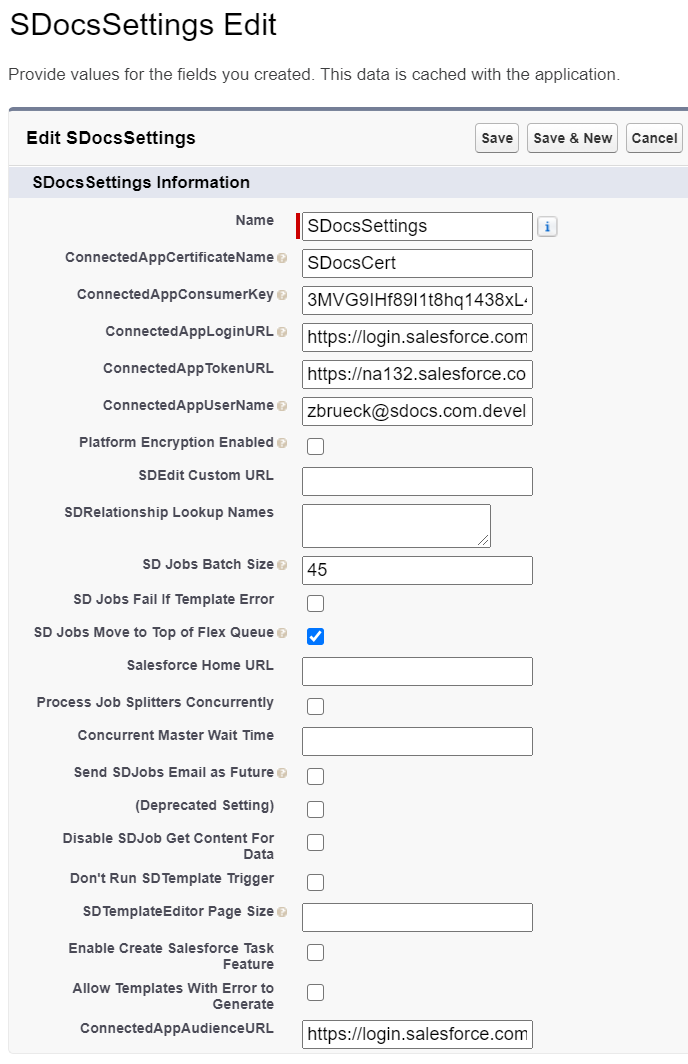
Fill in the following values:
Name: SDocsSettings
ConnectedAppCertificateName: SDocsCert
ConnectedAppConsumerKey: Paste the consumer key that you copied in step 3
ConnectedAppLoginURL:
[Production]: https://login.salesforce.com
[Sandbox]: https://test.salesforce.com
Note: If you are using Salesforce Government Cloud, use your MyDomain URL instead of the URLS listed above.
ConnectedAppTokenURL: Enter your Salesforce domain URL.
ConnectedAppUserName: Enter the username that you want to use as the S-Sign Internal User (we recommend using an administrator's user name). The S-Sign Internal User is a Salesforce user which all S-Sign operations will be conducted by through the secure S-Docs Connected App.
Note: If you are using Salesforce Government Cloud, you also need to fill in the ConnectedAppAudienceURL field with one of the URLs listed below. This field sometimes populates with your MyDomain URL, which should not be used for this field. If your MyDomain URL populates this field, replace it with one of the 2 URLs listed below.
ConnectedAppAudienceURL:
[Production]: https://login.salesforce.com
[Sandbox]: https://test.salesforce.com
Your SDocsSettings entry should look similar to the following:
Click Save.
You've now successfully configured your S-Docs Connected App. You can return to the S-Sign Configuration Steps and continue with Step 4.
Return to S-Sign Installation and Configuration - Salesforce Lightning
Return to S-Sign Installation and Configuration - Salesforce Classic.
Troubleshooting
My Self-Signed Certificate is Expiring Soon!
Several months after setting this up, you may get an email from Salesforce informing you that your self-signed certificate expired. If that is the case, you can follow the steps below to renew your certificate. We recommend doing this after hours.
1. From the setup menu, type "Certificate" into the Quick Find bar and click Certificate and Key Management in the dropdown menu.
2. Click Delete for SDocsCert.
3. Click Create Self-Signed Certificate.
4. Set Label to SDocsCert.
5. Set Unique Name to SDocsCert.
6. Click Save.
7. Click Download Certificate.
The next steps are different in Salesforce Classic and Salesforce Lightning.
For Classic:
1. From the setup menu, type "Apps" into the Quick Find bar, then click Apps (under Build > Create).
2. Scroll down to the Connected Apps section, find "Sdocs Connected Apps," and click the Edit link next to it.
3. Scroll down to Use digital signatures.
4. Click Choose File and select the previously downloaded certificate.
5. Click Save.
6 It may take several minutes for the new certificate to take affect.
7. Confirm that everything is working (test SDJobs with Mass Merge).
For Lightning:
1. From the setup menu, type "App Manager" into the Quick Find bar, then click App Manager in the dropdown menu.
2. Find the "Sdocs Connected Apps" connected app. Click the dropdown arrow on the right, and click View.
9. Click Edit at the top of the page.
11. Scroll down to Use digital signatures.
12. Click Choose File and select the previously downloaded certificate.
13. Click Save.
14. It may take several minutes for the new certificate to take affect.
15. Confirm that everything is working (test SDJobs with Mass Merge).
General Troubleshooting
If you performed this setup but are receiving errors, please try the following:
- Navigate to Setup > Connected Apps > SDocs Connected Apps > Profiles, and verify that the profiles of the following users are added to the app's permitted profiles list:
- The S-Sign Internal User
- Go to Setup > Remote Site Settings and verify that there are entries for the appropriate Salesforce production/sandbox URL and the customer’s home URL (Salesforce Classic). Additionally, verify that these entries are active.
- Make sure the user's profile has the Apex REST Services permission checked.