Introduction
Welcome to S-Sign, a 100% native e-signature solution for Salesforce. This guide details the steps you need to take to install and configure S-Sign in your org so that you can get started with secure e-signatures. S-Sign leverages Salesforce Sites and the secure Connected App feature, which you'll learn how to set up in this guide.
To view this same guide for Salesforce Classic, click here.
Note: This article makes several references to your S-Sign Internal User. Your S-Sign Internal User is any licensed Salesforce user of your choosing. S-Sign operations that require internal data access will be conducted through this user's profile using the secure S-Docs Connected App. We recommend choosing a Salesforce Administrator.
Tutorial Video
Watch the following tutorial video or follow the instructions below to install and configure S-Sign in your org.
Install S-Sign
Unlike S-Docs, S-Sign is not available on the AppExchange. Contact S-Docs Sales to obtain an installation link for the latest version of S-Sign. Make sure to select "Install for All Users." We recommend testing in a sandbox environment before installing in your production org.
You may need to update S-Docs if you're running an older version.
Pro Tip
Try to keep as few tabs open as possible during this configuration process. This will help prevent settings confirmed in one tab from being negated by another open tab.
Head over to Installed Packages by typing "installed" into the Quick Find / Search bar in Setup to ensure that S-Sign has downloaded correctly and that your version numbers are up to date.

We recommend assigning the S-Sign User or Administrator permission sets to yourself and users who will be interacting with S-Sign. Learn more about S-Sign permission sets here.
Note: If you are using S-Sign version 2.1 or above, your org needs to have the
Quote object enabled for S-Sign to work properly. To view instructions on how to enable Quotes for your org,
click here.
Configuring S-Sign
Config Step 1: Create Remote Site Settings
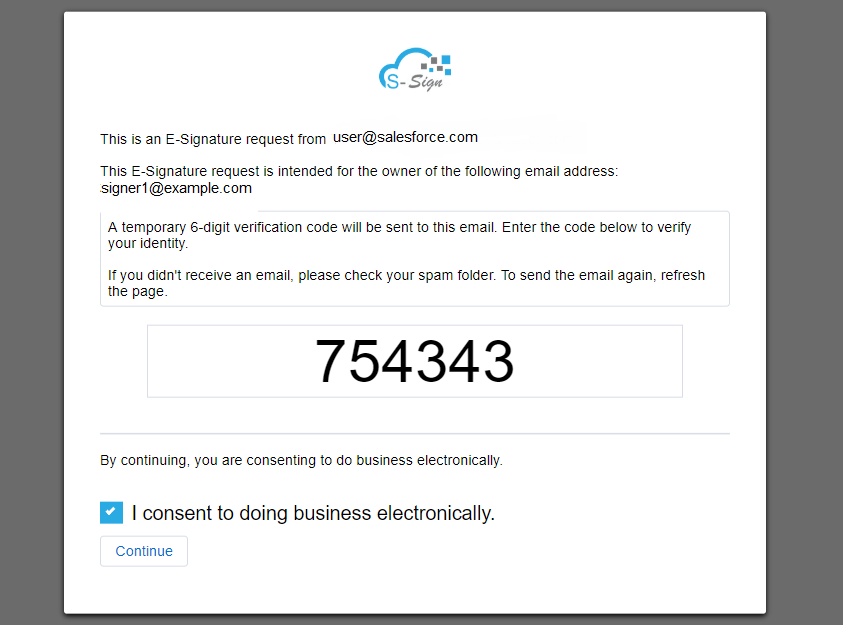
S-Sign uses SendGrid, an email service, to send out verification emails to signers in order to confirm the signer's identity. This bypasses any email limitations you may run into in your Salesforce org, ensuring that your e-signature requests will always send. To allow S-Sign to tell SendGrid when to send out a verification email, you must create a Remote Site Setting within Salesforce that whitelists SendGrid's API domain (i.e. allows S-Sign to communicate with SendGrid).
To do this, simply click the Setup cog in the upper right hand corner, type "Remote" in the Quick Find / Search bar, and click Remote Site Settings from the options that drop down. Then, click New Remote Site.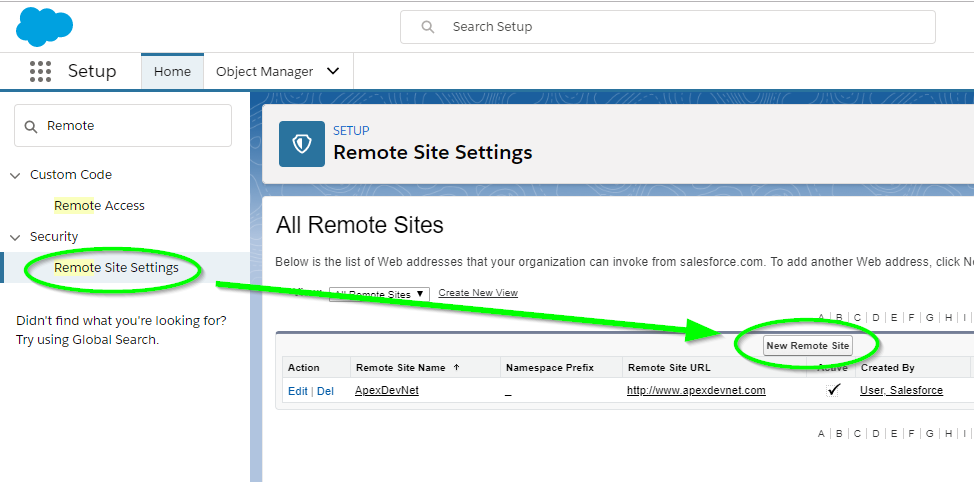
Fill in the following fields for your new remote site:
Remote Site Name: SSign_Email_Verification_Site
URL: https://api.sendgrid.com
Ensure that the Active checkbox is checked. You can leave everything else as it is.
Next, create a new remote site for the Salesforce login URL if you don't have one already set up.
For Production Org:
Remote Site Name: Salesforce_Production
Remote Site URL: https://login.salesforce.com
For Sandbox Org:
Remote Site Name: Salesforce_Sandbox
Remote Site URL: https://test.salesforce.com
Finally, create a third remote site for your Salesforce domain.
Remote Site Name: Enter anything you'd like
Remote Site URL: Enter your Salesforce domain.
Note: You can copy your domain by clicking your user profile in the upper right corner, and copying it from under your username. Note that you need to add "https://" at the beginning.
If you are using S-Sign with communities, you should create a remote site for your custom domain as well.
Config Step 2: Create a Site to Capture External Users' Signatures
Like S-Docs, S-Sign is native to the Salesforce platform. This means that all signers must sign within Salesforce, even if they do not have a Salesforce account. To accomplish this, we'll set up a Site in our org that will display your document(s) and allow users to sign them.
Start by again clicking the Setup cog, then type Sites into the Quick Find search bar and [1] click Sites from the options that drop down. [2] Register a Force.com Domain from this page if you don't have one already. Then, [3] click the New button on the "Sites" list to create a new Site.

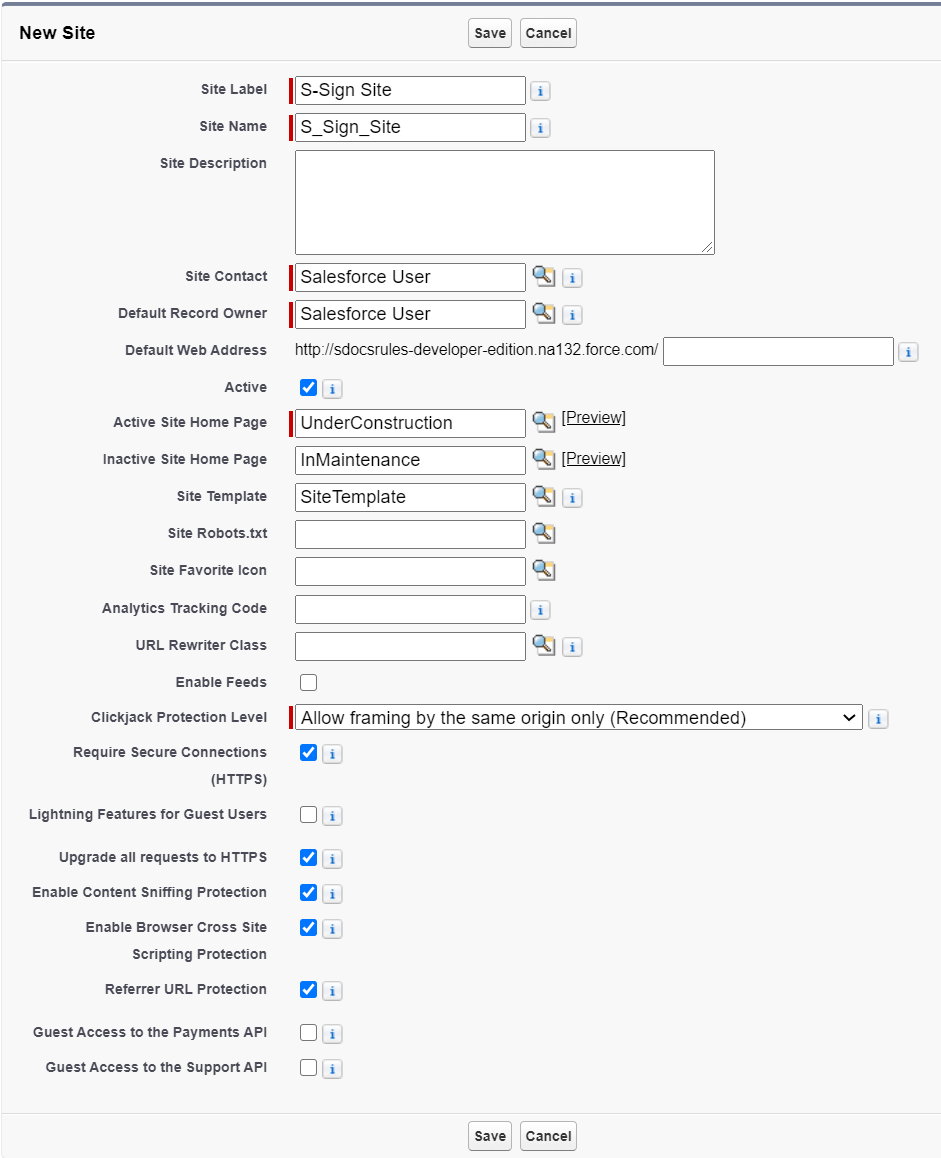
Fill in the following fields for your Site:
- Site Label: S-Sign Site
- Site Name: S_Sign_Site
- Site Contact: This is the user responsible for receiving site-related communications from the site visitors and Salesforce.com. By default, it is set to the user creating the Site.
- Default Web Address: You can append something to the end of your domain, but it is not necessary.
- Active: Make sure this is checked so that the site is active.
- Active Site Homepage: You can choose anything you want for this, but we recommend setting it to "Under Construction." This won't be visible to anyone.
Finally, ensure that you uncheck the Lightning Features for Guest Users checkbox. This is to conform to S-Sign's security standards.
You can choose whatever you'd like for the rest of the fields or leave them at the default settings.
Click Save.
Once you click Save, you should be redirected to the Site Detail Page. The only thing left to do for this step is to add a few Visualforce pages to our site. Scroll down to the "Site Visualforce Pages" list on the Site Detail Page and click Edit.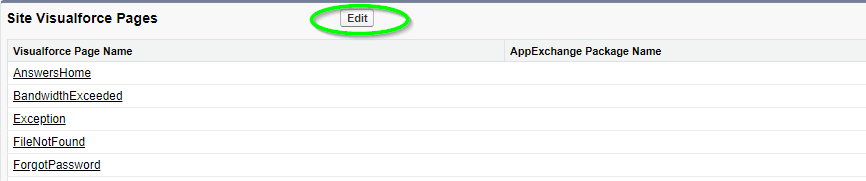
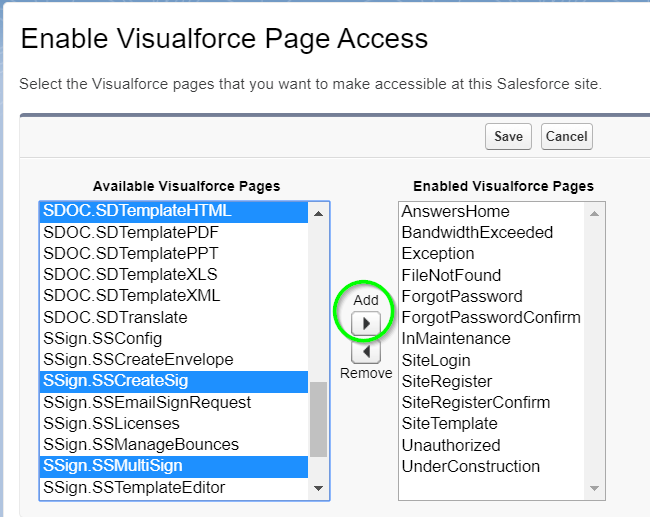
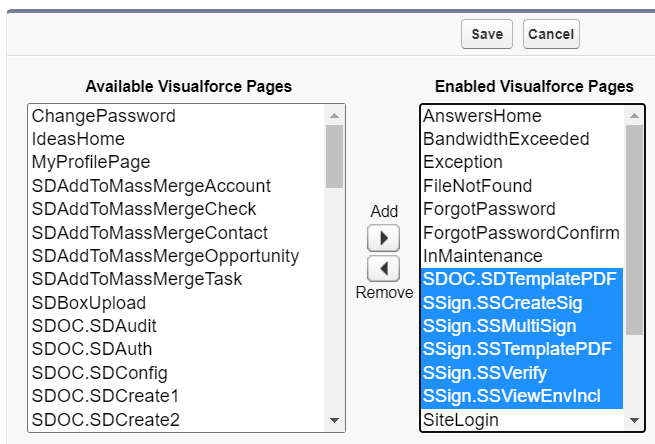
Add the pages SDOC.SDTemplateHTML, SSign.SSMultiSign, SSign.SSCreateSig, SSign.SSTemplatePDF, SSign.SSVerify, and SSign.SSViewEnvIncl. Then, click Save. You've now completed this step!
Create Sharing Rules
Note: If you are using S-Sign version 2.178+,
please skip this step and move on to
Step 3.
If you are using S-Sign version 2.110-2.177, you need to create a Sharing Rule on the S-Sign Envelope and SDoc Template objects. First, navigate to Setup > Sharing Settings, and choose your object. You will need to repeat this step for both objects.

Click New to create a new sharing rule.
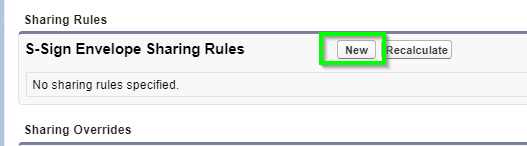
Enter the following settings:
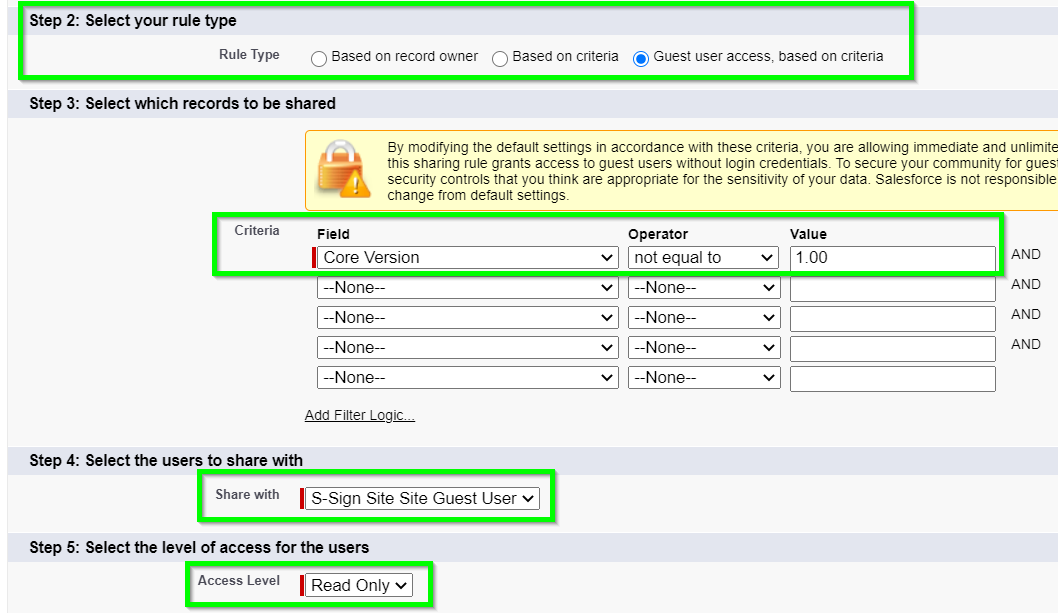
Rule Type: Guest user access, based on criteria
Field: Core Version
Operator: not equal to
Value: 1.00
Share With: S-Sign Site Guest User
Access Level: Read Only
Config Step 3: Create a Lookup Field to your Object on the S-Sign Envelope Object
You need to create a lookup field for any objects you’ll be using with S-Sign (Note: you can skip this step if your object is Opportunity or Contact, as a lookup field for these objects comes built into the package - if you are using version 2.1 and above, Contract, Quote, and Account will also have a lookup field pre-configured).
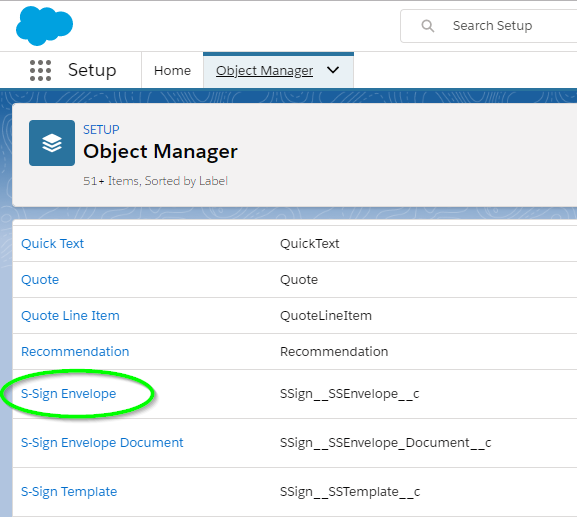
Navigate to the Object Manager in the Setup menu and click the S-Sign Envelope object (not S-Sign Envelope Documents).
Click the Fields & Relationships tab and click New.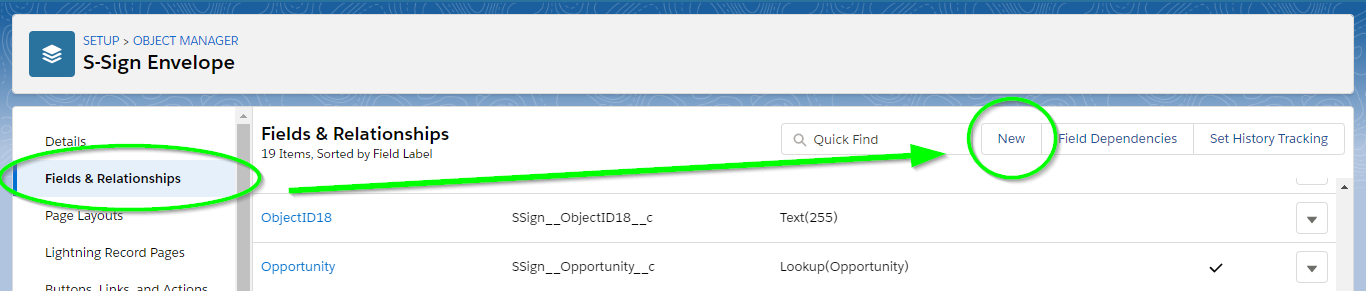
Step 1 of 6: Choose Lookup Relationship for the field type. Click Next.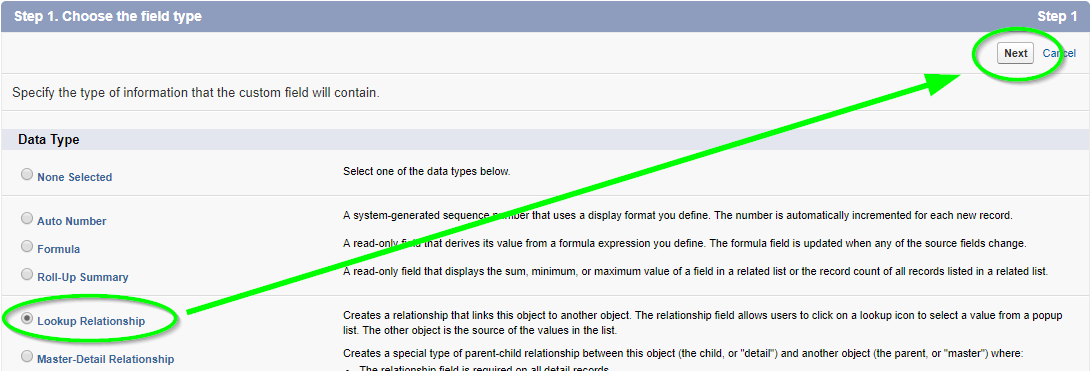
Step 2 of 6: Select the object for which you are creating the lookup relationship (the object you want to use S-Sign with). Click Next.
Step 3 of 6: This step is where you’ll add the field label and name. Default values can be kept for the rest of the fields.
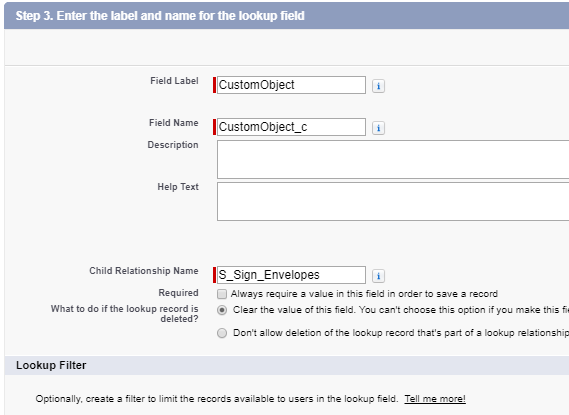
- For custom objects, the field label will just be the name of your custom object. The field name should be the API name of your custom object with only a single underscore and a 'c' at the end, instead of the usual "__c." For example: if your custom object was named CustomObject and the API name was CustomObject__c, then your field label would just be CustomObject, and your field name would be CustomObject_c.
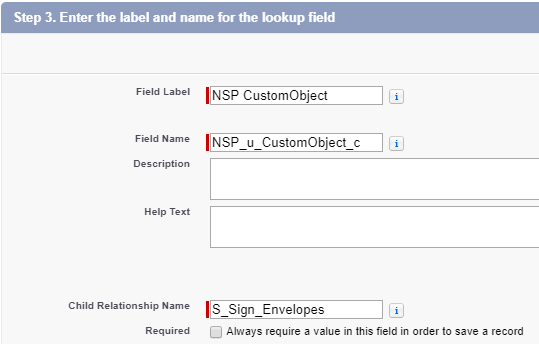
- If your custom object is part of a managed package, it will have a namespace at the beginning. Say the object's API name is NSP__CustomObject__c. For the field name, you would replace the two underscores after the namespace with _u_ and remove one of the underscores from __c, so the resulting API name would be NSP_u_CustomObject_c.
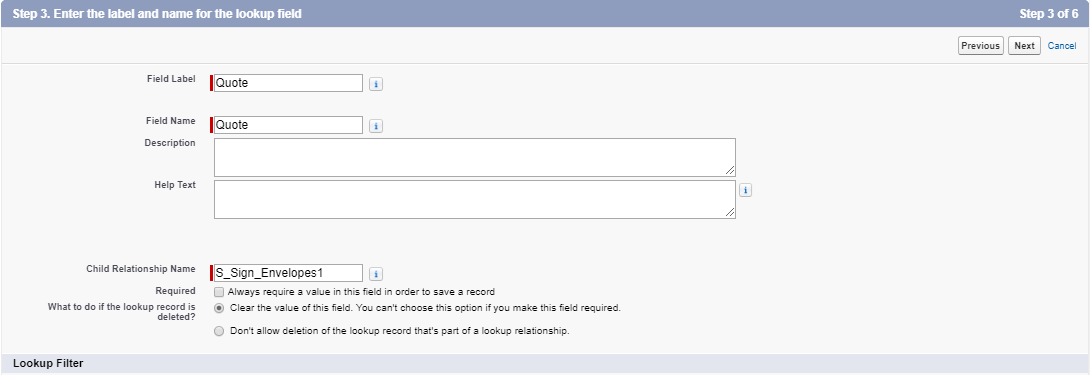
- For standard objects, just enter the name of your standard object (ex. the Quote object would have the field name and field label 'Quote').
Step 4 of 6: Select your own field-level security settings. Click Next.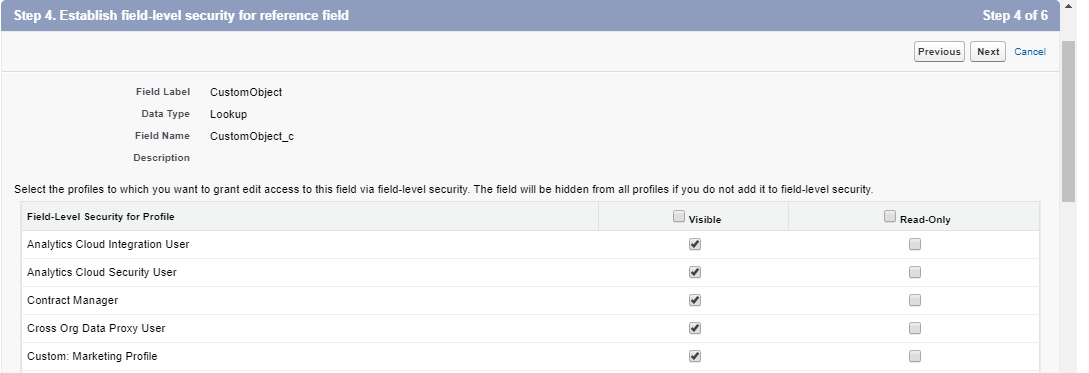
Step 5 of 6: Keep the default values.
Step 6 of 6: Add the S-Sign Envelopes related list to the appropriate page layouts. Click Save, and when you go to your object’s page, you’ll see the S-Sign Envelopes related list.
Config Step 4: Create an S-Docs Connected App
S-Sign leverages Salesforce's secure Connected App integration. This involves configuring a Salesforce Connected App and specifying an internal user in your org to conduct S-Sign operations through. To set this up, please follow the steps outlined in this article.
Assign The S-Sign Internal User Permission Set
After specifying an S-Sign Internal User during the Connected App configuration in Step 4, you need to assign the S-Sign Internal User Permission Set to said user.
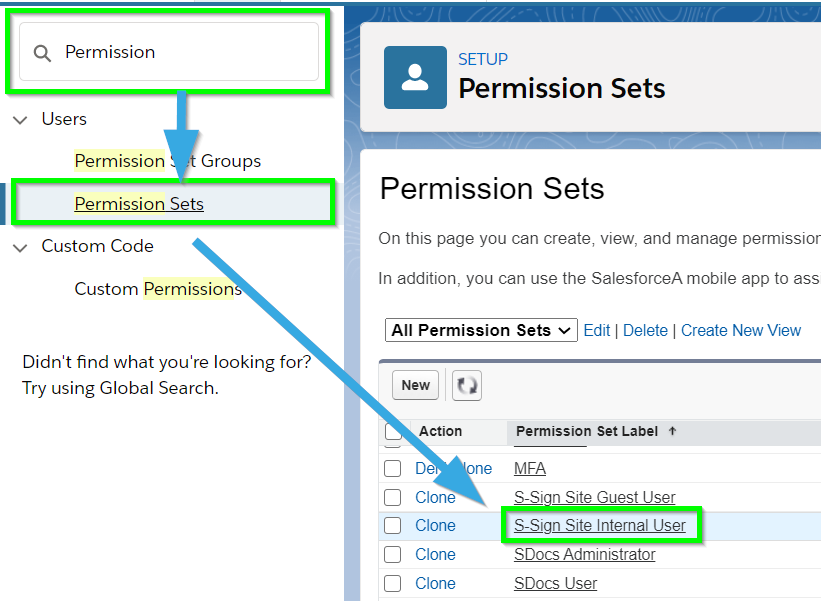
From the Setup menu, type "Permission" into the Quick Find bar, click Permission Sets in the dropdown menu, then click on the S-Sign Site Internal User permission set.
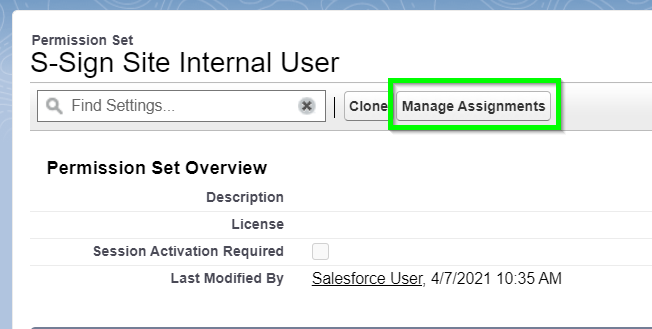
Next, click Manage Assignments.
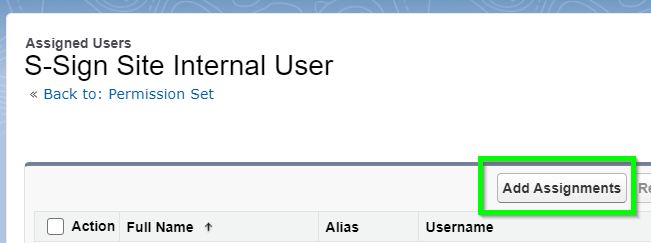
Then, click Add Assignments.
From there, choose the username that you specified as the S-Sign Internal User in Step 4.
Config Step 5: Provide Site Info
The next step is providing S-Sign with your Site's Site label and URL.
Start by navigating to the S-Sign Configuration page. If you are using S-Docs 4.381+, you can get to this page by clicking the App Launcher in the upper left corner, typing "S-Docs Setup" into the QuickFind bar, then clicking S-Docs Setup in the dropdown menu. From there, find and click on Go To S-Sign Setup Page.
If you are using a version of S-Docs below 4.381, the S-Sign Configuration page can be accessed through one of the following links:
[Production]: https://login.salesforce.com/apex/SSIGN__SSConfig
[Sandbox]: https://test.salesforce.com/apex/SSIGN__SSConfig
- The S-Sign Configuration page contains a field for your S-Sign Site URL. Ensure that the URL shown in this field matches the Site URL you created in step 2. To do so, navigate to the Site detail page for your S-Sign site (Setup > Sites > S-Sign Site), copy the site domain from the Custom URLs list, and paste it into the S-Sign Site URL field on the S-Sign Configuration page. Make sure to add https:// at the beginning of the domain.
- If your Site detail Custom URLs list includes two S-Sign Site URLs (shown below), use the URL that ends with secure.force.com.


Then, click the Set Site Info & Assign Permissions button. You can also click the Assign License button to assign an S-Docs license to the S-Sign Internal User if one has not already been assigned.

Config Step 6: Enter your License Key and Assign Licenses to Users
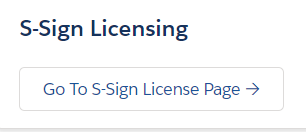
Once you've completed steps 1-5, you are ready to enter you license key and assign licenses to users in your org. Click Go To S-Sign License Page at the top of the S-Sign Configuration page.
From there, you can enter your license key.
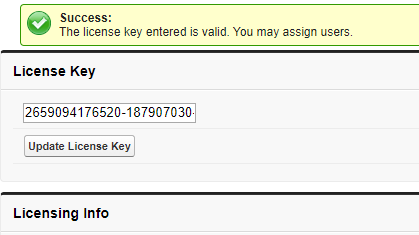
If you are on the trial version, all you need to do is enter the license key, and then all users in your org will be able to use S-Sign. If you are on the paid version, you can now scroll down to assign licenses to individual users by selecting their names and clicking Add Selected Users.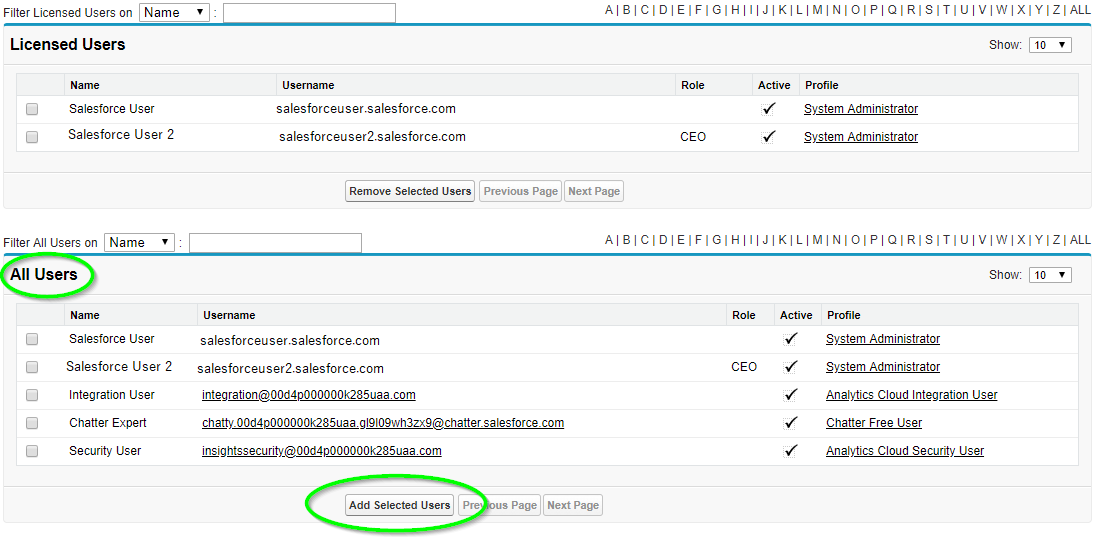
That's it! S-Sign is configured for your org. You are now ready to create S-Sign-enabled S-Docs templates to send for E-Signature.
Use Global Functions To Add Or Remove Licenses
Orgs that need to add or remove a large number of S-Sign licenses can use the addSSignUserLicenses and removeSSignUserLicenses functions. These functions are global and can be called from anywhere, allowing for flexibility if you need to make a bulk update to your S-Sign license assignments. These functions take a List<String> object. Although there are many ways to use them, the following example demonstrates how to add an S-Sign license to all active users:
[code lang="html"]List<String> userIds = new List<String>();
List<User> activeUsers = [SELECT Id FROM User WHERE isActive = true];
for (User activeUser : activeUsers) {
userIds.add(String.valueOf(activeUser.Id));
}
SSIGN.SSLicensesController.addSSignUserLicenses(userIds);[/code]